Queries and code quickstart
Learn about the fundamental concepts of queries and code.
This guide serves as an introduction to queries and code in Retool. It covers many of the concepts and terminology you can expect to use when querying and transforming data, scripting behavior, and executing code. After reading this page, you should have a good understanding of the fundamentals for writing queries and code.
Introduction
Web apps, mobile apps, and workflows all rely on functional code with which to operate. The code you write, language you use, and where you write it depend on the context and functionality being used.
- Queries
- Embedded expressions
- Transformers
- Temporary state
- Preloaded code
Queries are executable blocks of code that query data, control app behavior, and other functions. Queries must be triggered to run. This can be done with app event handlers or triggered as part of code elsewhere. Some queries can run automatically, such as when a referenced input changes (e.g., a text field) or as part of a workflow.
Retool performs string interpolation and evaluates {{ }} embedded expressions as JavaScript. As a result, you can write JavaScript code that evaluates and returns a value synchronously—almost anywhere.
Transformers are reusable blocks of JavaScript code that synchronously transform data. You write JavaScript code that manipulates or reshapes data, such as query results, to meet your needs.
Variables and localStorage are data stores for apps that need to temporarily store state.
Store a value temporarily in a variable.
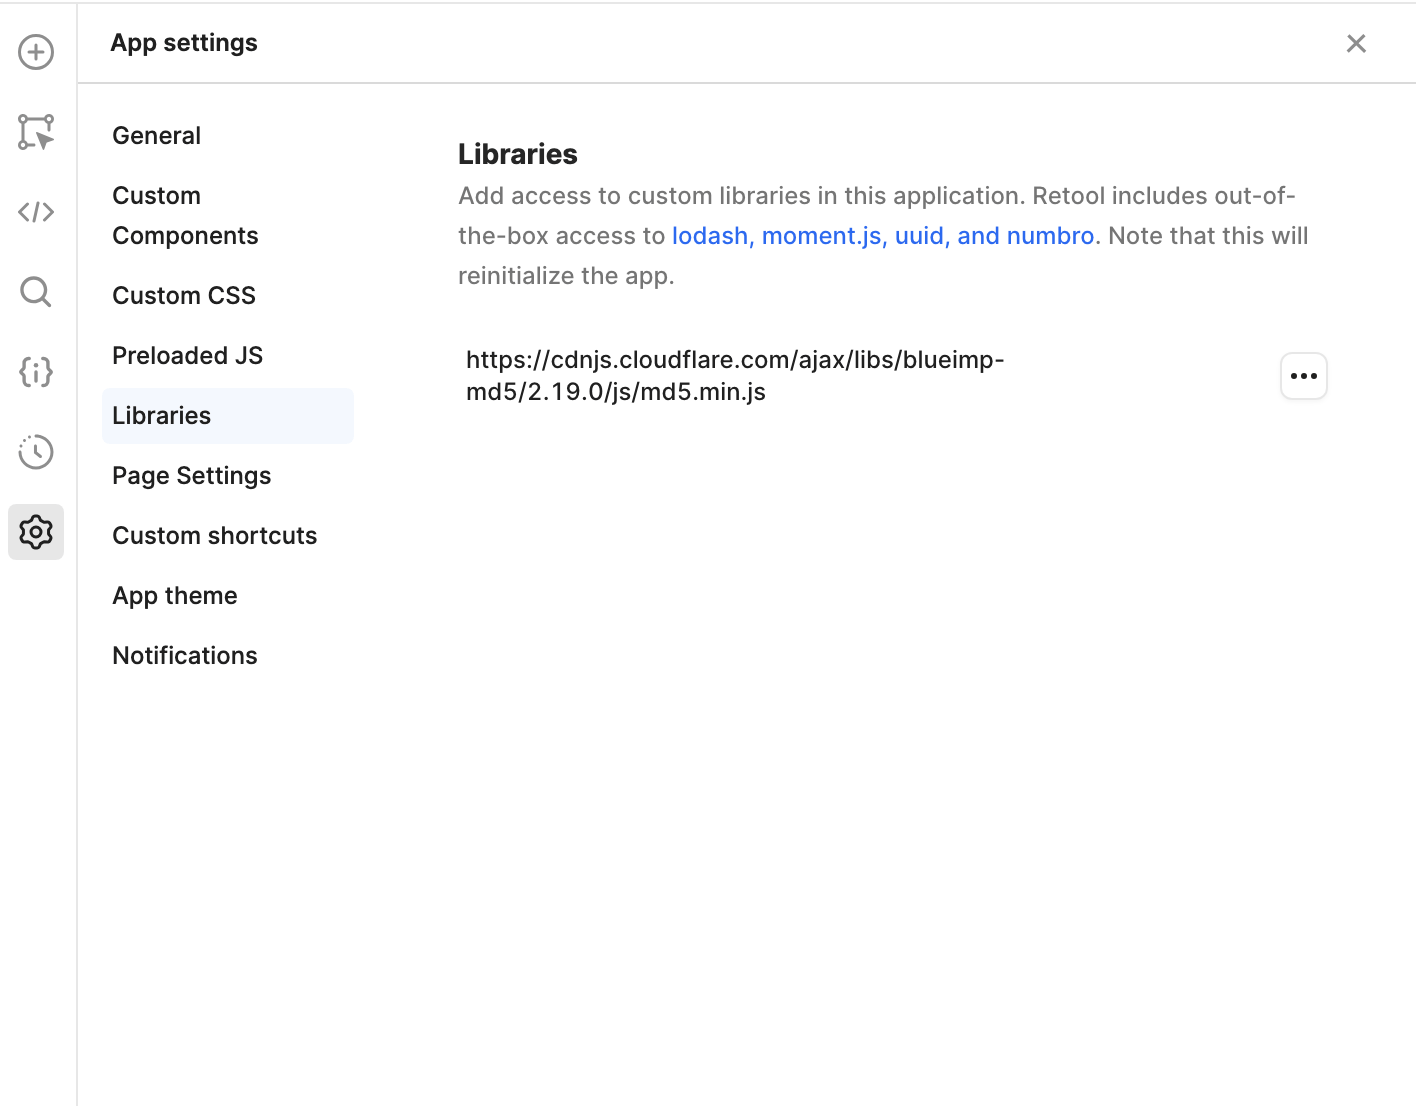
You can specify custom JavaScript code and libraries for use across Retool. You can also make use of built-in libraries and third-party libraries that Retool preloads.
Using custom Python in a workflow.
Queries
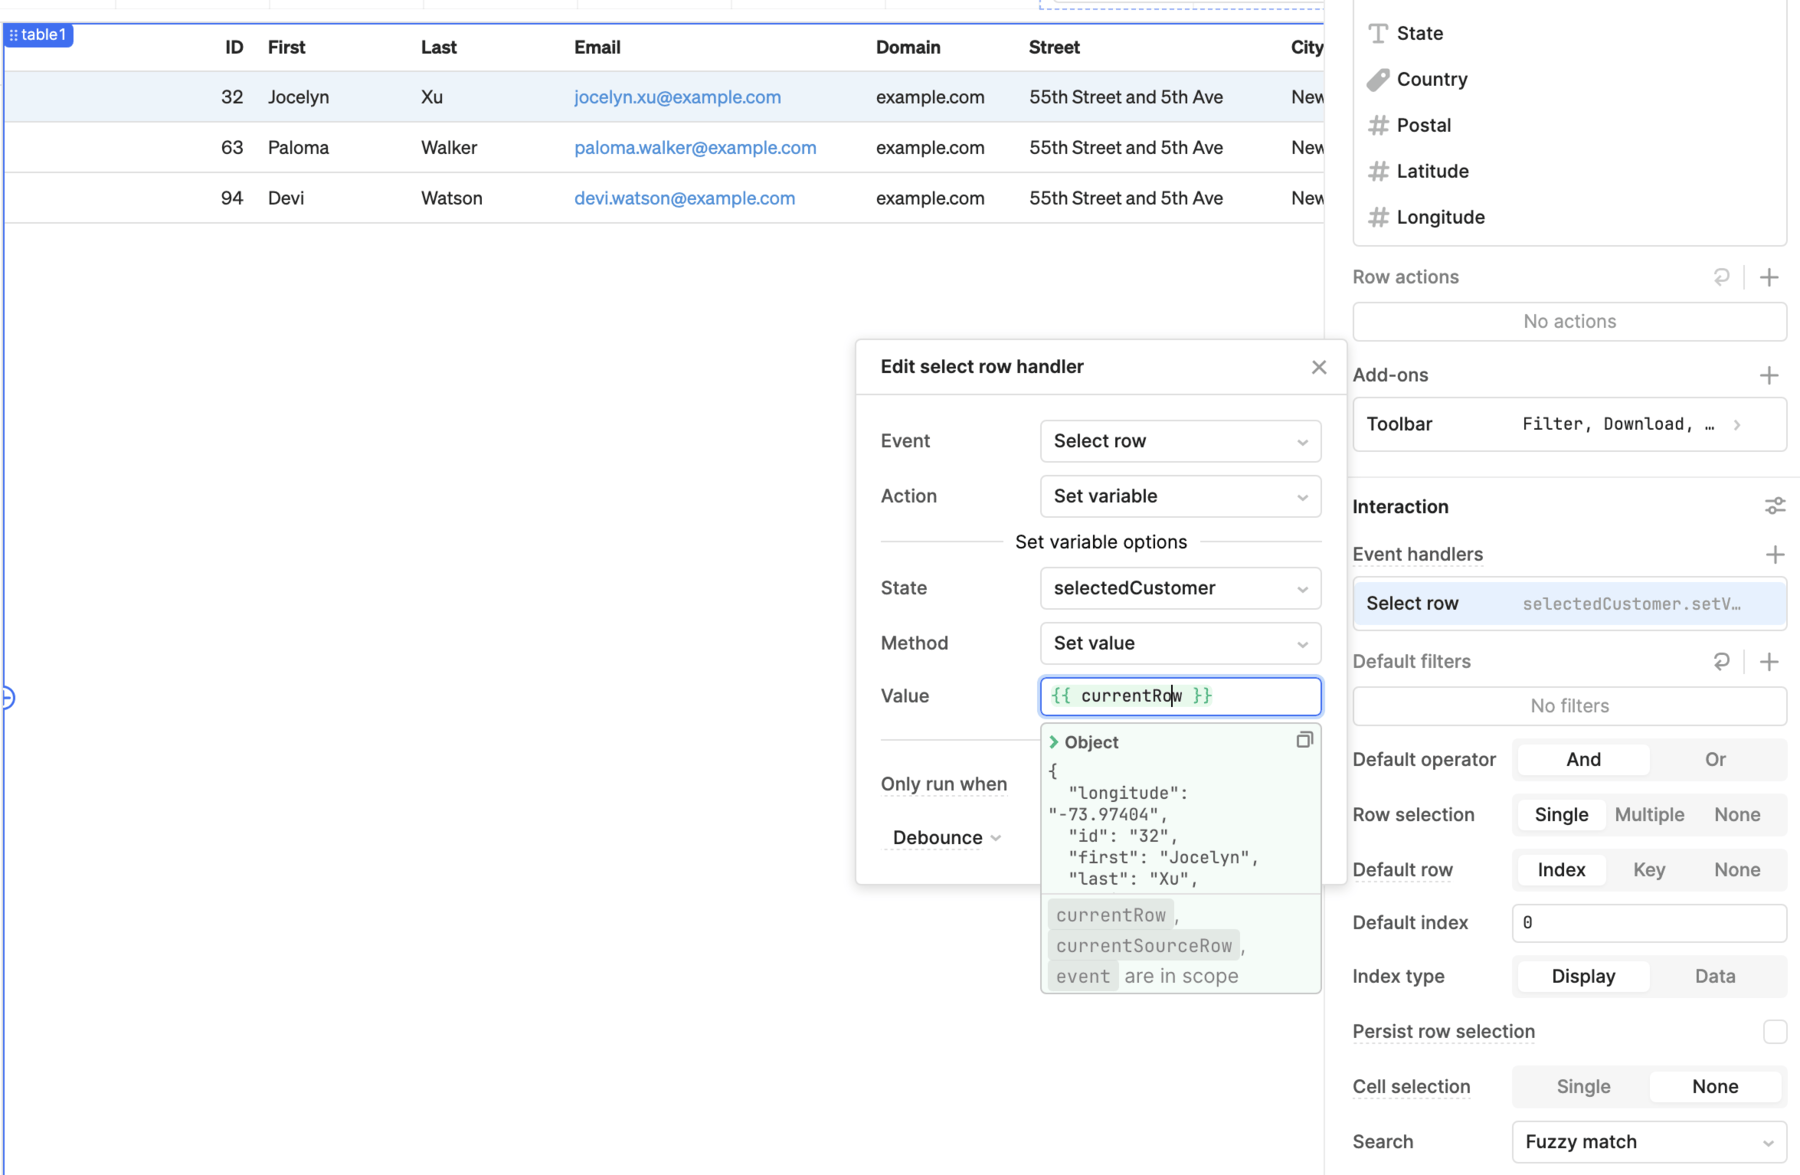
Queries are asynchronous blocks of code that execute on-demand. These are globally scoped and can be triggered from any part of an app or workflow. Query objects have state, expose properties, and can be controlled with methods.
The data property contains the results of the last run. You either select a query or reference it's data property to use its results.
Queries can also reference other values, such as components, and write them back to the data source. Queries can also perform asynchronous actions, run simultaneously, and trigger event handlers upon success or failure.
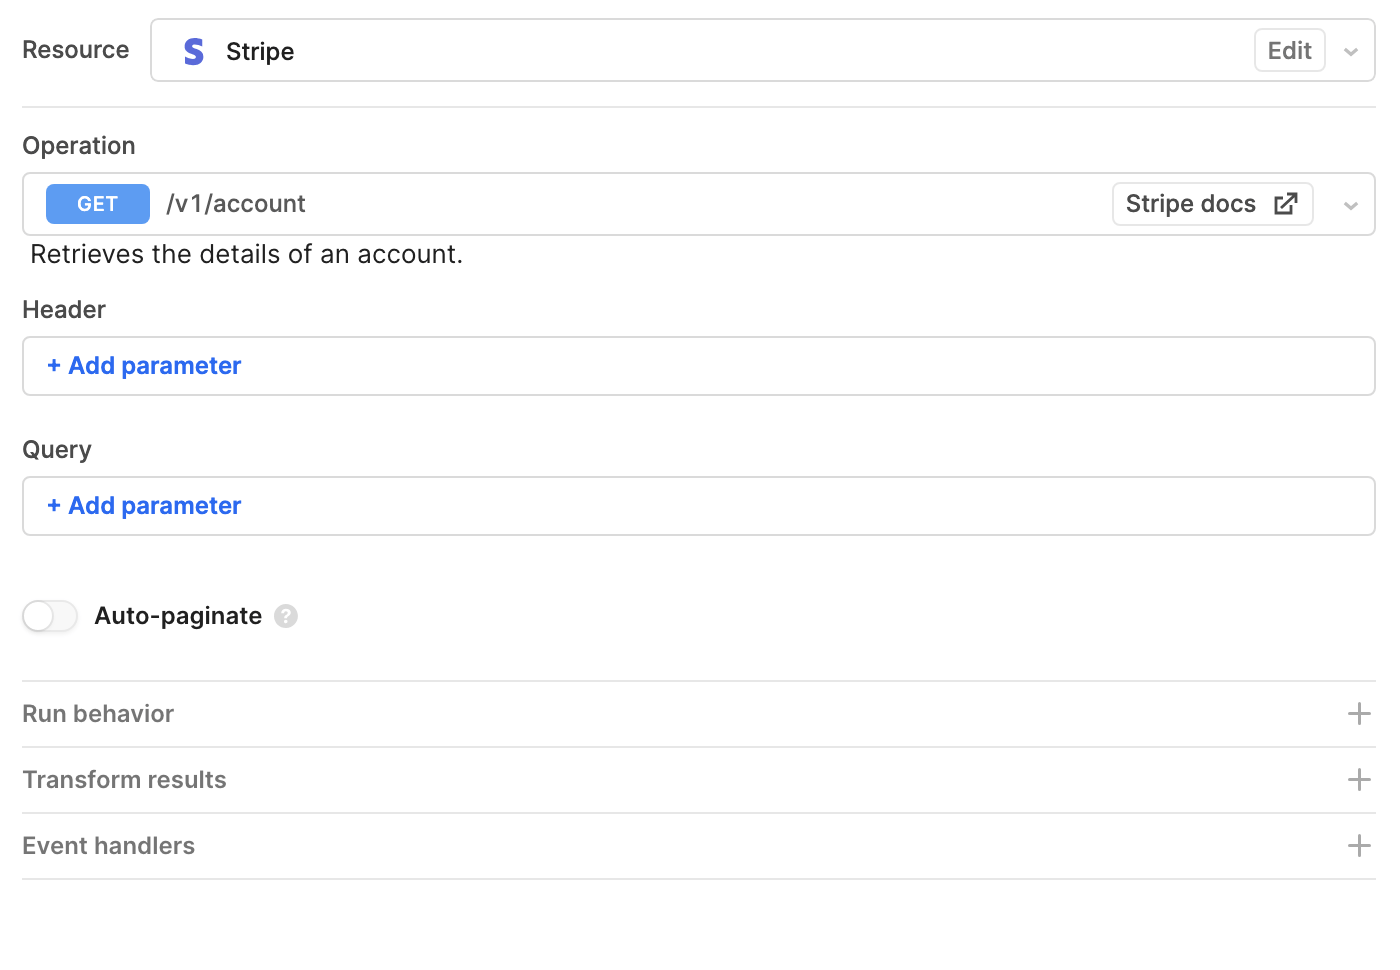
Resource queries
A resource query is a piece of code you write to interact with a resource (i.e., an API or database) and perform CRUD operations.
- Resource queries in apps
- Resource queries in workflows
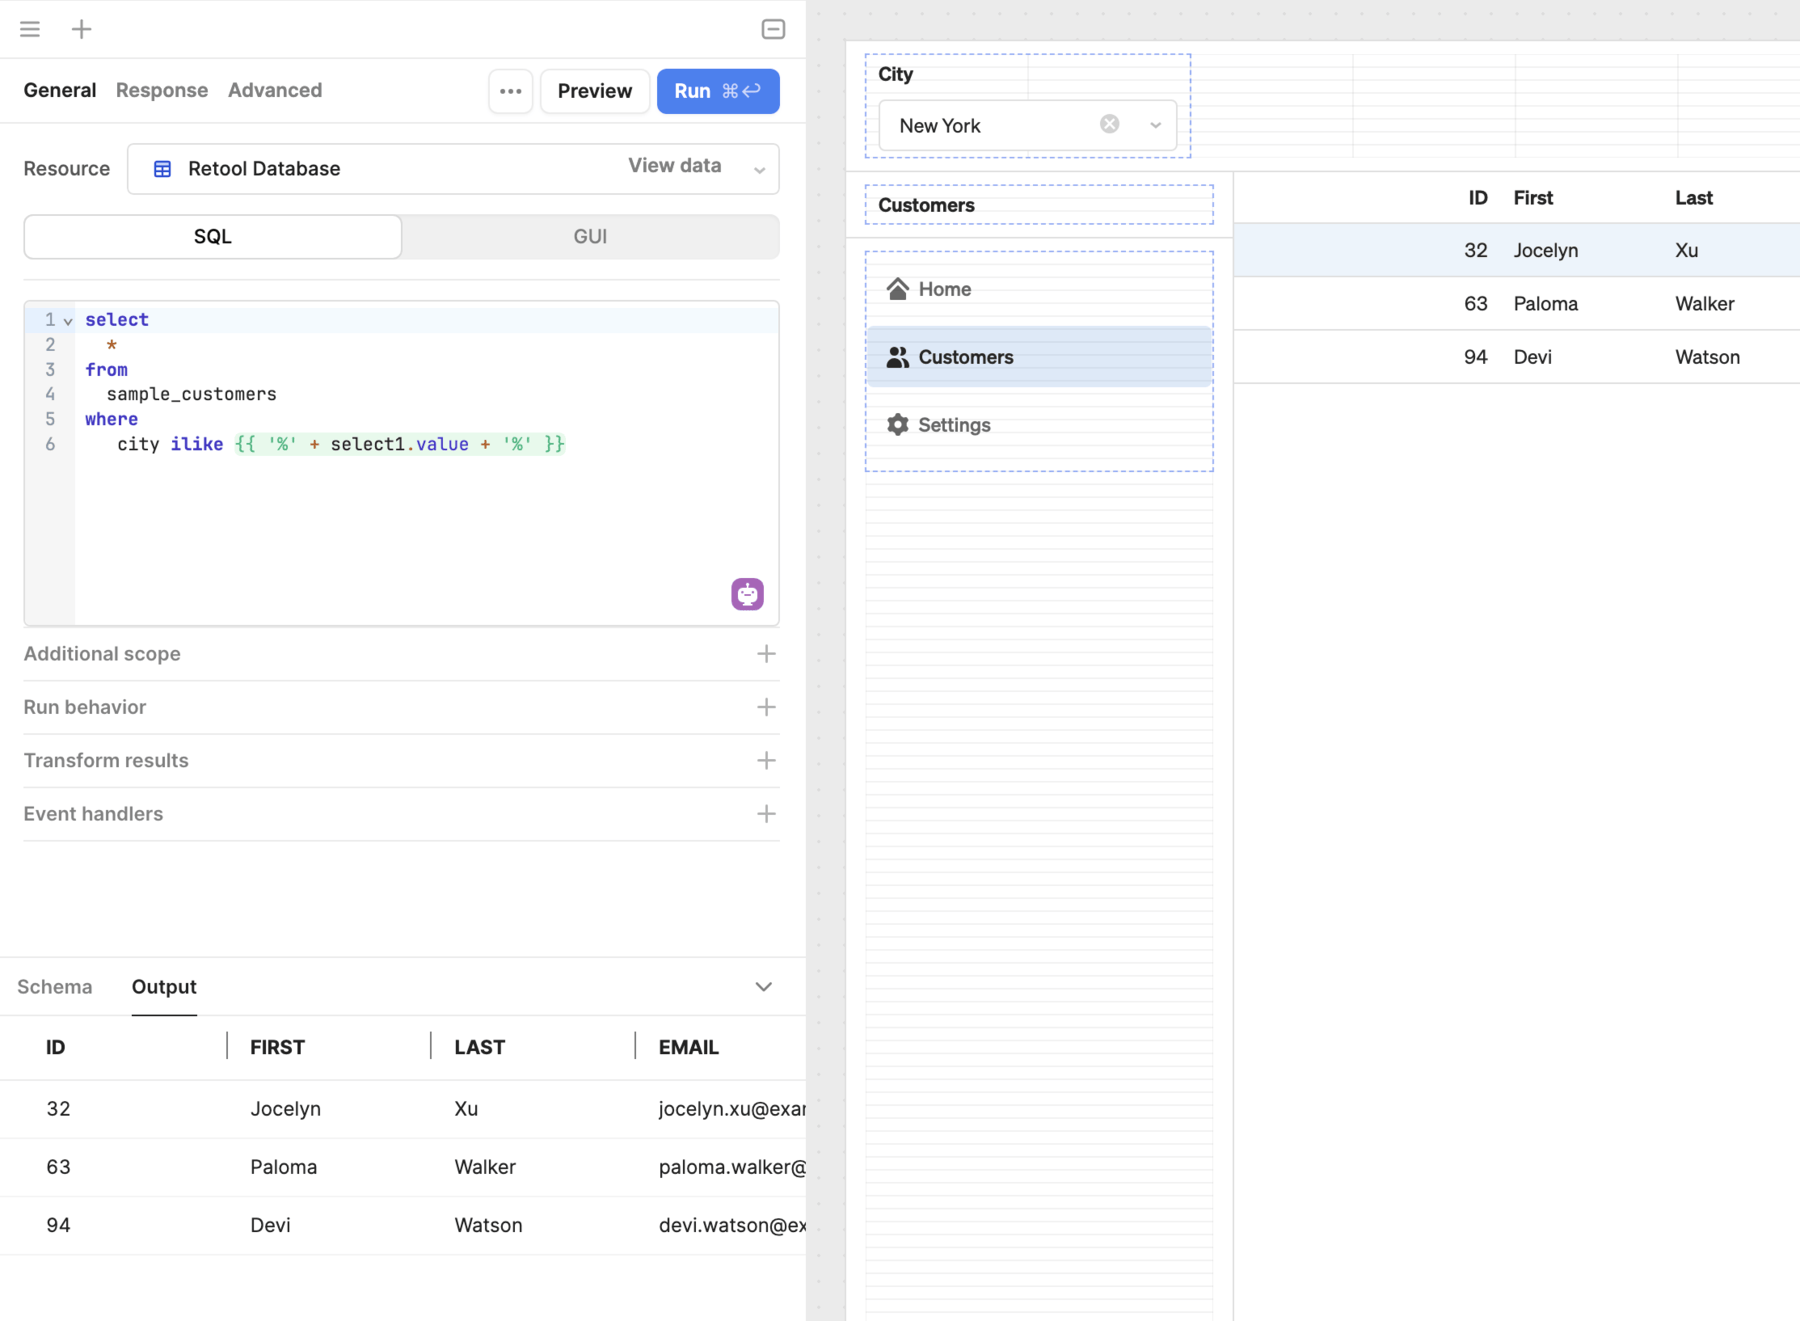
Resource queries are not part of an app's user interface. Users interact with queries via components. For example, a user completes and submits a form in a customer refund app. When the form is submitted, it triggers a refundCustomer query which performs a refund API action with Stripe.
If a resource query only reads data, such as retrieving a list of customers, it can automatically run. If a resource query writes data, it must be manually run using an event handler.
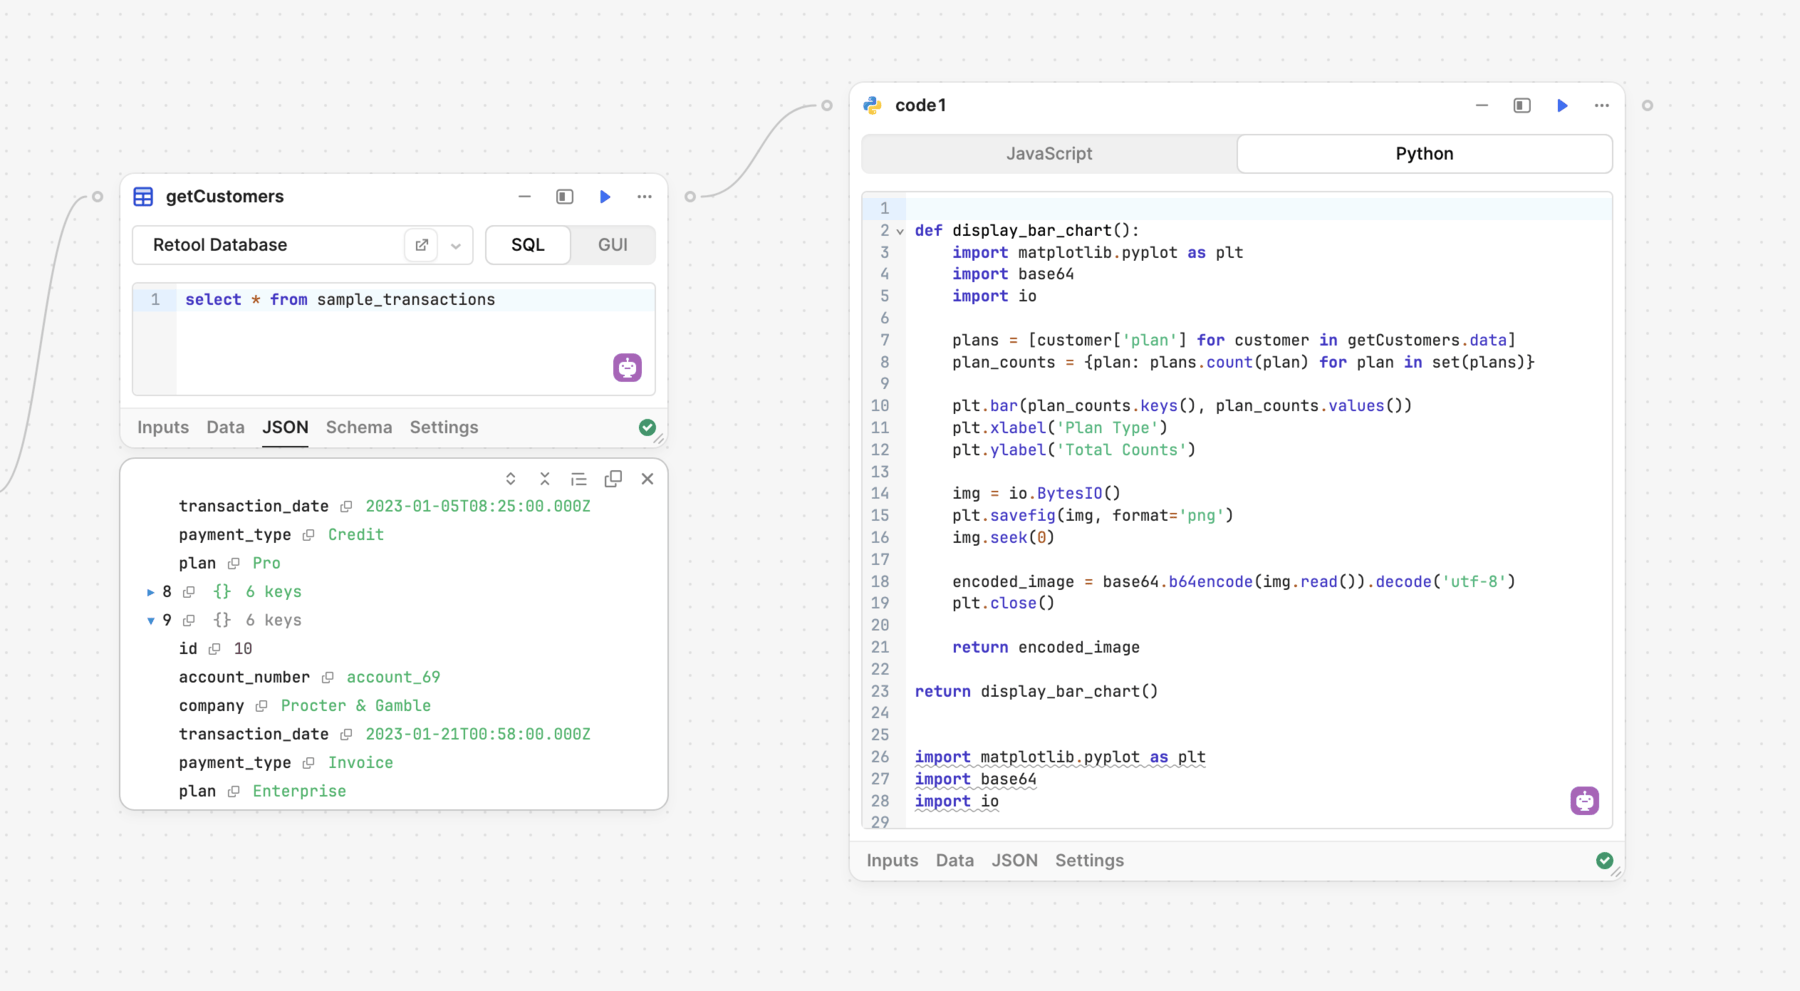
The query retrieves a list of customers from a database using an SQL statement.
Workflows use Resource query blocks to interact with data sources. These are fundamentally the same as app queries. You either select a Resource query block or reference it's data property in another block. When you specify the resource to query, Retool presents relevant options based on the resource type.
Resource query blocks run automatically when part of the workflow's control flow or as part of a function.
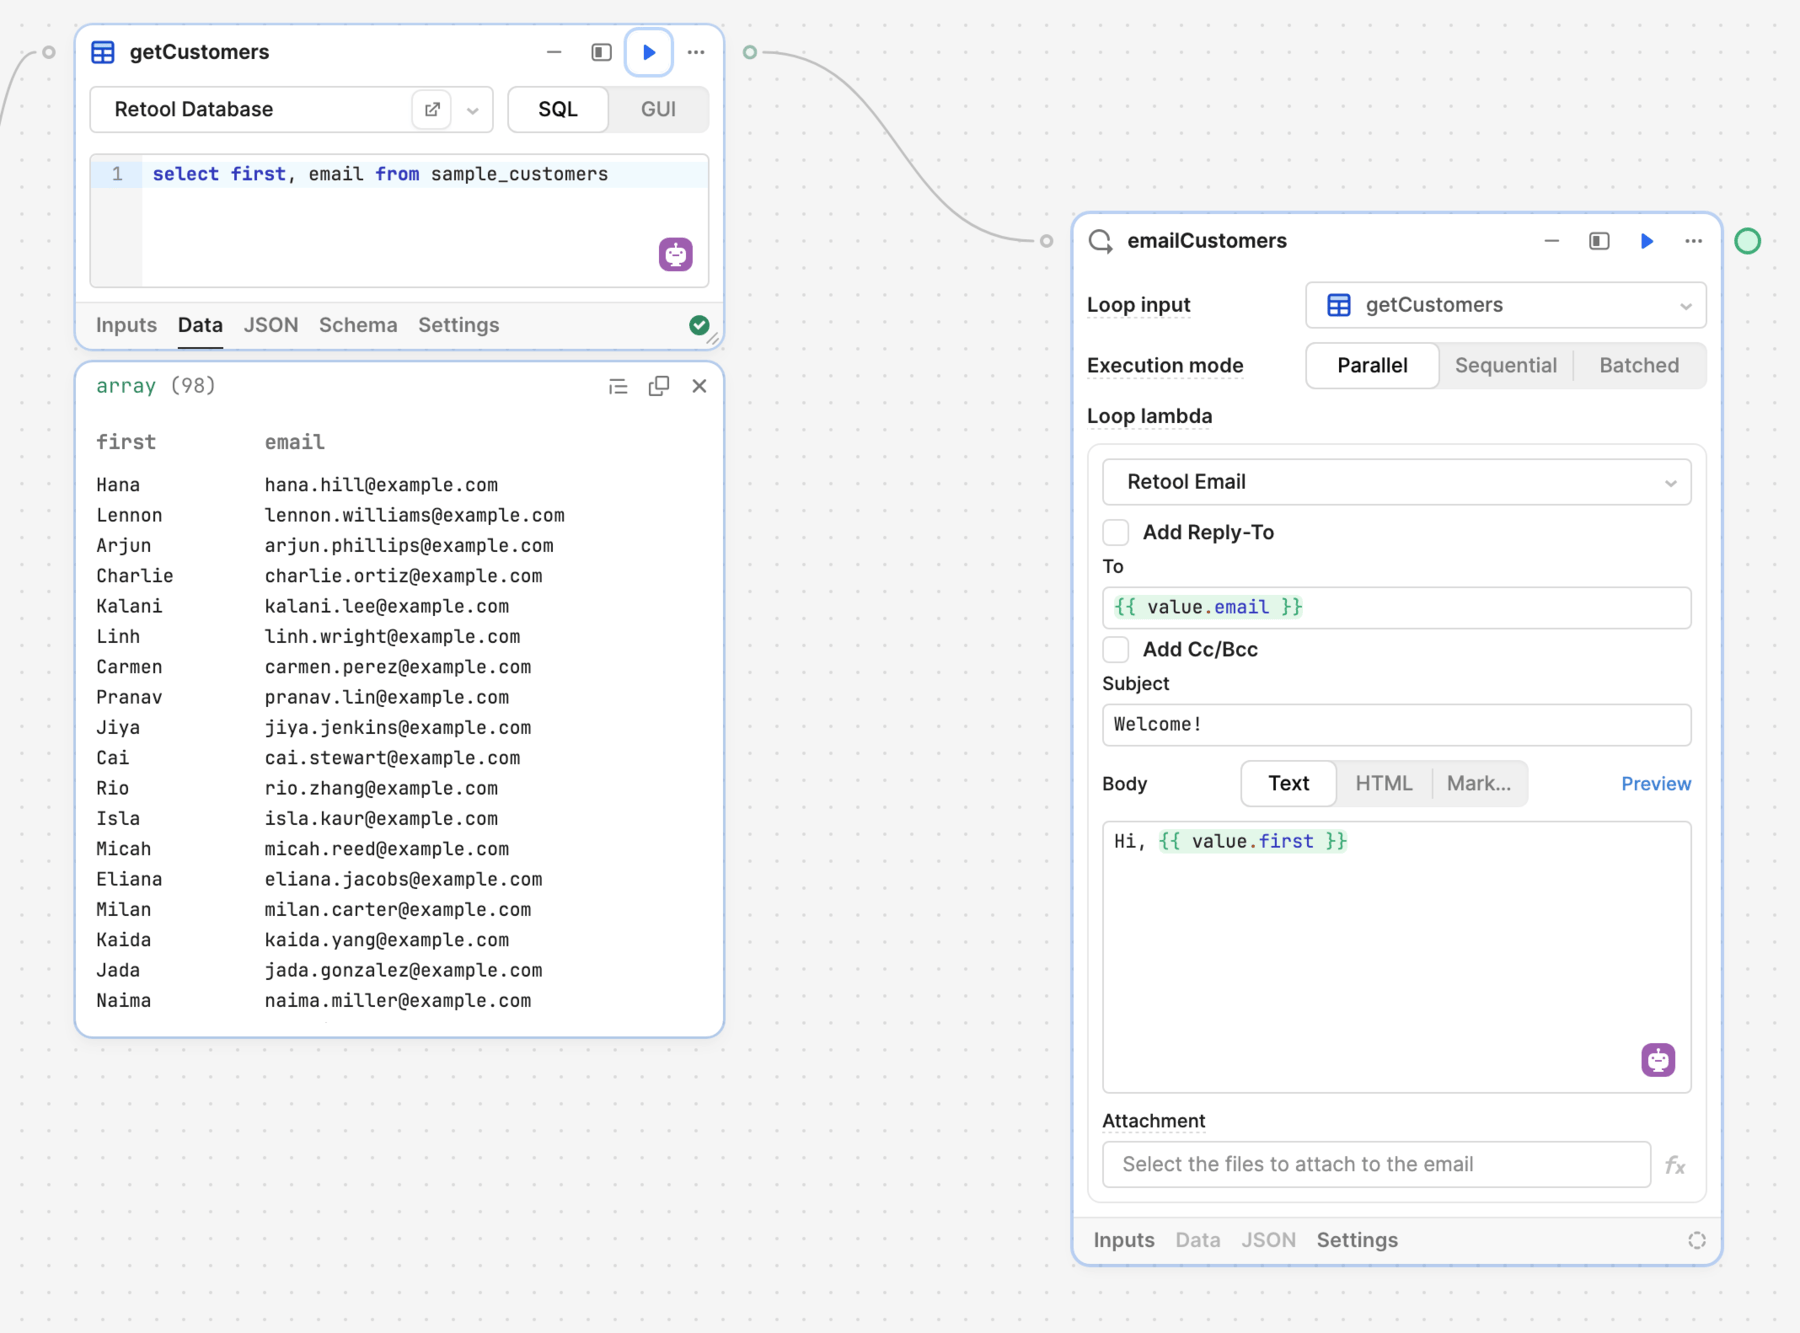
The Loop block references the getCustomers query. Its then iterates on the query results to send an email.
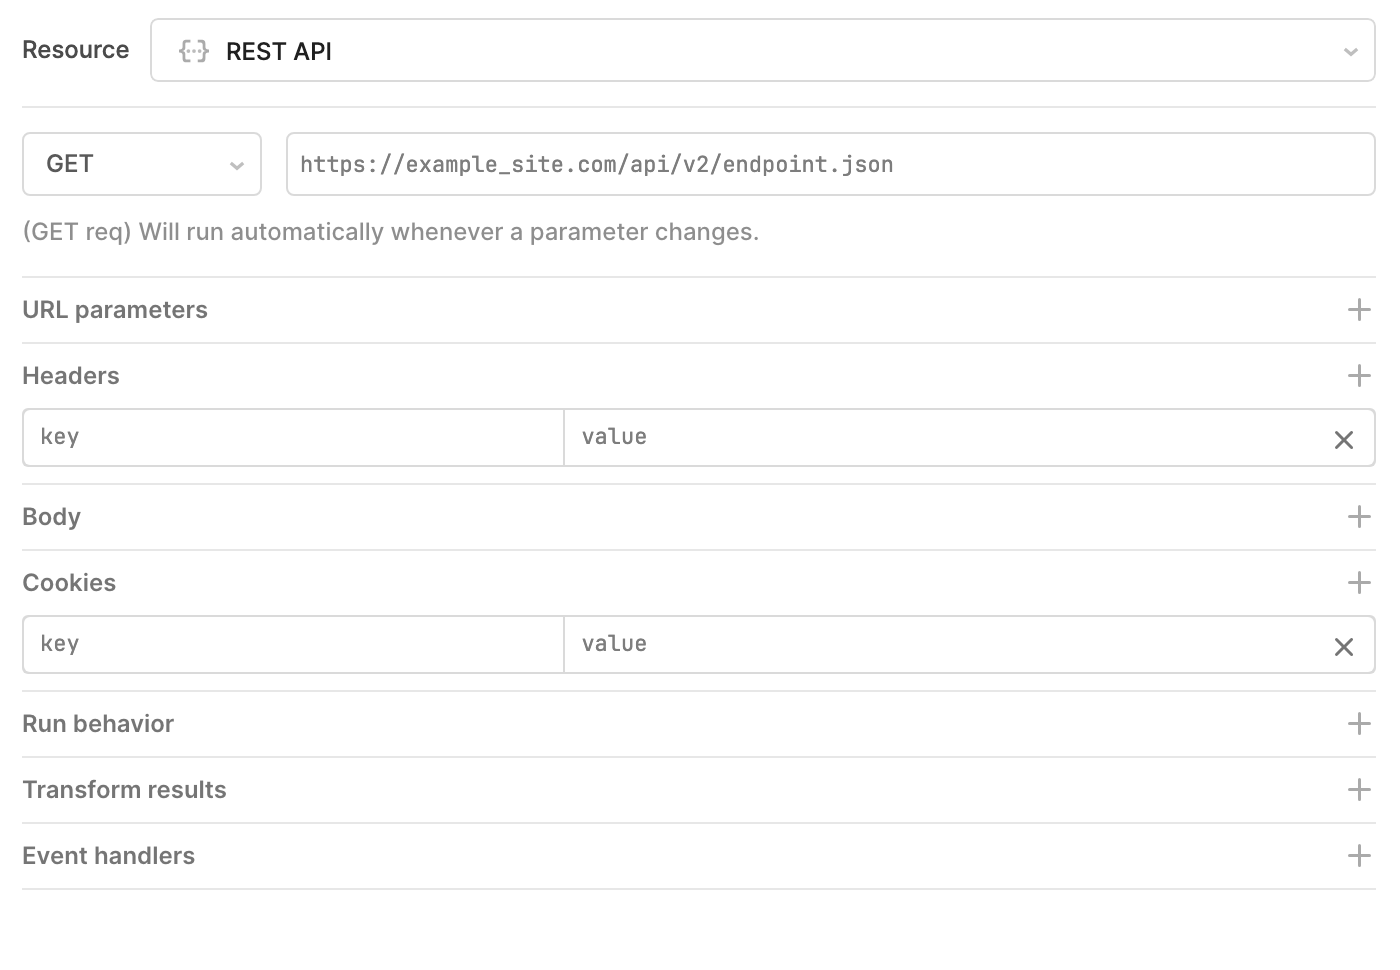
API resource queries
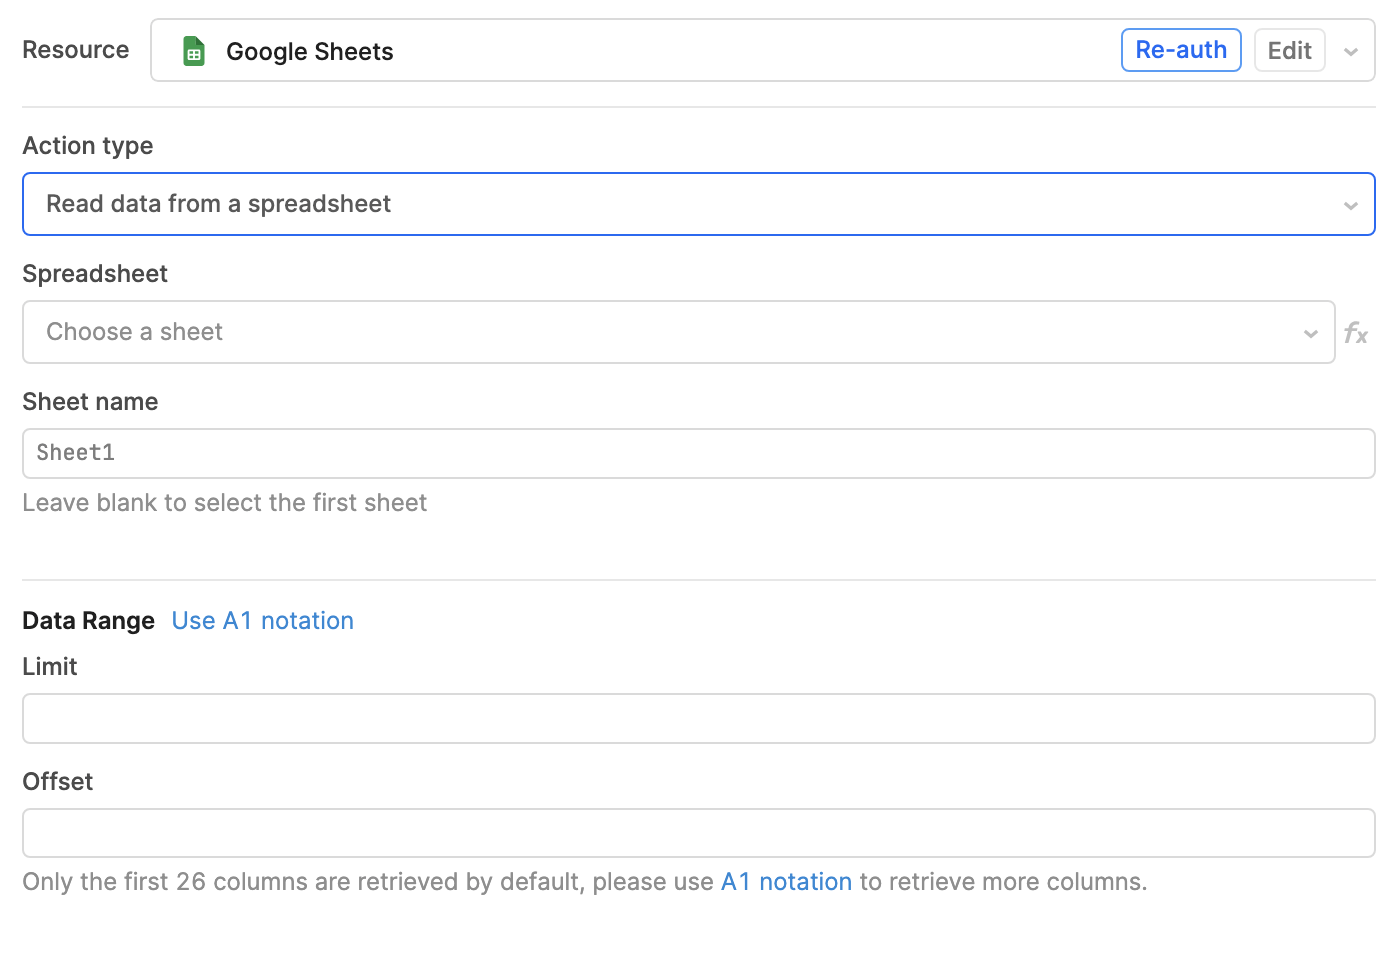
Queries for API-based resources include relevant options for making API requests. Resources for popular service integrations, (Amazon S3, Google Sheets Twilio, etc.) include a tailored set of options. This abstracts away some of the complexities of working with APIs.
Other resources, such as GraphQL-based integrations or custom APIs, include more generic options and require further knowledge of working with the API.

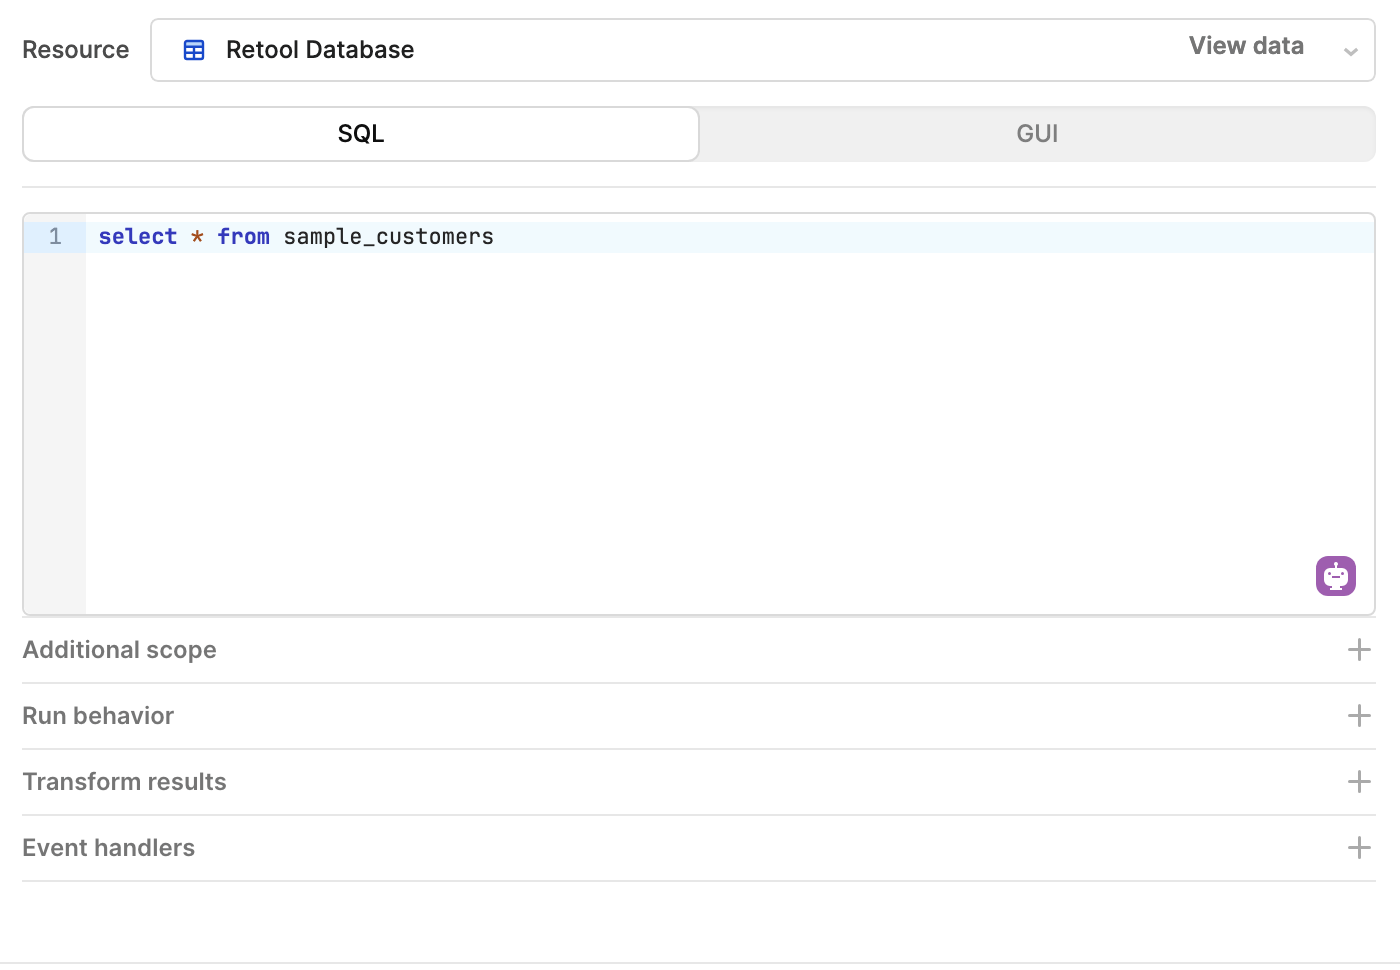
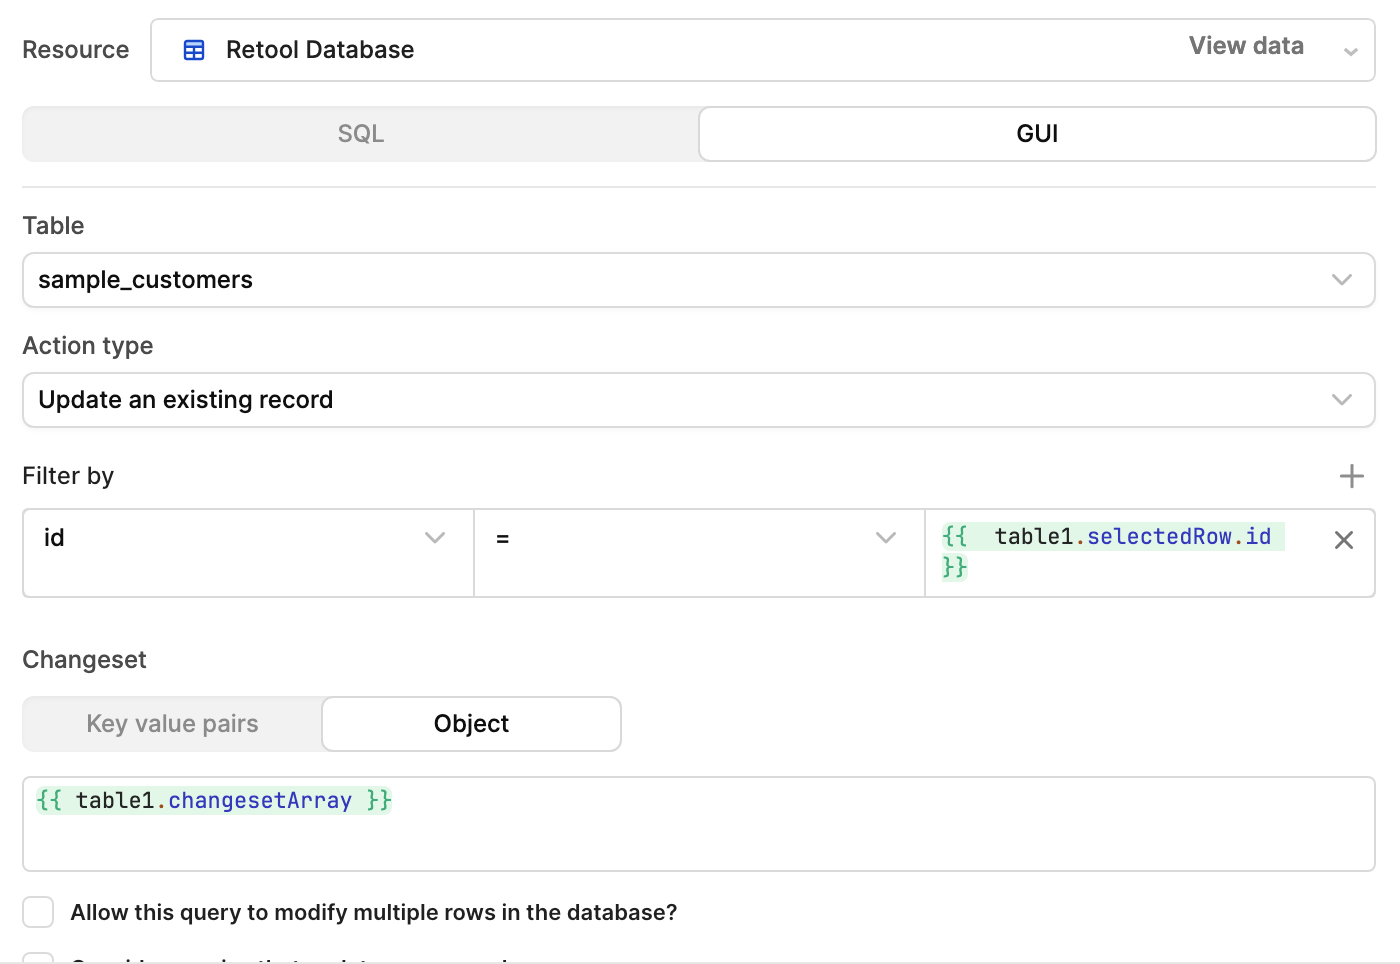
SQL resource queries
You interact with databases and other structured data stores using SQL. Retool provides two modes with which to interact using SQL: SQL and GUI.
- SQL mode is for primarily for reading data from databases. You write (raw) SQL statements that retrieve matching records.
- GUI mode is for writing and modifying data in databases. Rather than need to write an SQL statement, GUI mode queries contain options to specify what changes to make and the values to use. This method helps prevent against destructive actions that malformed SQL statements could cause, such as dropping a table or overwriting existing data with incorrect values.
Query variable spoofing prevention
To prevent a user from manipulating network requests to pass in arbitrary values to prepared statements, Retool enables query spoofing by default. To disable this, an administrator can turn off the Prevent query variable spoofing feature from the Settings > Beta page. Query variable spoofing rejects network requests that refer to current_user properties (e.g., current_user.email) which don’t match the expected values for the user making the query. If you include additional logic in your expression (e.g., current_user.groups.map(group => group.name)), query spoofing prevention is not available.
Code queries
You can write JavaScript code to control app behavior, transform data, set property values, and more. Workflows also supports Python code.
- Code queries in apps
- Code queries in workflows
JavaScript queries are multiline blocks of JavaScript code. You can write complex JavaScript statements to perform advanced data transformations and control app behavior, such as components and other queries.
The Loop block references the getCustomers query. Its then iterates on the query results to send an email.
JavaScript example
The following JavaScript query loops through each row of the specified table (table1.data) and triggers the updateCustomer query.
var rows = table1.data;
var errors = "";
var total = rows.length;

function runQuery(i) {
  // Update the Status text
  Status.setValue("Progress: " + (i.toString() + "/" + total.toString()));

  if (i >= rows.length) {
    console.log("Finished running all queries");
    return;
  }

  console.log("Running query for row", i);

  updateCustomer.trigger({
    additionalScope: { i: i }, // This is where we override the `i` variable
    // You can use the argument to get the data with the onSuccess function
    onSuccess: function (data) {
      runQuery(i + 1);
    },
    onFailure: function (error) {
      // Update the Errors text
      errors += "Found error at line " + i.toString() + ":  " + error + "\n\n";
      Errors.setValue(errors);
      runQuery(i + 1);
    },
  });
}

runQuery(0);
Workflows can execute both JavaScript and Python code. You can write complex statements to perform advanced data transformations or control workflow behavior, such as triggering functions.
You can use popular JavaScript or Python libraries to further extend the functionality of workflows.
The Code block executes custom Python code that extends the functionality of a workflow.
Python example
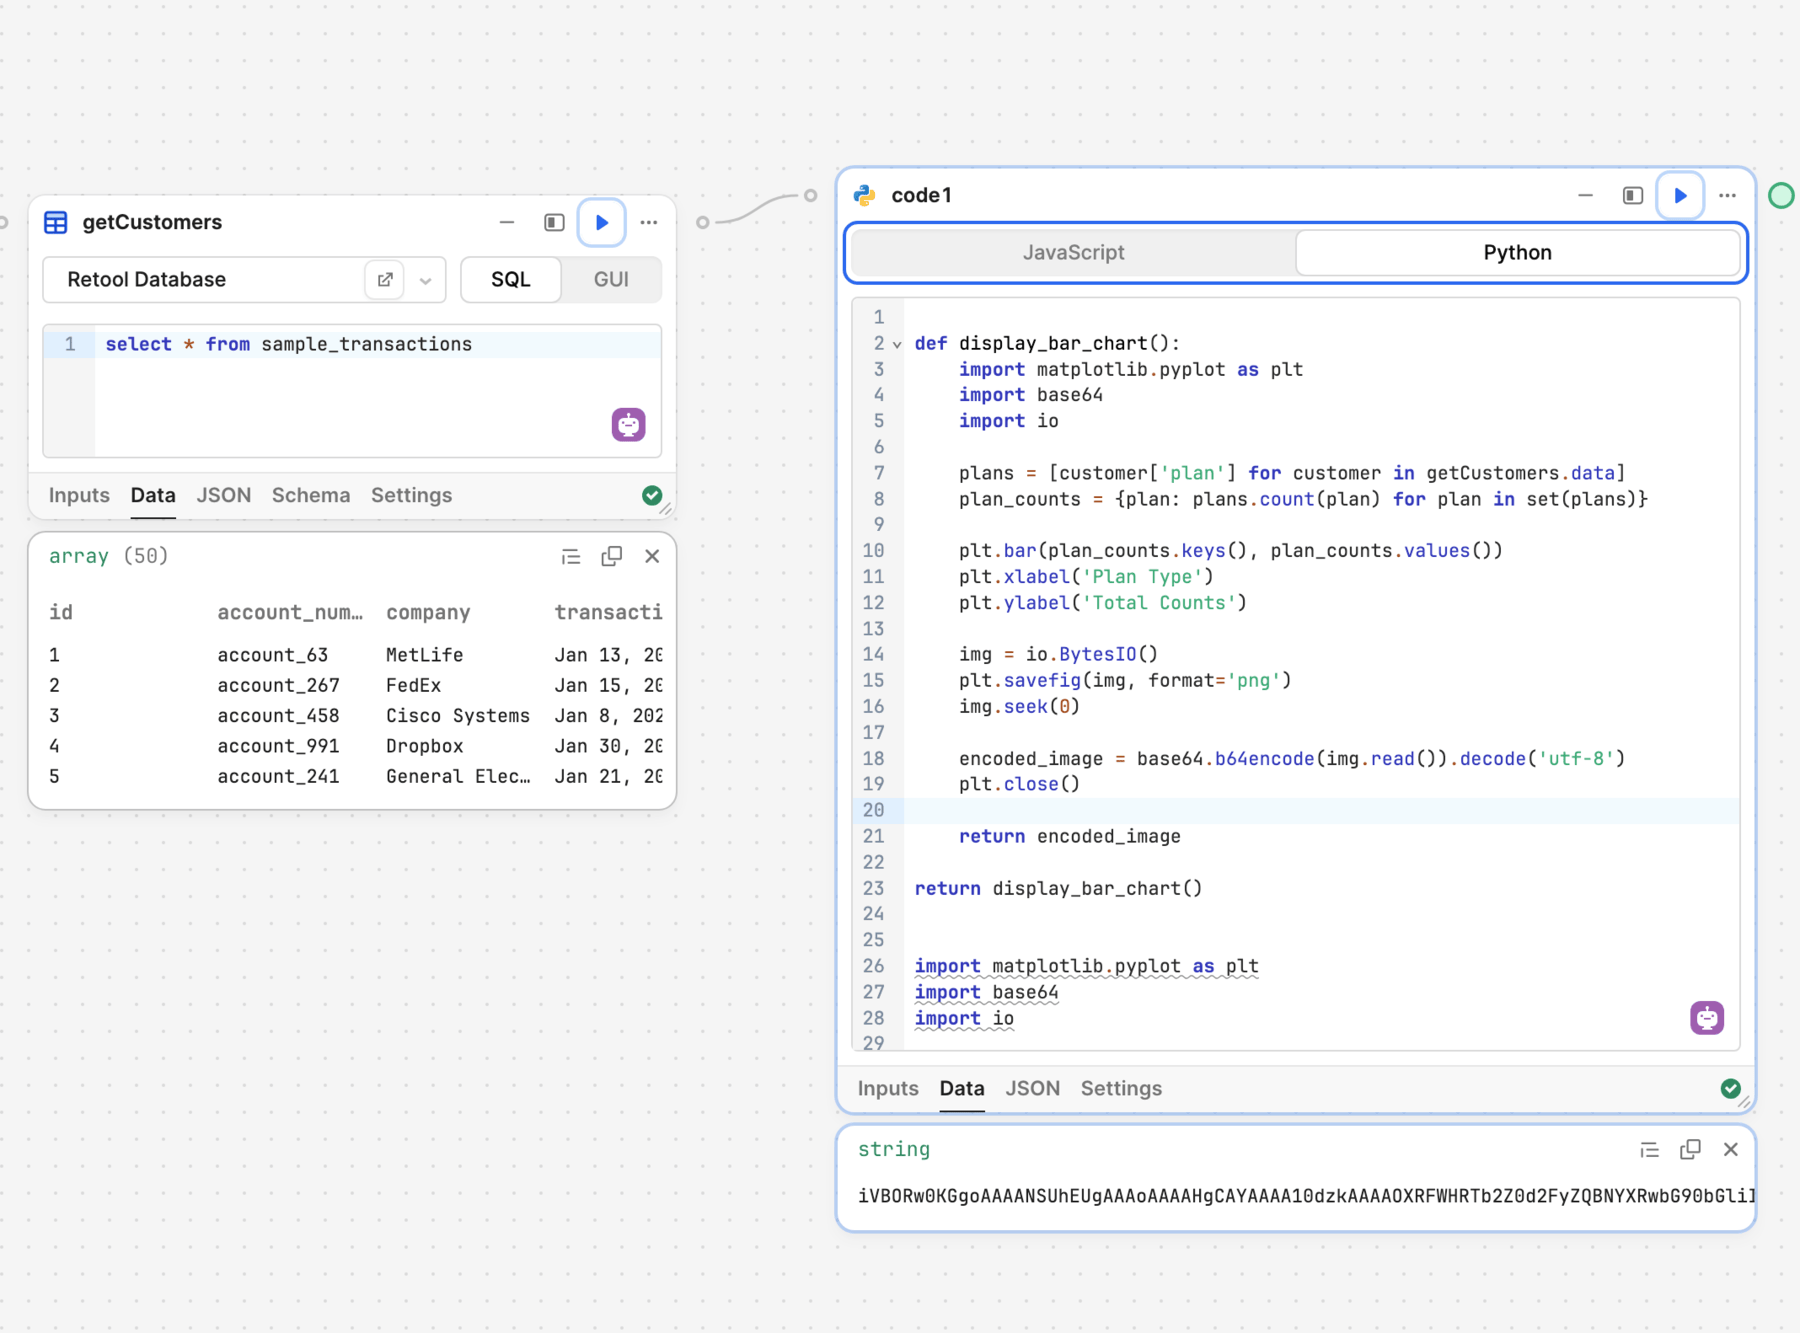
This workflow uses a Resource query block to retrieve a list of transactions. It then uses Python to generate a bar chart that counts the total number of subscription plans. The Python code returns a base64-encoded image which can then be stored in Retool Storage or another file store resource.
def display_bar_chart():
    import matplotlib.pyplot as plt
    import base64
    import io

    plans = [customer['plan'] for customer in getCustomers.data]
    plan_counts = {plan: plans.count(plan) for plan in set(plans)}

    plt.bar(plan_counts.keys(), plan_counts.values())
    plt.xlabel('Plan Type')
    plt.ylabel('Total Counts')

    img = io.BytesIO()
    plt.savefig(img, format='png')
    img.seek(0)

    encoded_image = base64.b64encode(img.read()).decode('utf-8')
    plt.close()

    return encoded_image

return display_bar_chart()


import matplotlib.pyplot as plt
import base64
import io

def display_plan_counts_chart():
    data = getCustomers.data
    plan_counts = {}

    for customer in data:
        plan = customer['plan']
        if plan in plan_counts:
            plan_counts[plan] += 1
        else:
            plan_counts[plan] = 1

    plt.bar(plan_counts.keys(), plan_counts.values())
    plt.xlabel('Plan Type')
    plt.ylabel('Count')
    plt.title('Total Counts for Each Type of Plan')
    plt.gcf().set_size_inches(15, 8)

    buffer = io.BytesIO()
    plt.savefig(buffer, format='png')
    buffer.seek(0)
    chart_image = base64.b64encode(buffer.read()).decode('utf-8')

    return chart_image

return display_plan_counts_chart()
The Code block executes custom Python code that extends the functionality of a workflow.

The chart generated by the Python code.
AI actions
AI actions are queries that interact with AI models. Instead of code, you write a prompt—the instructions for the AI model to follow—and include any relevant data.
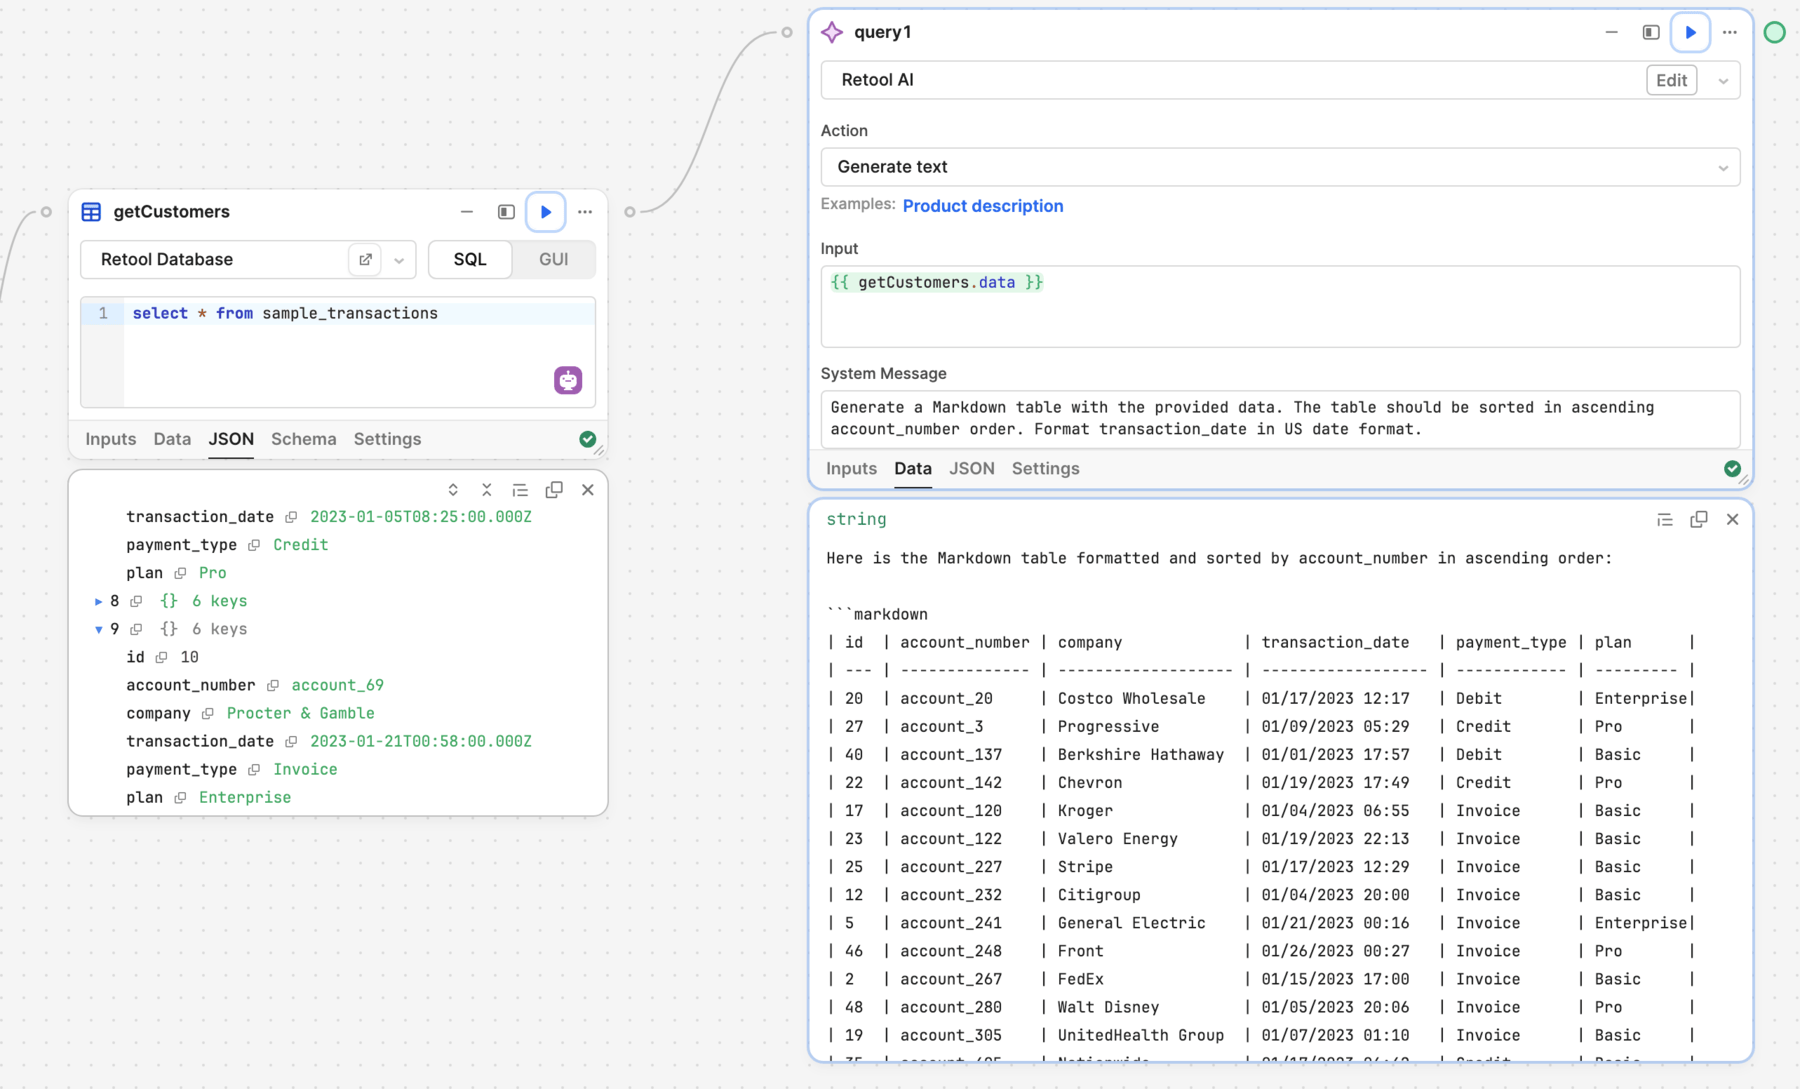
The AI action block references the getCustomers query and contains instructions to generate a Markdown table.
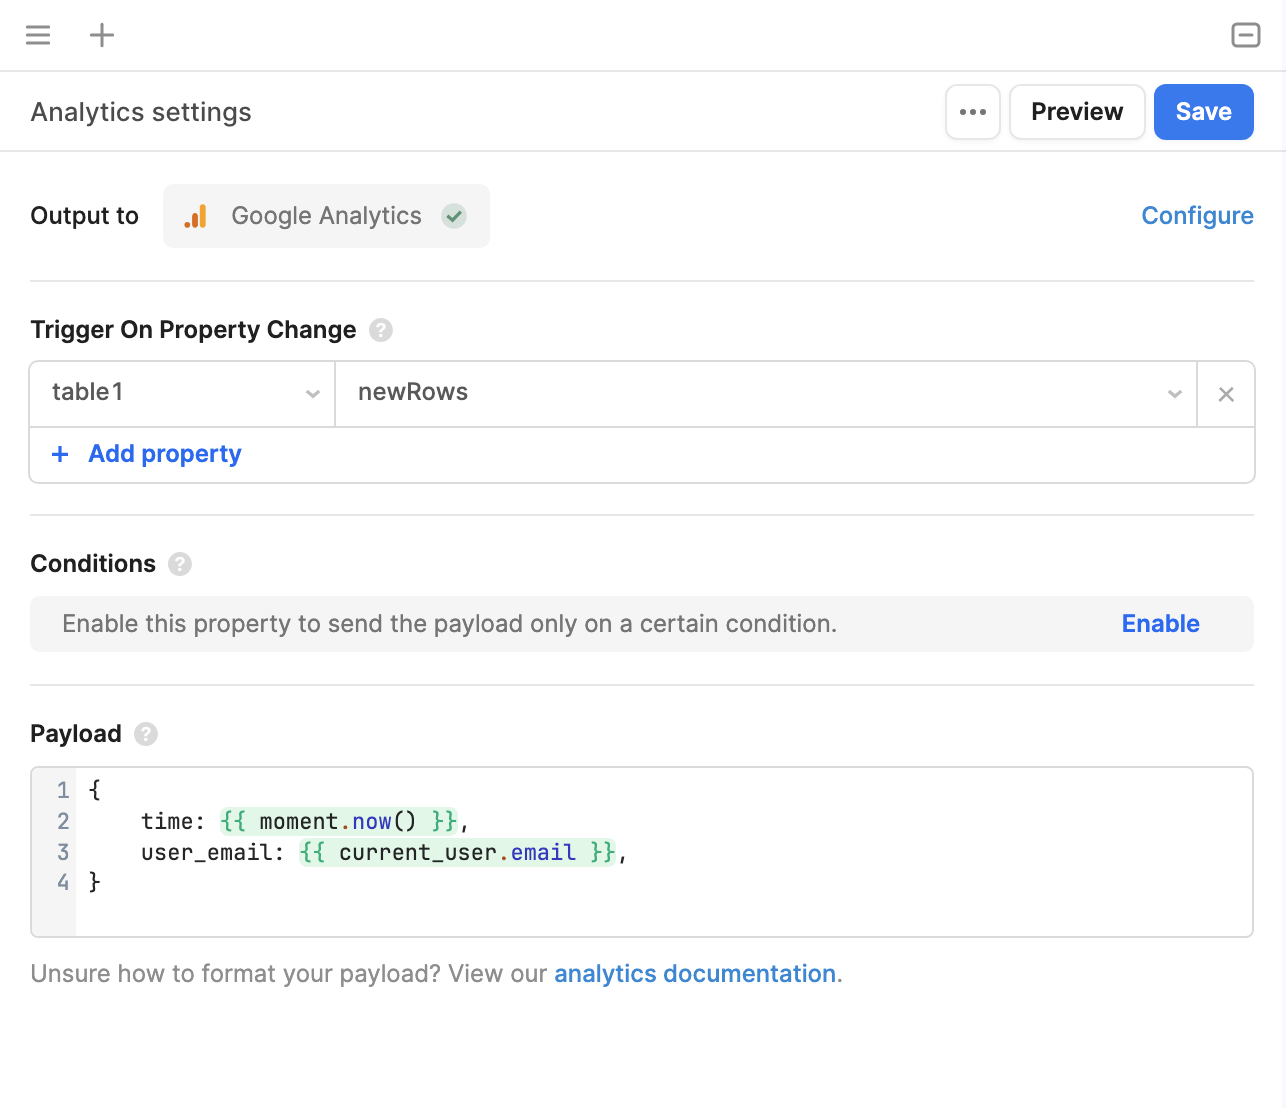
Analytics tracking
Retool can integrate with third-party analytics tools, such as Google Analytics and Segment. When configured, you can add Analytics tracking queries that send configured events when triggered.
Analytics tracking queries trigger on property change and can include conditional statements. When triggered, the query sends the configured payload to your connected analytics service.
The Code block executes custom Python code that extends the functionality of a workflow.
Testing queries
When editing a query, click Test to test out your changes with your latest edits. Retool executes your query and displays the result in the Output section, but no downstream entities within Retool are updated. For example, components are not updated, and event handlers are not executed.
In most queries, clicking Test fully executes the code in your query. Any changes, additions, or deletions that a query makes will in reality be completed when testing.
To be safe, Retool recommends testing your query on non-production data.
For SQL queries, clicking Test while using using GUI mode does not execute the query, and outputs a mock of the SQL query. This feature helps you avoid making destructive changes.
If you want to update your app state based on the query run, click , then Run in app. Retool executes the query against your resource, and propagates the resulting data into your app—components update, and other queries that depend on its value will run.
Once you confirm that the query works as intended, click Save to finalize your changes.
Embedded expressions
Retool performs string interpolation and evaluates {{ }} embedded expressions as JavaScript. As a result, you can write JavaScript code—that evaluates and returns a value synchronously—almost anywhere. This enables you to dynamically set property values using transformations or conditional logic to build complex apps and workflows.
Explore some common JavaScript expressions using the examples below.
- Truthy statement
- Ternary operator
- Data transformation
The Alert component's Hidden (hidden) property in the IDE uses a truthy statement that evaluates as true if the user is a member of the Sales team. Using ! at the start of the expression inverts the returned value from true to false. As a result, the alert only appears when a Sales team member is selected.
{{ !table1.selectedRow.teams.includes("Sales") }}
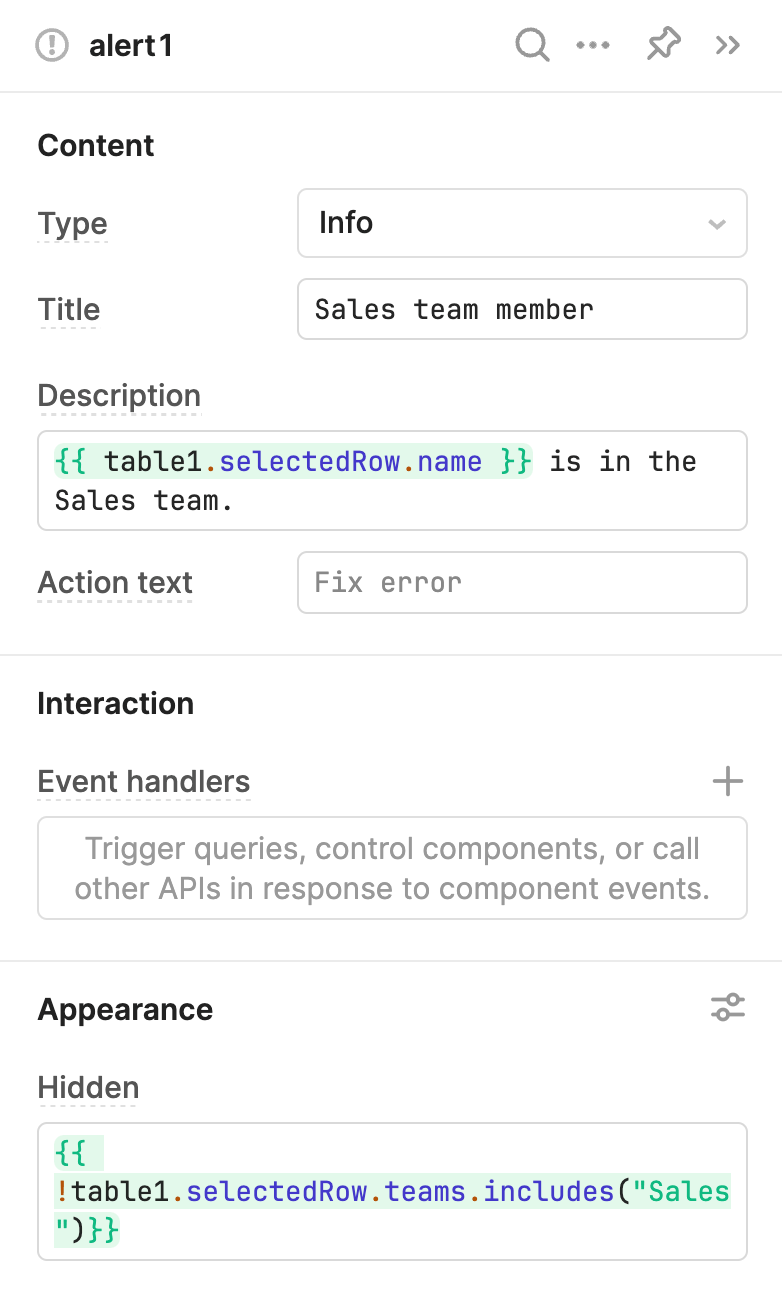
The alert is hidden when the statement evaluates as true.
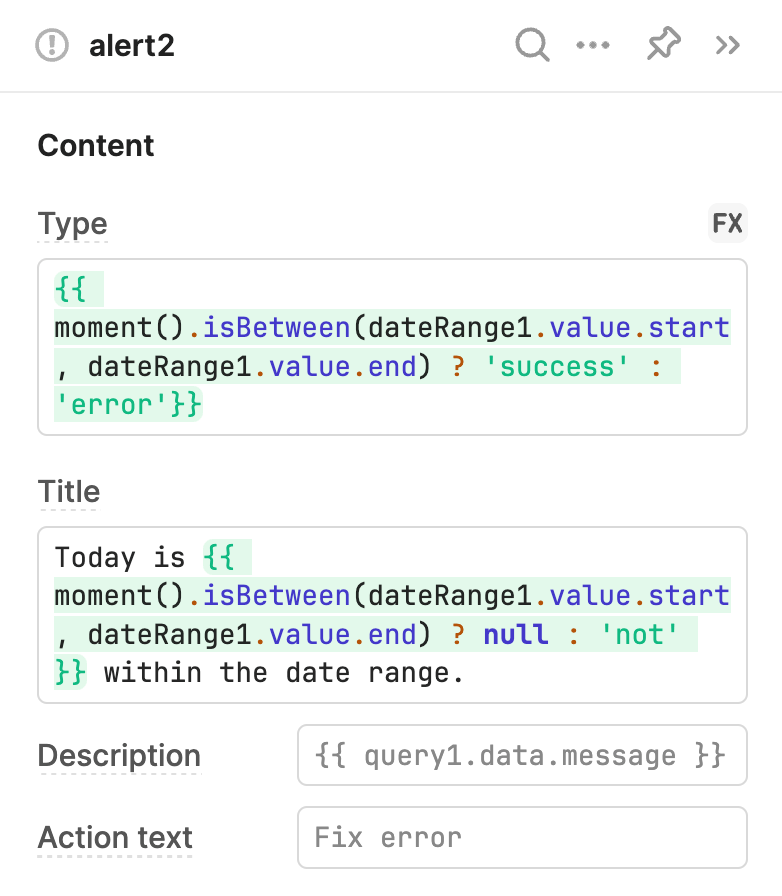
The Alert component's Type (type) and Title (title) properties in the IDE use conditional logic to determine what value to use. If the date range doesn't include today's date, the alert changes.
// Type
{{ +  moment().isBetween(dateRange1.value.start, dateRange1.value.end) ? 'success' : 'error'  + }}

// Title
Today is {{ +  moment.isBetween(dateRange1.value.start, dateRange1.value.end) ? null : 'not'  + }} within the date range.
The Table component's Data source (data) property in the IDE uses slice() to retrieve an index range from the listUsers query. The start and end values are determined by the Range Slider component. Adjusting the range automatically runs the query and updates the table.
{{ + listUsers.data.slice(rangeSlider1.value.start,rangeSlider1.value.end) + }}
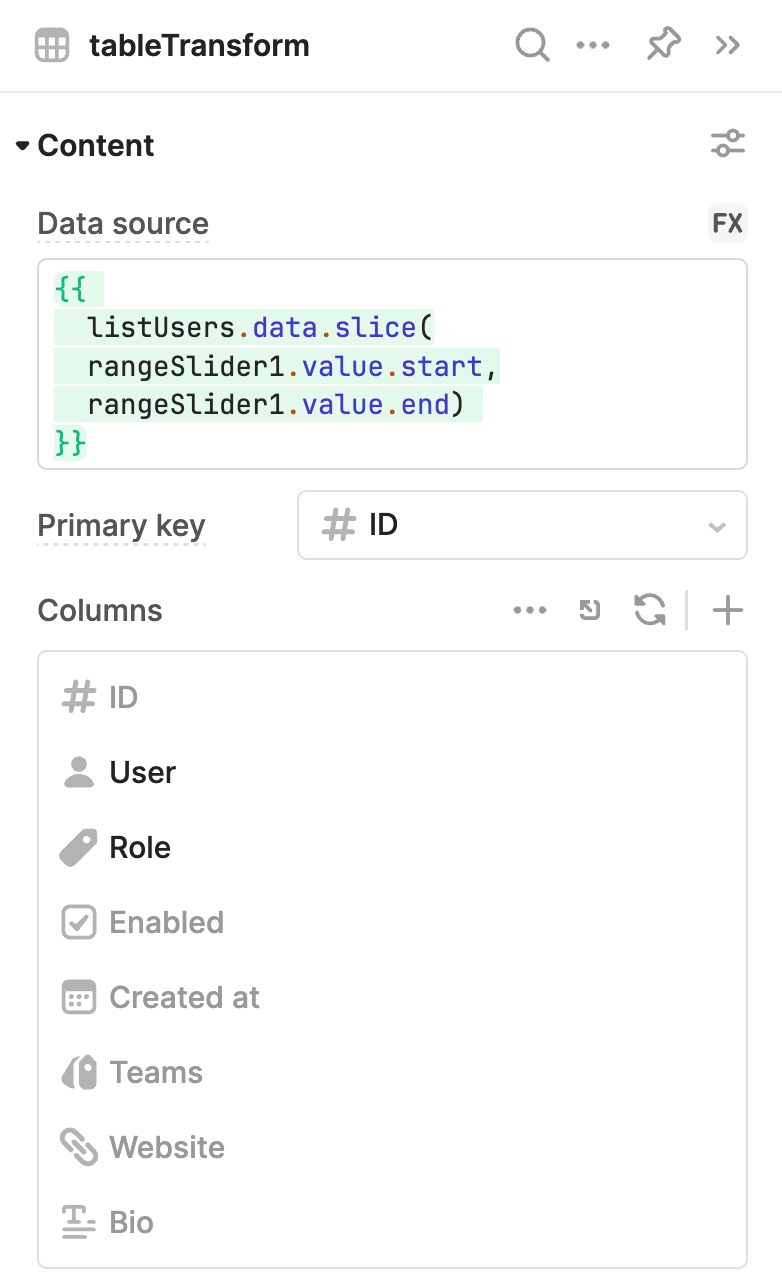
The expression used in Data source uses slice() to only include a specified range of items from an array.
Data transformations
While you can use JavaScript within {{ }} embedded expressions and JavaScript queries, you may need to manipulate data and implement complex logic to produce values, such as filtering or joining data sets.
Transformers
A transformer is a reusable block of JavaScript. You reference property values using embedded expressions and the results of the transformation are output on the transformer's value property using a return statement.
While similar to JavaScript queries, transformers cannot control app behavior. This is because transformers are dynamically evaluated in the same way as embedded expressions. The returned value updates whenever referenced values in the transformer change.
The Code block executes custom Python code that extends the functionality of a workflow.
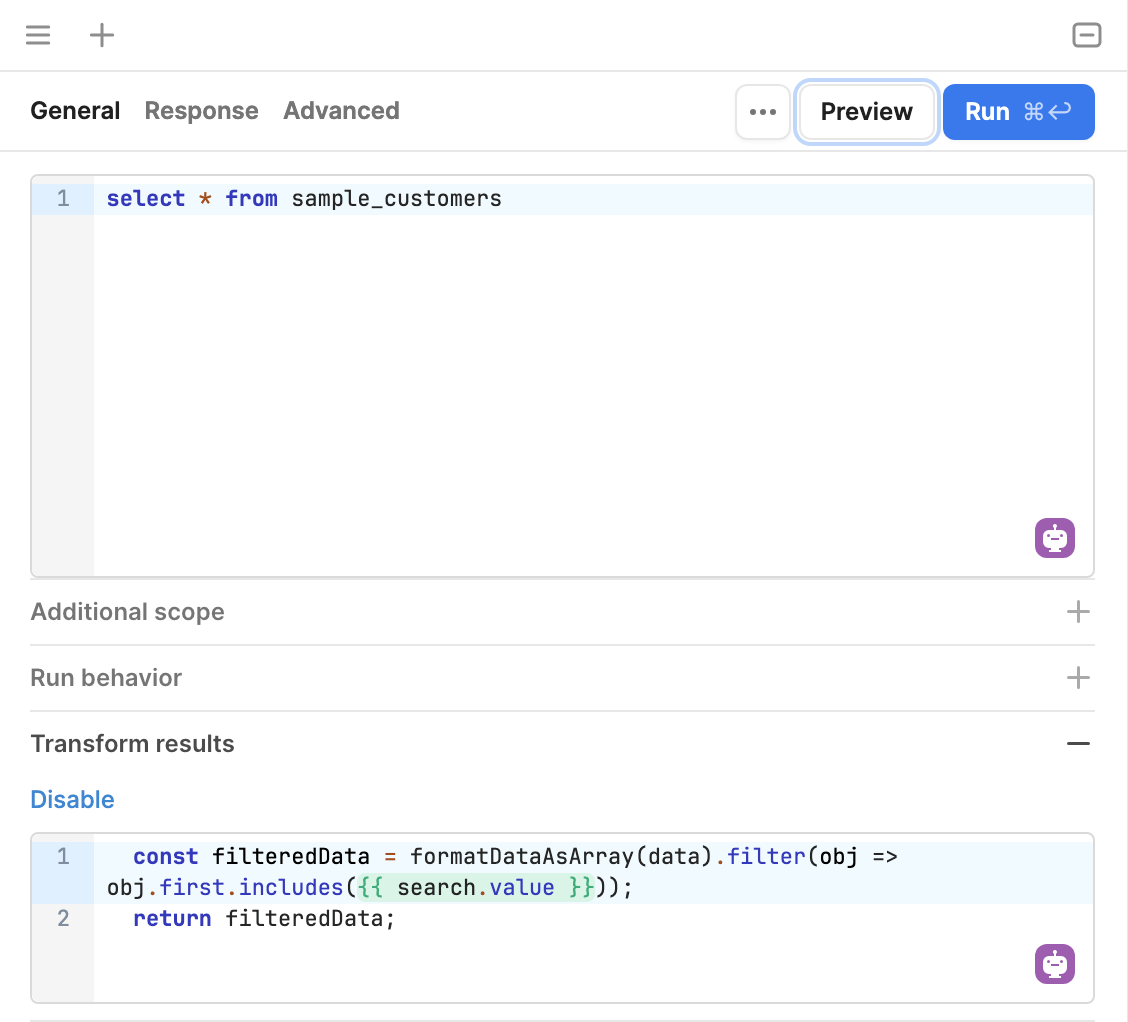
Query transformations
If a query returns data in a format unsuitable for components or other elements in your app, you can directly transform a query's output. The return value of this transformation is then used wherever you access query.data.
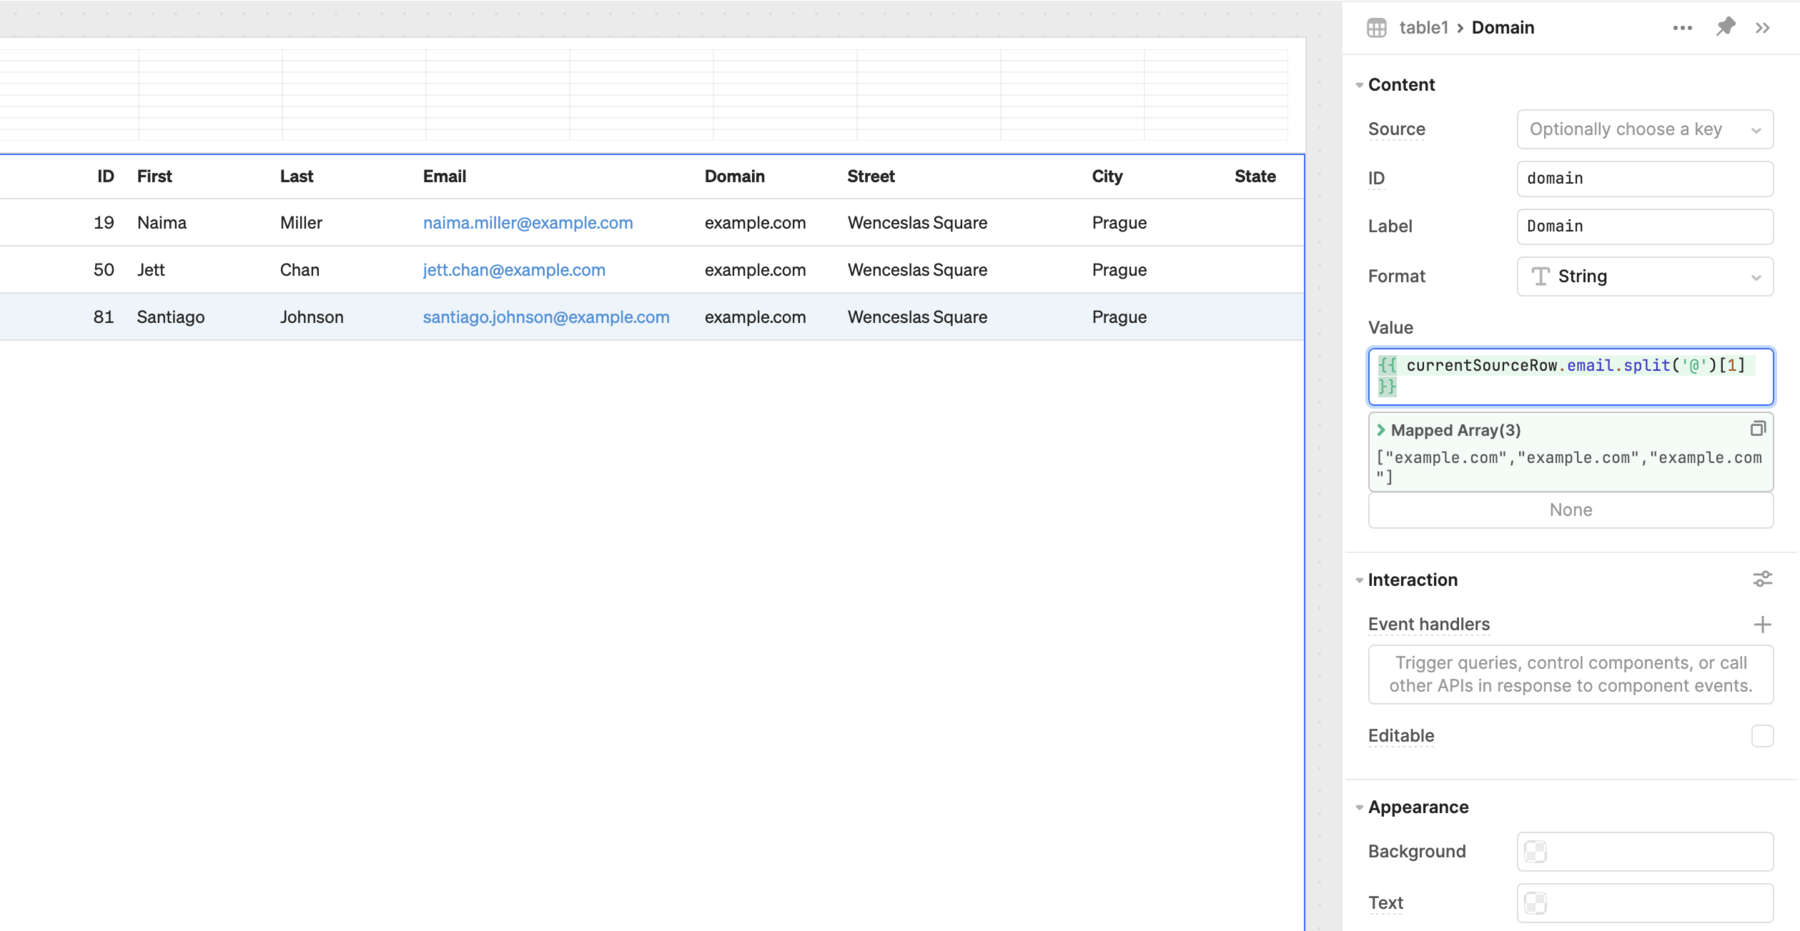
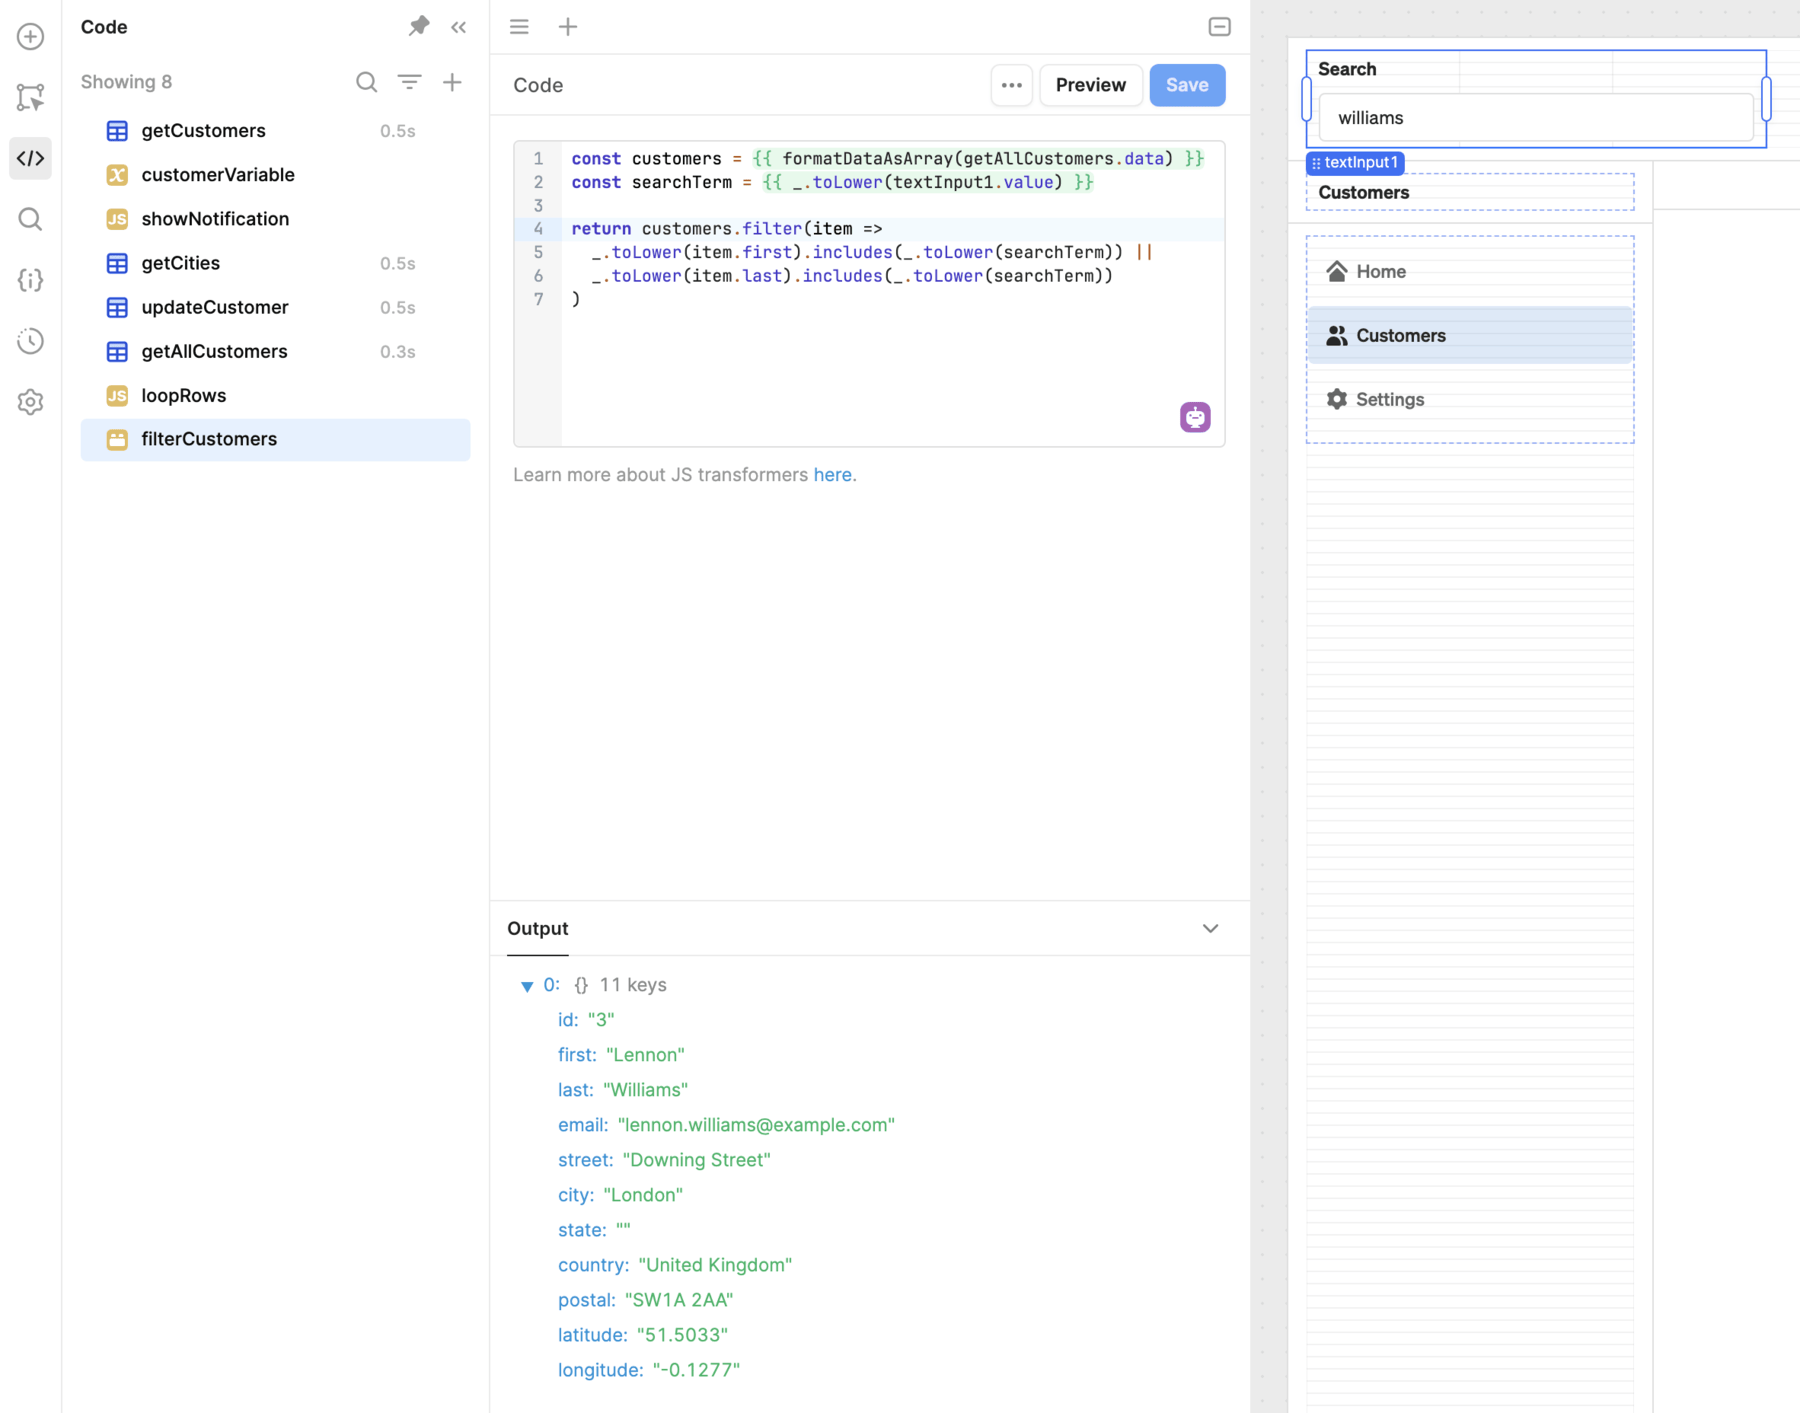
You can also use {{ }} embedded expressions in query transformations. This can help improve app performance as certain actions, such as filtering, can be performed using JavaScript rather than repeatedly running a query. For example, the following snippet filters query data based on whether the first name of a customer matches the value of a Text Input component.
const filteredData = formatDataAsArray(data).filter(
  obj => obj.first.includes({{ search.value }})
);
return filteredData;
The Code block executes custom Python code that extends the functionality of a workflow.
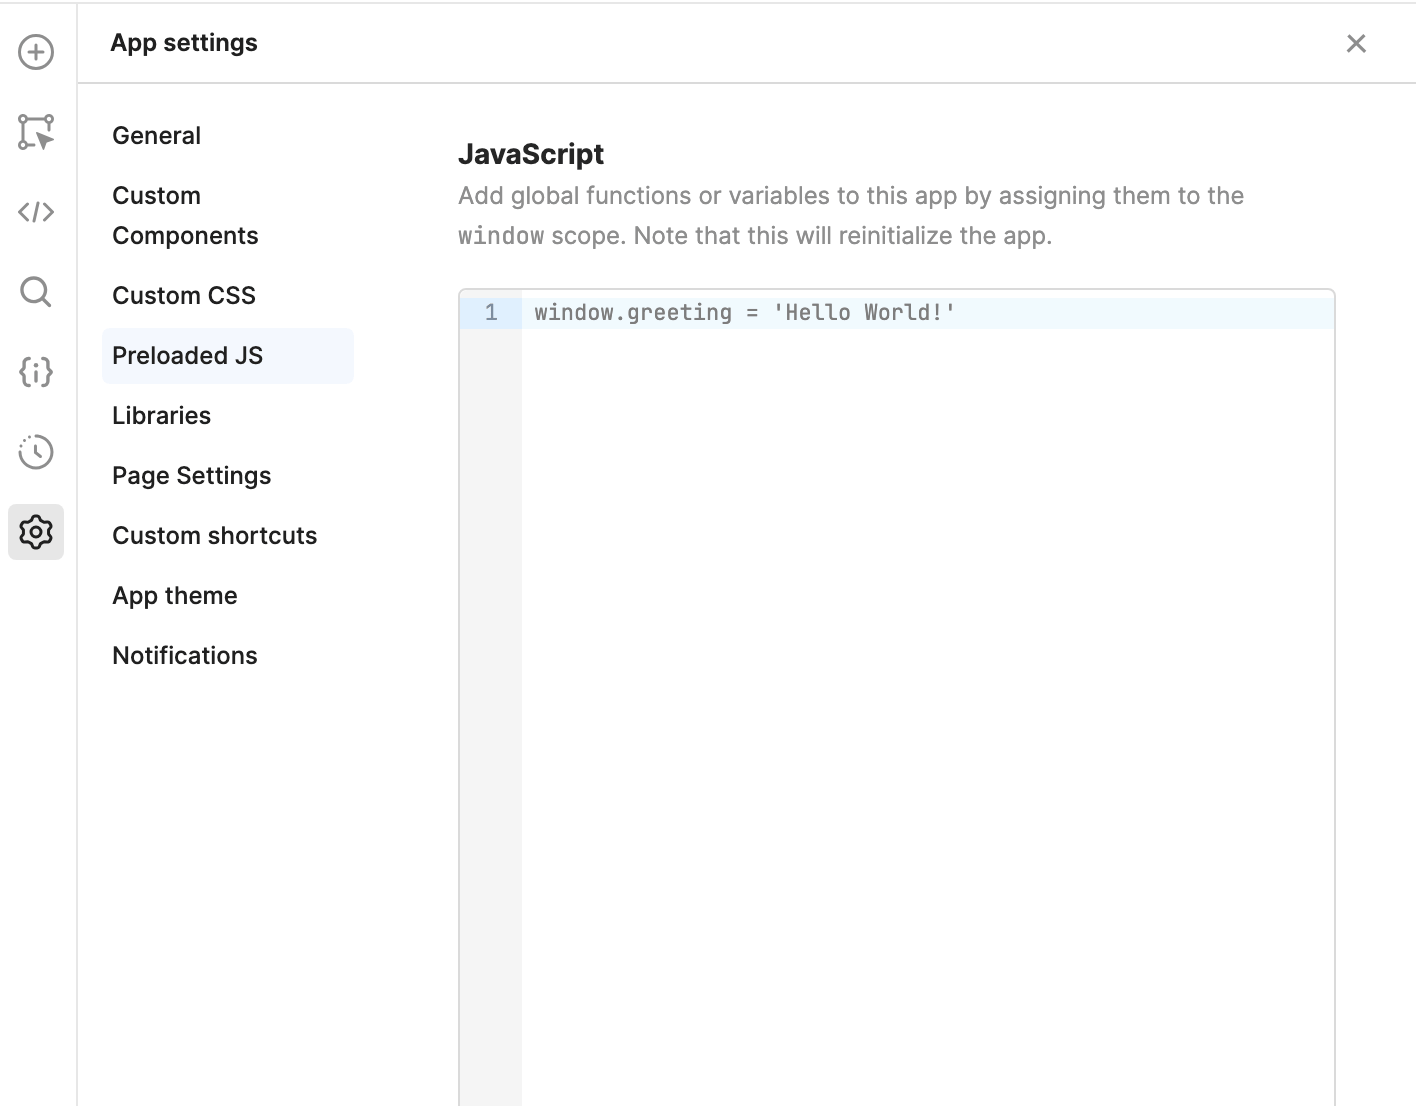
Preloaded code and libraries
You can specify custom code and libraries to use within apps and workflows. This extends the functionality within Retool and enables more flexibility.
- Custom code and libraries in apps
- Custom code and libraries in workflows
You can preload custom JavaScript statements and libraries on a per-app basis or for the whole organization to extend app functionality with custom logic.
The Code block executes custom Python code that extends the functionality of a workflow.
The Code block executes custom Python code that extends the functionality of a workflow.
Retool includes support for a selection of popular JavaScript libraries which you can use in a workflow. You can browse and add libraries, configure their imports, and use them in your workflow.
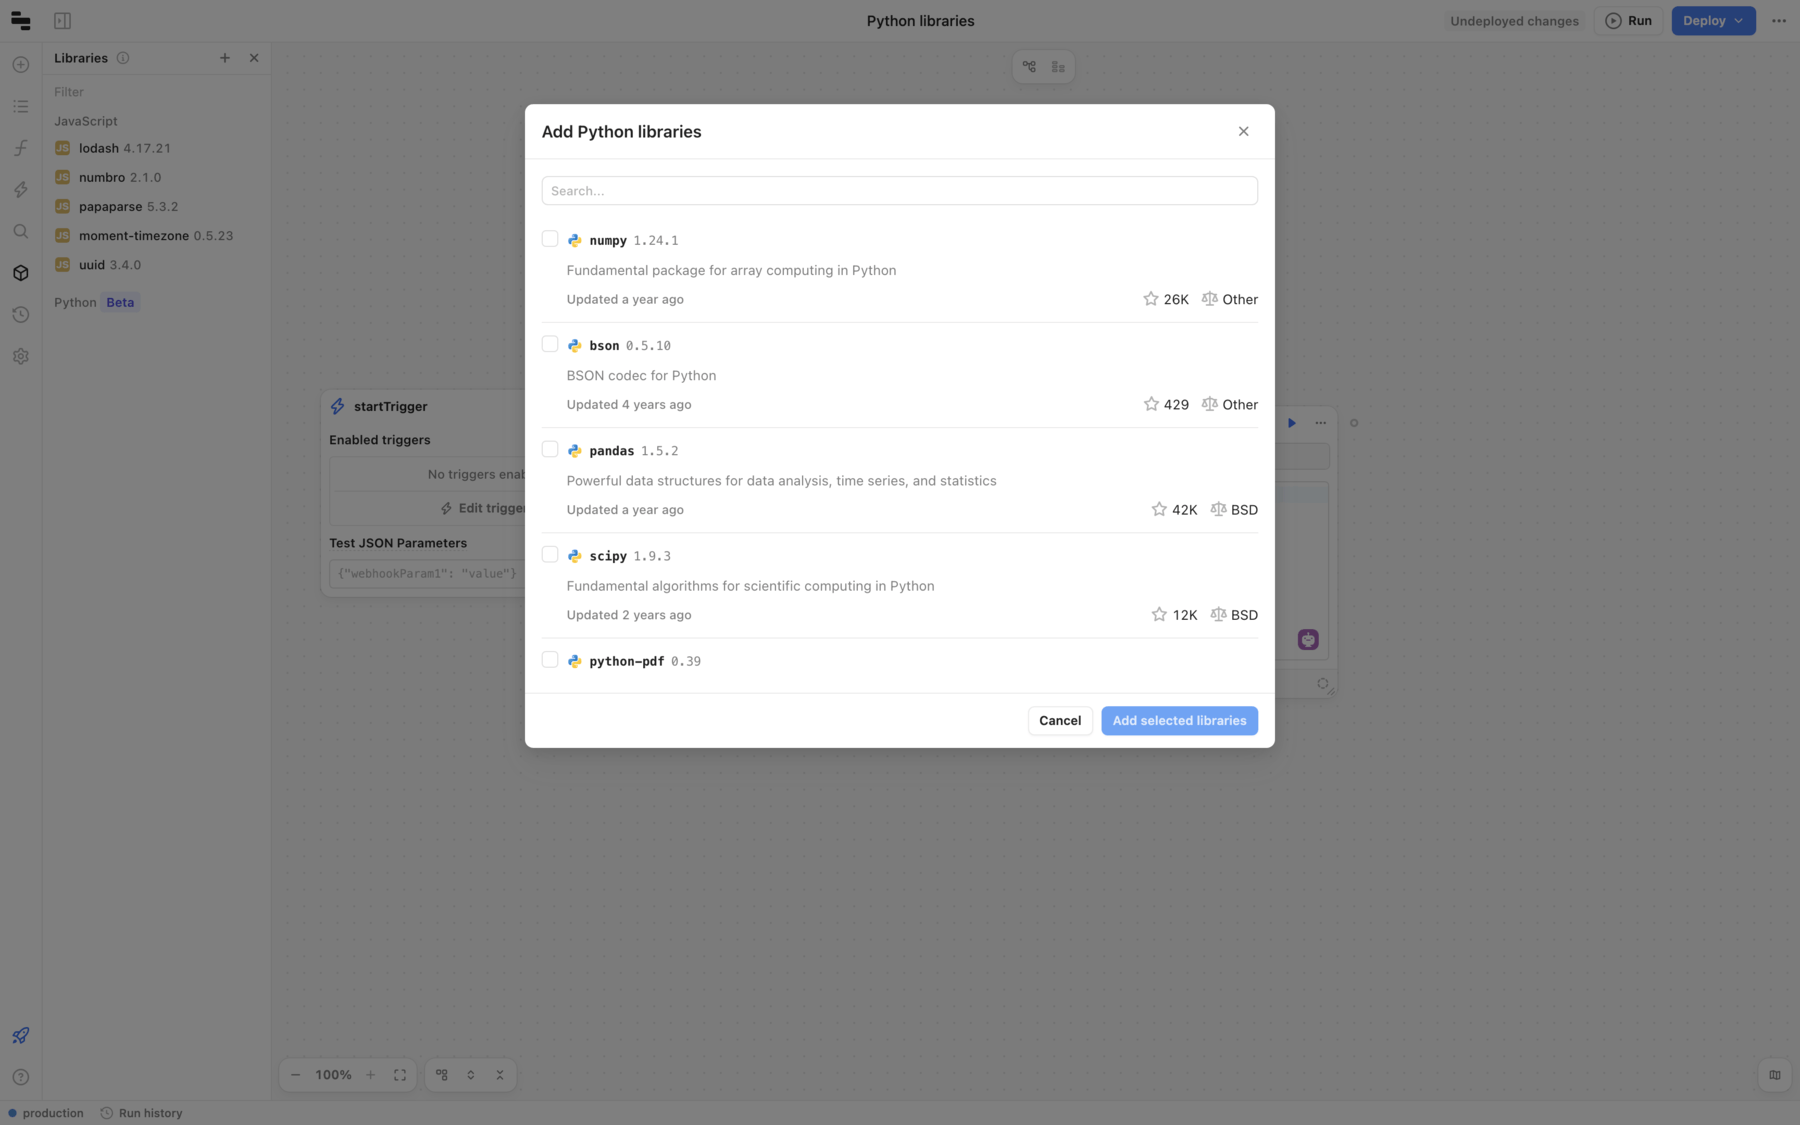
Built-in libraries
Retool also provides a series of built-in libraries, which are third-party libraries that you can import into a workflow.
Built-in libraries are not supported in apps. Use a preloaded library or custom JavaScript instead.
To use a built-in JavaScript library:
- Open the Libraries tab.
- Click +, and click Add JavaScript Library.
- The pop-up window shows the most commonly used libraries, or you can search for the library that you want to include.
- Toggle the checkbox to make it available, and click Add selected libraries when you are done.
Preloaded third-party libraries
Retool automatically imports the following utility libraries for use across Retool. These libraries are available for use in JavaScript queries and within {{ + + }} embedded expressions.
| Name | Alias | Description |
|---|---|---|
| Lodash | _ | A modern JavaScript utility library delivering modularity, performance & extras. |
| Moment.js | moment | Parse, validate, manipulate, and display dates and times. |
| UUID | uuid | Generate and validate RFC-compliant UUIDs. |
| Numbro | numbro | Convert, format, and manipulate numbers. |
| PapaParse | Papa | Parse CSV data, and convert between CSV and JSON. |
| i18next 1 | i18n | Manage the translation of a web application. |
Footnotes
-
Available in web apps only. Not available in workflows or mobile. ↩
Temporary state
Retool apps can temporarily store data using variables, localStorage, or URL query strings.
Variables
Variables can temporarily store data for a user while the app is running. They are accessible anywhere on your app using the value property.
Each variable has an initial value you configure and methods with which to update it. The variable reverts back to the initial value the next time the user opens the app.
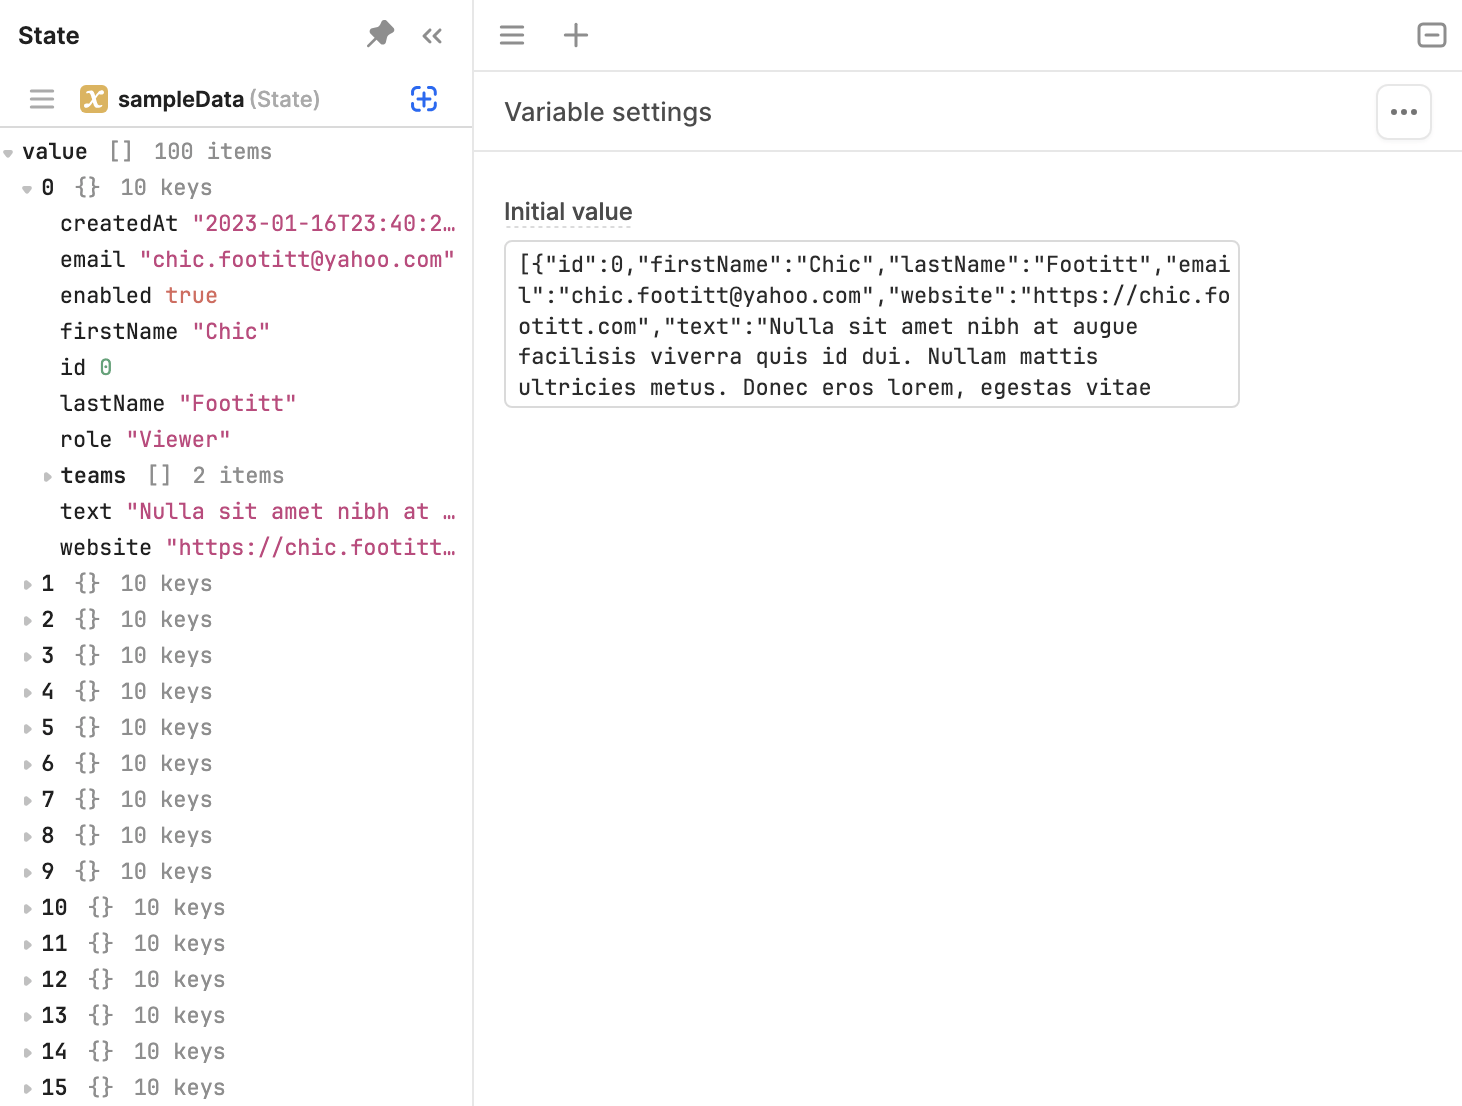
This variable contains an array of objects as its initial value.
localStorage
localStorage is a flexible solution for temporarily storing data locally to the browser. All apps in your Retool organization have the same origin and share access to the browser's localStorage.
Since users can erase their localStorage at any time though or switch to a different browser, localStorage should not be relied upon as a persistent data store.
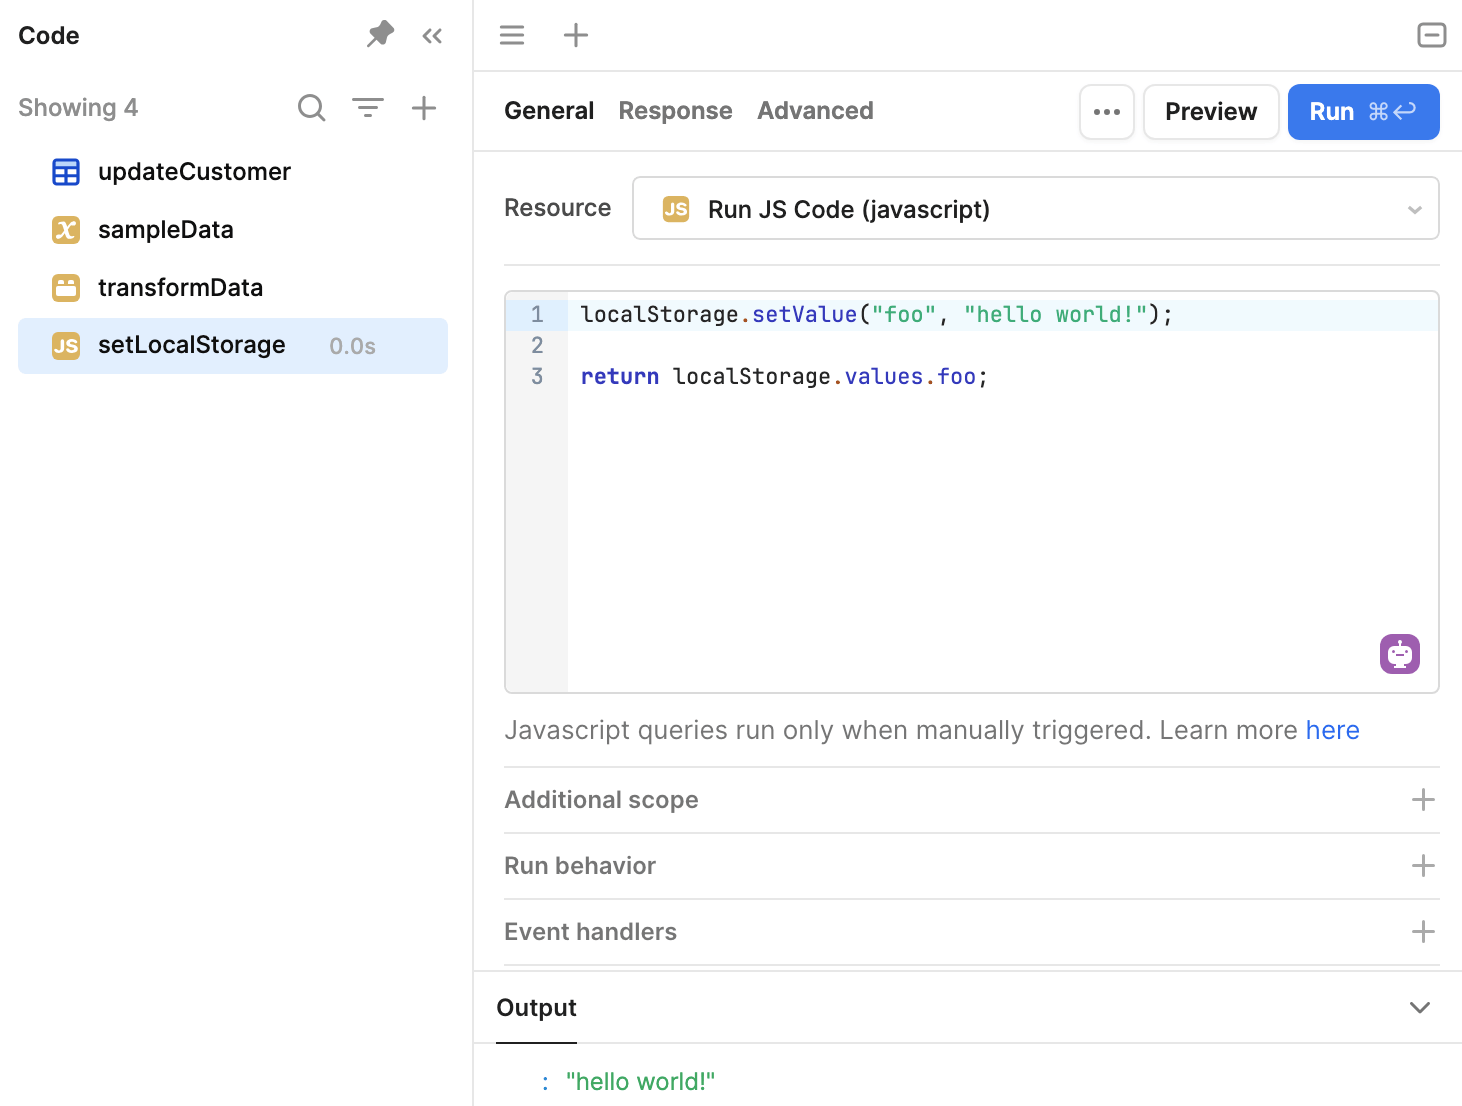
You can store data to the browser's localStorage.
URL query and hash strings
URL query strings are best suited for smaller pieces of information that you need to share between apps. You can append query strings to an app's URL and retrieve them using the url object.
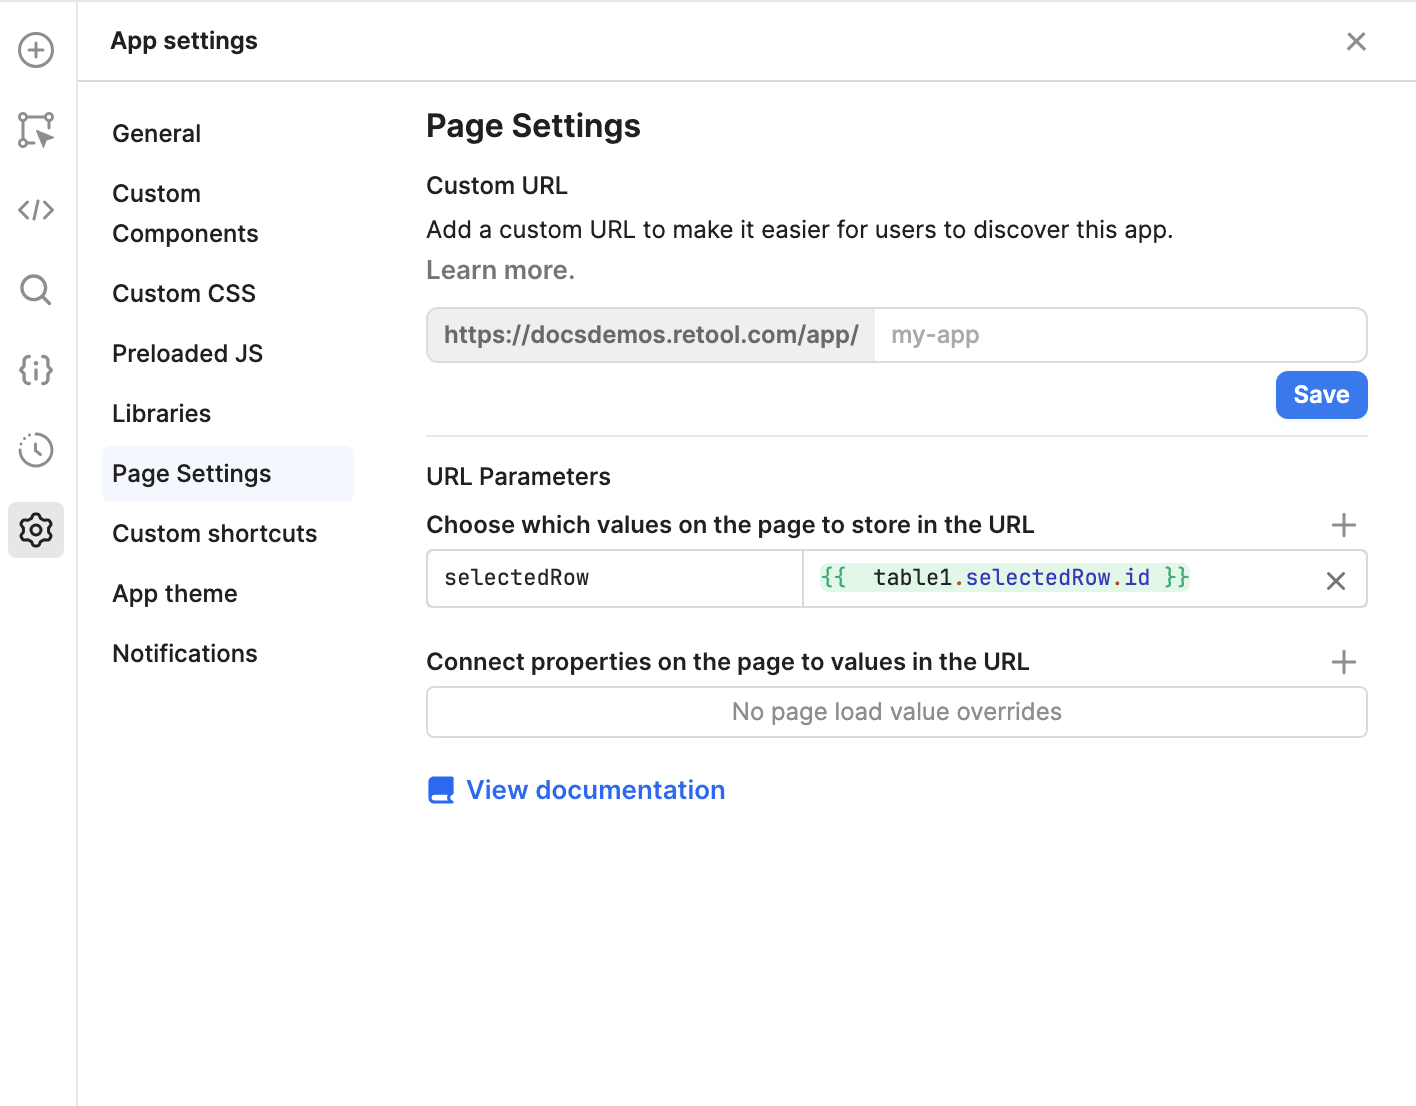
URL query and hash strings can be used to store values or sync state, such as the ID of a selected customer.