Configure SSO with OIDC authentication
Learn how to configure SSO with OpenID Connect (OIDC).
| Single Sign-On (SSO) Availability | |||
|---|---|---|---|
| Cloud | Generally Available | ||
| Self-hosted Edge 3.36 or later | Generally Available | ||
| Self-hosted Stable 3.33 or later | Generally Available | ||
Retool's OpenID integration uses the Authorization Code Flow. Retool, at minimum, expects either an ID token or access token to be a JSON Web Token (JWT) that contains the email of the authenticated user.
Requirements
To configure SSO with OIDC, you need:
- The OAuth client ID for your application
- The OAuth client secret for your application
- A list of scopes to grant to Retool
- The authorization endpoint for your OpenID provider
- The token endpoint for your OpenID provider
If you need RP-initiated logout so users fully sign out of your identity provider (not only Retool), you also need your IdP’s end session (logout) URL.
You should confirm how your SSO provider formats its ID and access tokens. Retool attempts to decode these tokens as JWTs. You must provide Retool the path in the decoded JWT that corresponds with your identifying user information.
Some SSO providers don't return both an ID token and access token by default. You might need to provide additional metadata to obtain both tokens. See the provider-specific guides and generic process to obtain a fat token for more details.
Required settings
Configure your SSO settings in Retool.
When possible, use the Settings UI to configure SSO for a more streamlined setup. Existing environment variables pre-populate in the Settings UI, which you can override or preserve. Some settings are only available as environment variables.
- SSO settings page
- Environment variables
On cloud instances and self-hosted instances on versions 3.16 and later, enter settings on Settings > Single Sign-On (SSO).
| Setting | Example value |
|---|---|
| Client ID | XXXXXXXXXX |
| Client secret | XXXXXXXXXX |
| Scopes | openid email offline_access profile |
| Auth URL | https://yourcompany.idprovider.com/oauth2/v1/authorize |
| Token URL | https://yourcompany.idprovider.com/oauth2/v1/token |
| End session URL | Optional. https://idp.example.com/logoutService |
| Email key | idToken.email |
For self-hosted instances on versions earlier than 3.16, configure the following environment variables on your Retool instance.
| Environment variable | Example |
|---|---|
CUSTOM_OAUTH2_SSO_CLIENT_ID | yypLZ44LxEz0XlQZBu5k2Nq9XsdOv4f5 |
CUSTOM_OAUTH2_SSO_CLIENT_SECRET | xxxxxxxxxxxxxxxxxxxxxxxxxxxxx |
CUSTOM_OAUTH2_SSO_SCOPES | openid email profile offline_access |
CUSTOM_OAUTH2_SSO_AUTH_URL | https://retool.auth0.com/authorize |
CUSTOM_OAUTH2_SSO_TOKEN_URL | https://retool.auth0.com/oauth/token |
CUSTOM_OAUTH2_SSO_END_SESSION_URL | Optional. https://idp.example.com/logoutService |
CUSTOM_OAUTH2_SSO_JWT_EMAIL_KEY | idToken.email |
CUSTOM_OAUTH2_SSO_JWT_FIRST_NAME_KEY | idToken.given_name |
CUSTOM_OAUTH2_SSO_JWT_LAST_NAME_KEY | idToken.family_name |
On self-hosted instances, you should also set the BASE_DOMAIN environment variable to ensure links using your domain—for example, new user invitations and forgotten password resets—are correct. Retool's backend tries to determine the BASE_DOMAIN if it is not set, but it can be incorrect if your website uses a proxy.
BASE_DOMAIN=https://retool.yourcompany.com
Configure SSO for your provider
Follow the configuration guides to set up SSO with OIDC for Auth0, Google, Okta, or Microsoft Entra ID.
Role mapping
Role mapping modify group memberships on subsequent logins. During initial configuration, test role mapping on a non-admin user or verify that a separate admin can log in with an alternate authentication method to avoid losing admin access.
You can also map the roles returned from the OpenID response to your Retool permission groups. Any Retool groups that are not specified in the role mapping are overwritten. Groups are created automatically in Retool when a user logs in.
The following example maps the devops and support roles to specific Retool permission groups.
| Setting | Environment variable | Example value |
|---|---|---|
| Roles key | CUSTOM_OAUTH2_SSO_JWT_ROLES_KEY | idToken.groups |
| Role mapping | CUSTOM_OAUTH2_SSO_ROLE_MAPPING | devops -> admin, support -> viewer |
After setting these environment variables, a user's groups sync the next time they log in to Retool over SSO.
Roles set using this environment variable are case sensitive. This means:
- Roles set within your IdP that you pass within the variable need to match exactly. For example, if you have a
Retool Adminrole in your IdP, you need to passRetool Admin. - Roles within Retool are always lowercase. For example, if you have a
Retool Adminrole within your IdP, and you want to map it to Retool'sadminrole, you need to set it usingRetool Admin → admin.
To disable role mapping, set CUSTOM_OAUTH2_SSO_ROLE_MAPPING_DISABLED to true.
Examples
| Roles | Role mapping setting | Result |
|---|---|---|
| ["admin", "editor"] | "" | The user is added to the "admin", "editor", and "All Users" groups. |
| [] | "" | The user is added to the "All Users" group. |
| ["admin", "support"] | "" | A new custom group called "support" is created. The user is added to the "admin", "support", and "All Users" groups. |
| ["support", "devops"] | "devops -> editor" | A new custom group called "support" is created. The user is added to the "editor", "support", and "All Users" groups. |
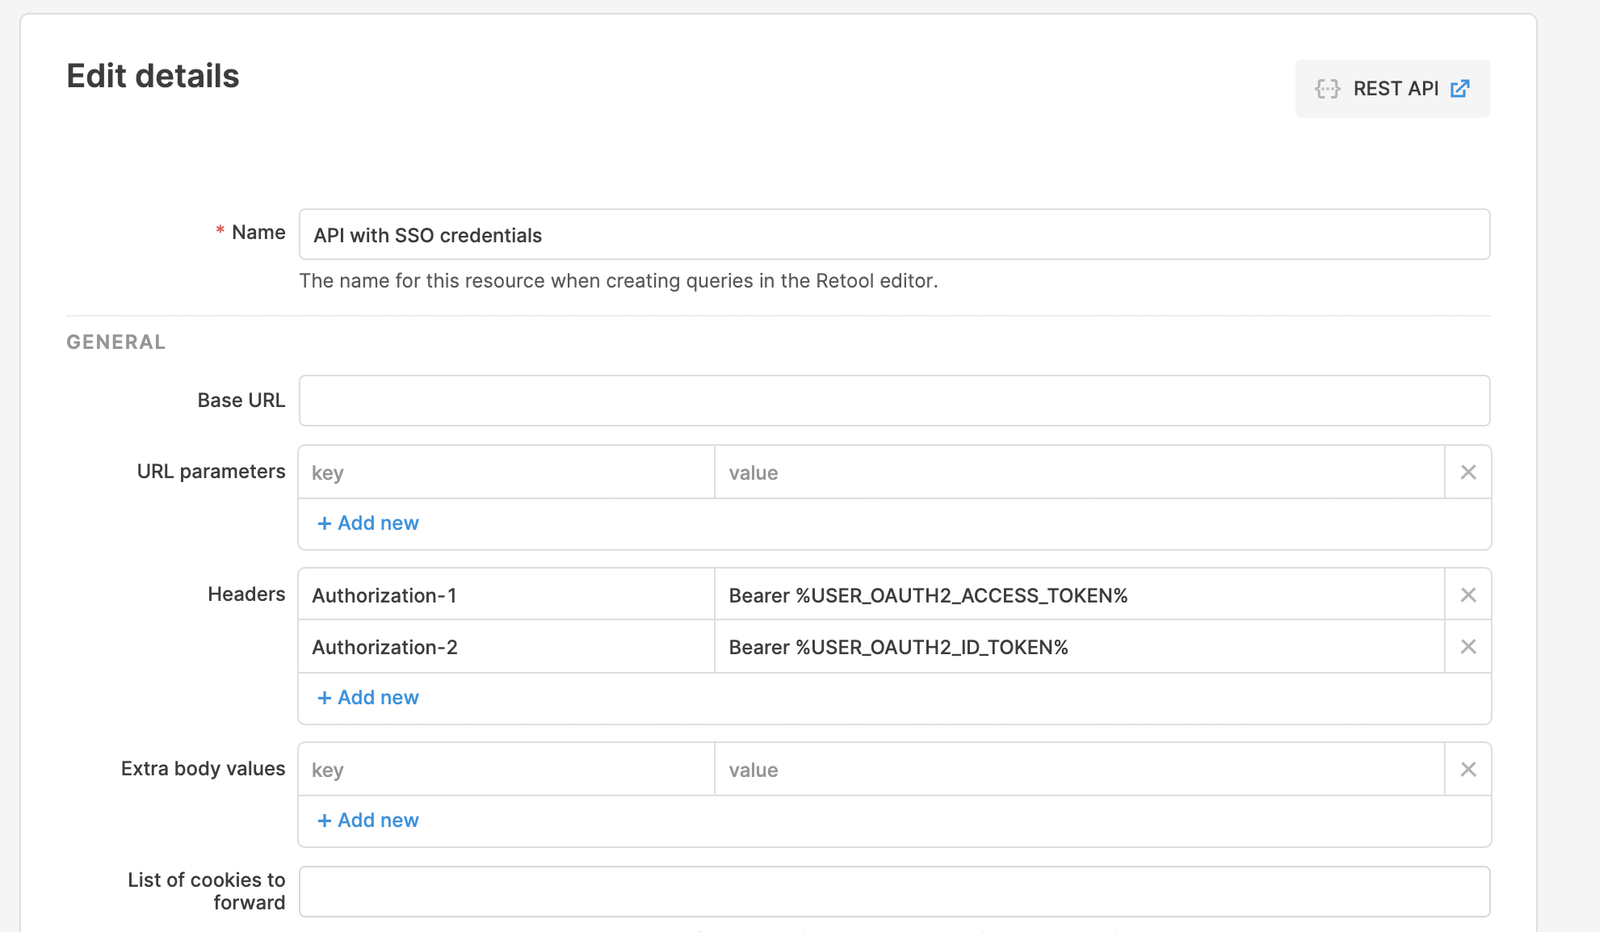
Use authentication JWTs in resources
Using SSO with OIDC, you can reuse the tokens obtained throughout the SSO process in API calls you make from Retool to your backend services.
In the following example, USER_OAUTH2_ACCESS_TOKEN is replaced with the access token obtained in the auth flow, and USER_OAUTH2_ID_TOKEN is replaced with the ID token obtained in the auth flow.
If your OpenID Provider returned a refresh token in the initial login flow, Retool automatically uses it to refresh the access and ID tokens every two hours by default. You can set a custom refresh time using the CUSTOM_OAUTH2_SSO_ACCESS_TOKEN_LIFESPAN_MINUTES environment variable.
Reference JWT claims in Retool apps
You can use JWT claims returned by your SSO provider to personalize Retool apps or control component permissions. Retool automatically includes these claims as the values of the current_user.metadata.idToken and current_user.metadata.accessToken keys. Access them using curly braces anywhere in your Retool app: {{current_user.metadata.idToken.picture}}
Custom claims
You can add custom claims following instructions from your IdP. See the guides to your IdP for instructions on where to add these claims. In Retool, custom claims are accessible in current_user.metadata.
Thin tokens and fat tokens
Some OIDC identity providers, such as Okta, don't send all the claims associated with a user during the authentication flow. This is called a thin token and is used in place of a fat token, which returns all claims, for performance reasons. If your ID token is missing certain claims, you can tell Retool to make an additional request to a given endpoint for the fat token.
You can configure this endpoint in Settings > Custom SSO > Fat token URL on cloud instances, or using the CUSTOM_OAUTH2_SSO_USERINFO_URL environment variable on self-hosted instances. For example, Okta uses the /userinfo endpoint.
CUSTOM_OAUTH2_SSO_USERINFO_URL=https://your-company.okta.com/oauth2/v1/userinfo
During the authentication flow, Retool replaces the thin token with the fat token returned from this endpoint.
RP-initiated logout
Signing out in Retool (for example with Go to URL to {your-domain}/logout) ends the Retool session. Some identity providers keep the user signed in at the IdP, so the next visit to Retool can sign them back in without a password. However, some IdPs expect RP-initiated logout. Use the following sections to configure RP-initiated logout.
Configure the end session URL
Set your IdP’s end session endpoint so Retool can build the logout URL:
- Cloud and self-hosted (SSO UI): Navigate to Settings > Single Sign-On (SSO) and locate the End session URL.
- Self-hosted (environment variable):
CUSTOM_OAUTH2_SSO_END_SESSION_URL
Log out via the Retool API
Enterprise users can use the Log out user endpoint of the Retool API to request a RP-initiated logout.
Each successful call is recorded in the audit log as FORCE_LOGOUT.
Test the connection
Once you've configured your settings, click Save Changes. To test the integration and its settings, click the Test Connection button.
This triggers a simulation of the SSO flow that ensures that the proper groups are mapped, the right user metadata is sent from your identity provider, and the integration works seamlessly. Clicking the Test Connection button does not change the current user's permission groups, and you won't be locked out if SSO is misconfigured.
After Retool tests the connection, a new tab opens and displays the Connection Status, Issues Detected, and Connection Details. If there are any issues, this page displays warnings and recommendations to resolve them. You can see the full response from the SSO provider in the Connection Details section.
Once you are satisfied with your configuration, log out of Retool and log back in using SSO to test the flow yourself.
If you use a self-hosted instance and updated your environment variables, restart your Retool instance.