Embed classic apps
Learn how to embed classic apps with optional authentication.
You can embed your classic apps within your existing web-based applications, such as an internal metrics dashboard or customer support tool. Retool provides React and JavaScript SDKs to make the process seamless, and lets you authenticate users in a variety of ways to make sure access to data is secure.
By default, users of embedded apps are billed as internal users. If external apps are enabled in your organization, users of embedded apps are billed as external users if their email falls outside of the internal domain list. Learn more about external users.
Prerequisites
Follow these recommendations to ensure a seamless experience.
Use the same domain
Use the same top-level domain for your Retool organization as the parent app in which you want to embed. For example, retool.example.com and app.example.com.
- Cloud instances: Refer to the custom domain guide for instructions on configuring DNS settings.
- Self-hosted instances: Refer to your cloud provider for instructions on configuring your domain, if necessary.
Use HTTPS for embed URLs
If you intend to use custom authentication with Retool API, ensure that all URLs use HTTPS.
Install an SDK
You can embed classic apps using Retool's React or JavaScript SDKs.
- React
- JavaScript
The following example demonstrates embedding a classic app using the React SDK. It includes some additional data that is passed to the embedded app.
import React from 'react';
import Retool from "react-retool";

const sampleData = { name: 'Sample data' }
const url = 'your_app_url'

const App = () => {
  return
  <>
    <Retool
      url={url}
      data={sampleData}
      onData={(data) => mockFunction(data)}
    />
  <>
}
See the react-retool documentation for more information.
After including the JavaScript SDK library, you initialize an instance of your classic app and embed it at the specified location using the createRetoolEmbed() function.
const container = document.createElement('div')

app.appendChild(container)

const sampleData = { name: 'Sample data' }
const url = '<your_app_url>'

embeddedRetool = createRetoolEmbed({
  src: url,
  data: sampleData,
  onData: (data) => {
      mockFunction(data)
  }
});

container.appendChild(embeddedRetool)
Pass data between embedded and parent apps
Embedded classic apps can use the data property and Parent Window queries to read values from the parent application. They can also use JavaScript queries to pass data back to the parent app using the browser's postMessage API.
Pass data to an embedded app
Data you pass using the data property is made available to the embedded app using Parent Window queries. You add this query to your embedded app and reference the data key in the Selector field. If you aren't using either the React or JavaScript SDK, the selector can be a CSS property.
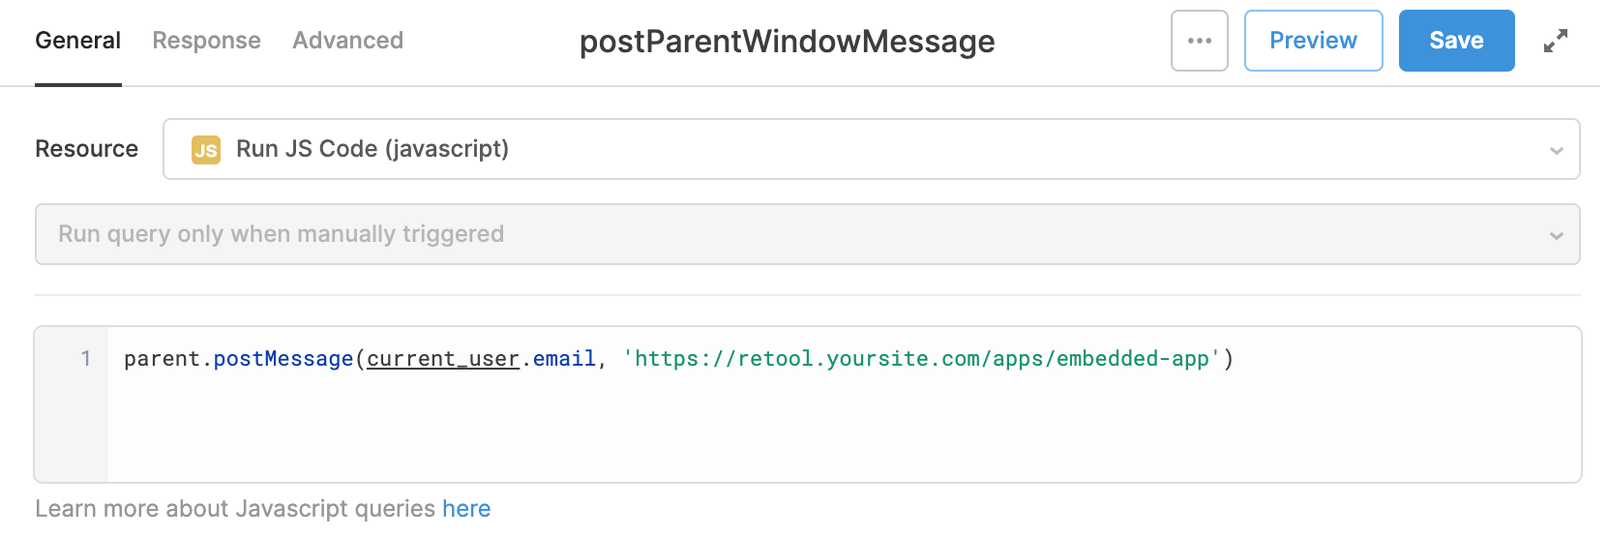
Pass data to the parent app
To pass data to the parent app, add a JavaScript query and use the postMessage API to send the data. For example, a query that sends the email address of the current_user to the parent app might look like this.
On the parent application side, write a JavaScript statement to listen and handle these messages. The following example uses window.addEventListener() to log the received message to the console.
window.addEventListener(
  "message",
  function (e) {
    console.log("Parent window received: ", e.data);
  },
  false,
);
The code to handle postMessage requests depends on your specific implementation.
Authenticate users in embedded apps
Users within your Retool organization sign in to an embedded app as they would when accessing the classic app normally. If you currently use Retool authentication (i.e., you manage users directly in Retool), this can result in users needing to sign in to both the parent app and then Retool.
To avoid this double-authentication flow, you can implement SSO using a supported identity provider or a custom authentication flow using Retool API.
SSO
If your parent application uses SSO with an identity provider (idP) that Retool supports, configuring your Retool organization to use the same idP will allow users to seamlessly authenticate with embedded apps. Since authentication is handled by the idP, both the parent application and Retool organization share the same authentication state.
You can also map groups and roles from your idP into Retool to centralize user management. An added benefit of this approach is that all of your users can also sign into the Retool organization on the web using SSO.
Certain Identity Providers like Okta prevent embedding of third-party applications. You may need to add the domain on which you're hosting Retool as a trusted origin.
Automatically sign in users
You can configure Retool to automatically sign users in without showing the login screen. This occurs whenever a user has an existing, authenticated session on the IdP.
To configure this, navigate to your organization's Single Sign-On settings and enable Trigger Login Automatically. Self-hosted instances can also configure this by setting one of the following environment variables to true in the docker.env file.
- SAML:
TRIGGER_SAML_LOGIN_AUTOMATICALLY - OIDC:
TRIGGER_OAUTH_2_SSO_LOGIN_AUTOMATICALLY
Custom authentication with Retool API
Available on a Business or an Enterprise plan only.
If your parent application uses a different authentication method, such as username and password, you can integrate custom authentication using the Retool API. When a user successfully authenticates, your backend makes an API request to Retool that generates a secure, single-use URL. Opening this URL then authenticates the user without the need for them to sign in again.
To perform custom authentication with Retool API, you need to:
- Generate an access token so you can create sessions for embedding classic apps.
- Create permission groups for your users so you can give them access to apps.
- Create an embed URL to use when embedding apps into your parent app.
- Use the embed URL to display the app.
The process to generate the URL happens between your app's and Retool's backend.
Authentication flow
When your web application authenticates a user, using your preferred authentication method, your backend must make a request to Retool to generate an embed URL. This embed URL is a secure, single-use link that can be used anywhere in your product. To generate and use the embed URL to securely embed apps inside your other app, you need to make some small updates to the frontend and backend parts of your codebase. The following diagram illustrates the authentication flow.
See the GitHub repository for a live demo.
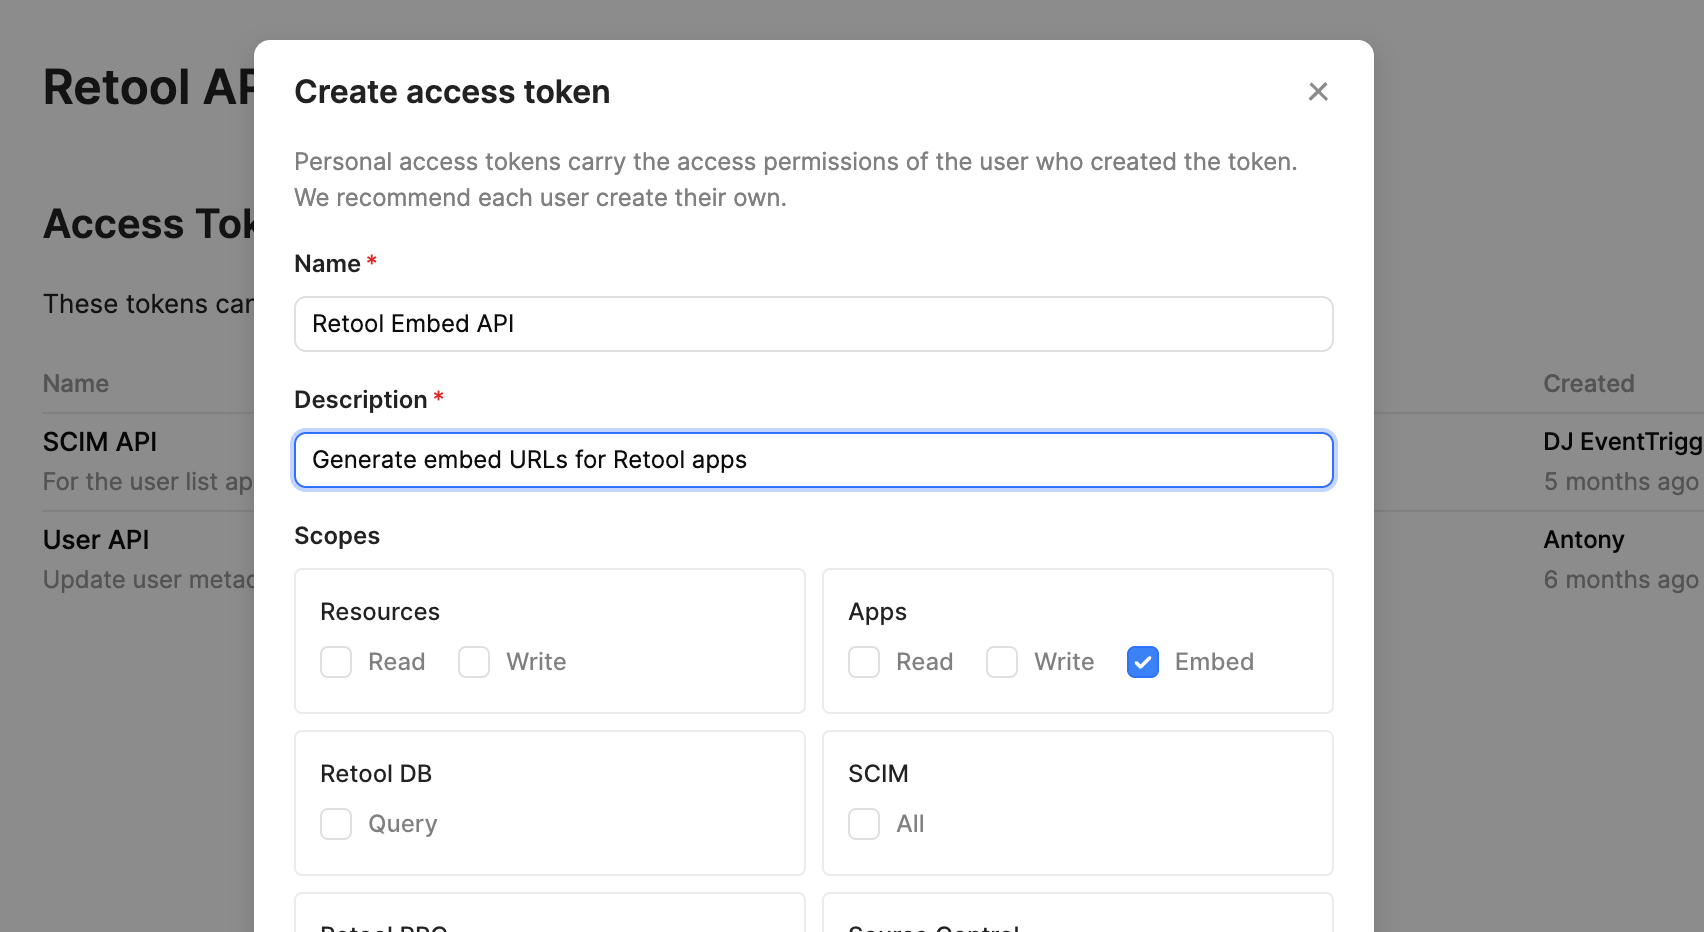
1. Generate an access token
To embed classic apps, you need to create an access token with the Embed scope. This token allows you to create sessions for embedding apps.
You can create API tokens with the Embed scope in the API settings for your organization.
- Go to Settings > Retool API and click Create new to generate an access token.
- Enter a name and description, then select the required scopes.
- Copy and save your token, as you can only access it once.
2. Create permission groups for your users
Permission groups determine the classic apps users can access. Depending on your use case, you might need to create more than one permission group.
To create a permission group:
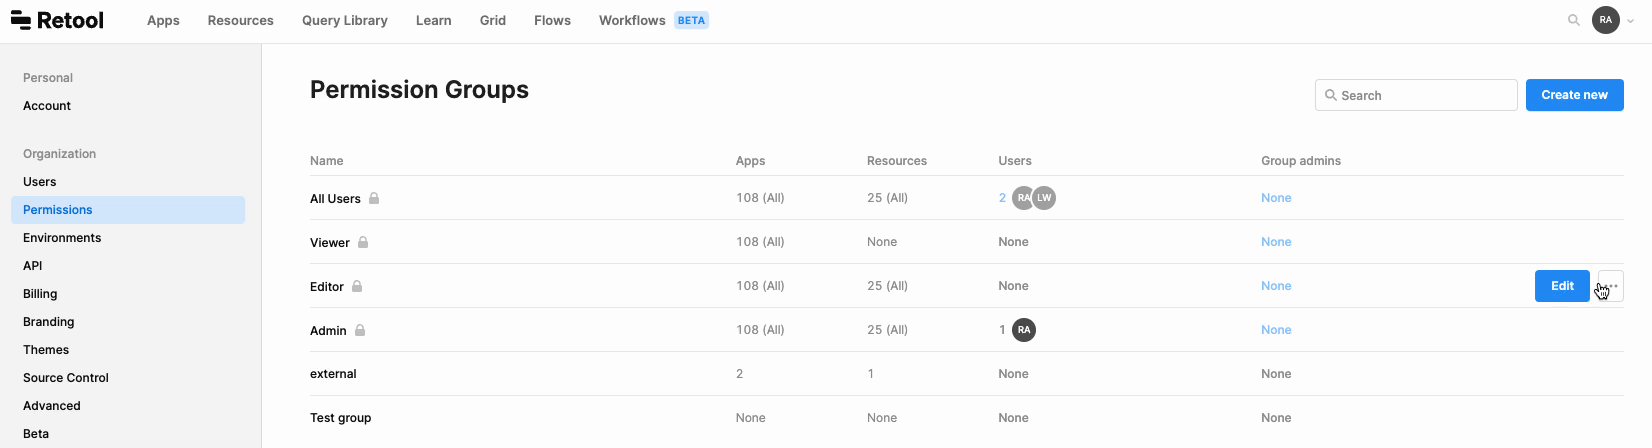
- Navigate to the Permission Groups page at
/settings/permissions. - Click Create new in the top right and complete the form to create a group.
- Optionally add internal users on the Members tab by clicking + Add new members. External users are added later, in the POST request to your embed URL.
- On the Classic apps tab, enable Use access to the classic apps you want users to have access to.
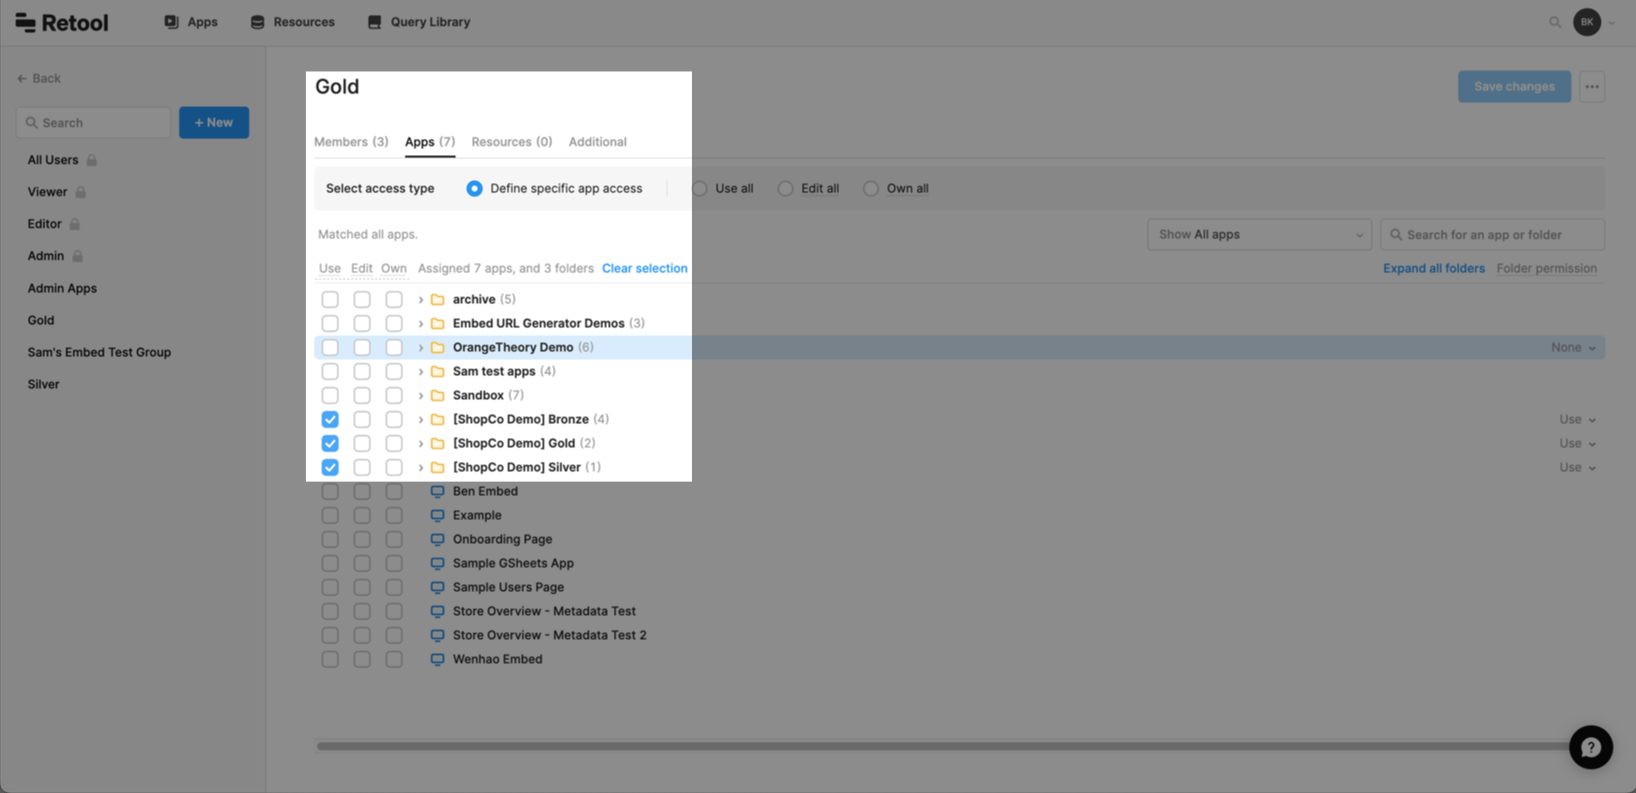
Make sure to note down the group IDs you want to give access to. You can find a group's ID by hovering over the group, clicking the ••• menu, and then selecting Copy group ID.
3. Create an embed URL
The embed URL is a single-use link to a classic app for an authenticated user. Your backend sends a POST request to /api/embed-url/external-user with a few parameters, and Retool returns the URL. This URL is then used by your frontend to display the classic app.
The table below outlines the parameters you can send, and whether they're required.
| Parameter | Required | Description |
|---|---|---|
landingPageUuid | Yes | A string to specify the page in the classic app to render. You can find the landingPageUuid by opening the classic app and using the Command Palette (opened with ctrl k) to select Copy classic app UUID. |
groupIds | Yes | An array of integers specifying the Retool group IDs to allow. Retool ignores the organization’s default admin group for this request, so the user isn’t added to it. |
sessionDurationMinutes | No | The session token's duration, in minutes. If unset, defaults to 1440 (1 day). Values from 10 to 43200 (30 days) are accepted. |
externalIdentifier | Yes | A string or integer unique identifier for the external user. If the user's email is to be used, it must match what is passed in userInfo.email. |
userInfo | No | User profile information, necessary to leverage user fields in classic apps such as {current_user.email}. Can contain string fields for email, firstName, and lastName. If email matches an existing Retool user, the same account will be used. |
metadata | No | An object with additional metadata. Can be at most 1KB of JSON. |
environment | No | A string to specify an environment for the classic app to run in. |
branch | No | A string to specify a branch to be displayed. You can't display both releaseVersion and branch. |
releaseVersion | No | A string to specify a release to be displayed. Defaults to latest but you can pass version numbers too (e.g.,1.0.0). You can't display both releaseVersion and branch. |
POST request examples
Below are a few example POST requests. Because frameworks vary, only cURL and Python examples are provided.
You need to replace APP_UUID, GROUP_IDs, and UUID in the cURL example for it to work. See the request parameters section for more information.
- cURL
- Python
- JavaScript
// Replace APP_UUID, GROUP_IDs, UUID with
curl -X POST "https://retool.example.com/api/embed-url/external-user" \
  -H "Authorization: Bearer retool_01hn417x8zsaqfye58r995re18" \
  -H "Content-Type: application/json" \
  -d  '{ "landingPageUuid": APP_UUID, "groupIds": GROUP_IDs, "externalIdentifier": UUID}'
This example accepts a request from the client, builds and sends a POST request to /api/embed-url/external-user, receives the embed URL, and returns the URL to the client.
@app.route('/embedUrl', methods=['POST'])
def embed_url():
  data = request.get_json()
  app_uuid = app_name_to_uuid[data['retoolAppName']]

  # userJwt is an example variable that the frontend could pass to your backend and is not required
  token, first_name, last_name, email = jwt.decode(data['userJwt'], secret_key)

  headers = {
    // The RETOOL_API_KEY is the token generated in the first step
    'Authorization': f"Bearer {os.environ['RETOOL_API_KEY']}",
    'Content-type': 'application/json',
  }
  body = {
    'landingPageUuid': app_uuid,
    'groupIds': [12, 13],
    'externalIdentifier': token,
    'userInfo': {
      'firstName': first_name,
      'lastName': last_name,
      'email': email,
    },
    'metadata': {
      'storeId': 5
    }
  }

  options = {
    'method': 'POST',
    'headers': headers,
    'body': json.dumps(body),
  }

  resp = requests.post(f"https://{os.environ['RETOOL_URL']}/api/embed-url/external-user", **options)
  if resp.ok:
    return resp.json()
  else:
    # Handle error
    pass
router.post('/embedUrl', async (req, res) => {
  const data = req.body;
  const app_uuid = app_name_to_uuid[data.retoolAppName];

  // userJwt is an example variable that the frontend could pass to your backend and is not required
  const secret_key = process.env.SECRET_KEY;
  const decoded = jwt.decode(data.userJwt, secret_key);
  const { token, firstName, lastName, email } = decoded;

  const headers = {
    'Authorization': `Bearer ${process.env.RETOOL_API_KEY}`,
    'Content-type': 'application/json',
  };

  const body = {
    'landingPageUuid': app_uuid,
    'groupIds': [12, 13],
    'externalIdentifier': token,
    'userInfo': {
      'firstName': firstName,
      'lastName': lastName,
      'email': email,
    },
    'metadata': {
      'storeId': 5
    }
  };

  try {
    const response = await fetch(`https://${process.env.RETOOL_URL}/api/embed-url/external-user`, {
      method: 'POST',
      headers: headers,
      body: JSON.stringify(body),
    });

    if (!response.ok) throw new Error('Response not OK');

    const jsonResponse = await response.json();
    res.json(jsonResponse);
  } catch (error) {
    res.status(500).json({ error: error.message });
  }
});
If you need to make sure users can only see data specific to them, see the Control access and classic app behavior with metadata section.
4. Use the embed URL to display the classic app
On your frontend, use the Retool React component or the Retool Embed SDK to render the embed URL. Below is a sample request your frontend would make to your backend.
- React
- JavaScript
const RetoolWrapper = ({ retoolAppName, userJwt }) => {
  const [retoolEmbedUrl, setRetoolEmbedUrl] = useState("");

  useEffect(() => {
    const options = {
      method: "POST",
      headers: { "Content-Type": "application/json" },
      body: JSON.stringify({ userJwt, retoolAppName }),
    };
    fetch("/api/embedUrl", options)
      .then((res) => res.json())
      .then((data) => {
        setRetoolEmbedUrl(data.embedUrl);
      });
  }, [retoolAppName]);

  return (
    retoolEmbedUrl && (
      <Container maxWidth={false} disableGutters>
        <Retool url={retoolEmbedUrl} />
      </Container>
    )
  );
};
const container = document.createElement('div')
app.appendChild(container)

const getEmbedUrl = async () => {...}

getEmbedUrl().then((retoolEmbedUrl) => {
    embeddedRetool = createRetoolEmbed({
        src: retoolEmbedUrl,
        style: "border: 1px solid blue; height: 100%; width: 100%;",
        data: {dataValue: false},
        onData: (data) => {
            mockFunction(data)
        }
    });
    container.appendChild(embeddedRetool)
});
6. Control data access with metadata
You can pass information in the metadata object to dynamically control the data users see and behavior within an application. These variables are added to the current_user.metadata object when the embed URL is generated.
Because Prevent Query Spoofing is turned on, the metadata associated with the current user cannot be spoofed. Retool will reject any requests if a bad actor alters any metadata values passed in via the POST request above.
7. Testing
When generating the embed URL, Retool may create an additional user depending on the data that is passed into your POST request.
To avoid creating an extra user while testing, pass in the email associated with your Retool account in the email property of the userInfo object, as well as the IDs of the permission groups you’re in.
If an email is specified and it matches that of an existing Retool user, Retool will update the user, its metadata, and permission groups. Otherwise it will create a new user if this email does not exist.
If no email is specified, Retool updates the user if the externalIdentifier matches, or creates a new user if the externalIdentifier does not exist.
Embed classic apps as an IFRAME
If you cannot use an SDK to embed classic apps, you can still embed a classic app as an IFRAME. You can do this with an embed code, or with a public link.
- Embed code
- Public link
This method lacks some of the features available in the SDK but can allow users to authenticate by signing in.
- Make sure that your classic app is published, and not in your Drafts folder.
- Open your classic app, and click Share.
- Click Copy embed code.
If you don't need to add authentication because your classic apps do not surface user-specific data, you can enable public links. You can share this link directly with users or embed the classic app in other classic apps. These classic apps can be accessed by anyone on the internet and always reflect the production environment of the classic app.
Public links to classic apps are available on Team, Business, and Enterprise plans. If you self-host Retool, reach out to your account manager or the support team and request access to public links.
To generate a public link, complete the following steps:
- Make sure that your app is published, and not in your Drafts folder.
- Open your app, and click Share.
- Click Copy link.
To turn off public links, click Public in the Manage access section, and change access to your organization only.