Salesforce query tutorial
Learn how to read and write data to Salesforce.
You're viewing documentation for classic apps, which use Retool's original app editor. The new app builder is the recommended way to build apps and where Retool focuses new development.
After setting up a Salesforce integration with Retool, your Salesforce resource is available to use in the query editor. You can then configure a query using the Salesforce Object Query Language (SOQL) or other query types to retrieve and modify data from Salesforce.
Create a query
- Classic app
- Workflow or agent
Retool recommends using the new app builder so you can use natural language to build React-based apps using AI.
To create a Salesforce query in a Retool app:
- In the Retool app IDE, open the Code tab, then click + in the page or global scope.
- Select Resource query.
- Choose your Salesforce resource.
- Select the query type and configure parameters.
Workflows and agent custom tools use the same Resource query block to query Salesforce.
- Add a Resource query block to your workflow or custom tool's function canvas.
- Choose your Salesforce resource.
- Select the query type and configure parameters.
Custom tools use the same block-based canvas as workflows, so the steps are identical in either context.
Query types
Under Query types, choose the method to use to query Salesforce. SOQL queries are often used to read data, and CRUD operations and Bulk operations are often used to write data. Apex REST calls custom business logic that isn't covered by the other query types.
SOQL queries
Select SOQL query to construct queries using Salesforce Object Query Language (SOQL) syntax.
For example, the following query retrieves opportunities marked "Closed Won" within the last month.
SELECT Id, Name
FROM Opportunity
WHERE StageName = 'Closed Won' and CloseDate >= {{ moment().format('YYYY-MM-01') }}
Use embedded expressions to make a query dynamic:
SELECT Id, Name, Email, Status
FROM Lead
WHERE Status = {{ statusSelect.value }}
  AND Email LIKE {{ '%' + searchInput.value + '%' }}
ORDER BY CreatedDate DESC
CRUD operations
The CRUD Action query type supports Retrieve, Create, Update, Delete, and Upsert operations. Refer to the Salesforce Object Reference for a list of standard objects.
Object type
The Salesforce object type to operate on (e.g., Account, Contact, Opportunity, or custom objects like Custom_Object__c).
// Standard objects
Account
Contact
Lead
Opportunity

// Custom objects (end with __c)
Custom_Product__c
Record ID
Required for Retrieve, Update, and Delete. The Salesforce record ID to retrieve, update, or delete. Salesforce IDs are 15 or 18 characters.
// Static ID
001xx000003DGb2AAG

// Dynamic from table selection
{{ table1.selectedRow.data.Id }}
Record data
Required for Create, Update, and Upsert. The field values to create or update, provided as a JavaScript object with field names and values.
{
  "Name": {{ nameInput.value }},
  "Email": {{ emailInput.value }},
  "Phone": {{ phoneInput.value }},
  "AccountId": {{ accountSelect.value }},
  "LeadSource": "Website"
}
Apex REST
Select Apex REST to call a custom Apex REST endpoint for business logic that isn't covered by SOQL or CRUD operations.
Apex endpoint
The custom Apex REST endpoint path. Include the path after /services/apexrest/.
// Apex REST endpoint
/CustomEndpoint

// With path parameters
/CustomEndpoint/{{ recordId.value }}
Bulk operations
Using the Bulk load query type, Retool supports Bulk Insert, Bulk Update, Bulk Upsert, and Bulk Delete operations.
Object type
The Salesforce object type to perform bulk operations on.
Operation
The bulk operation type (create, update, upsert, or delete).
Records
An array of records to process in the bulk operation, provided as a JavaScript array of objects.
{{
  fileInput1.parsedValue.map(row => ({
    Email: row.Email,
    FirstName: row.FirstName,
    LastName: row.LastName,
    Phone: row.Phone
  }))
}}
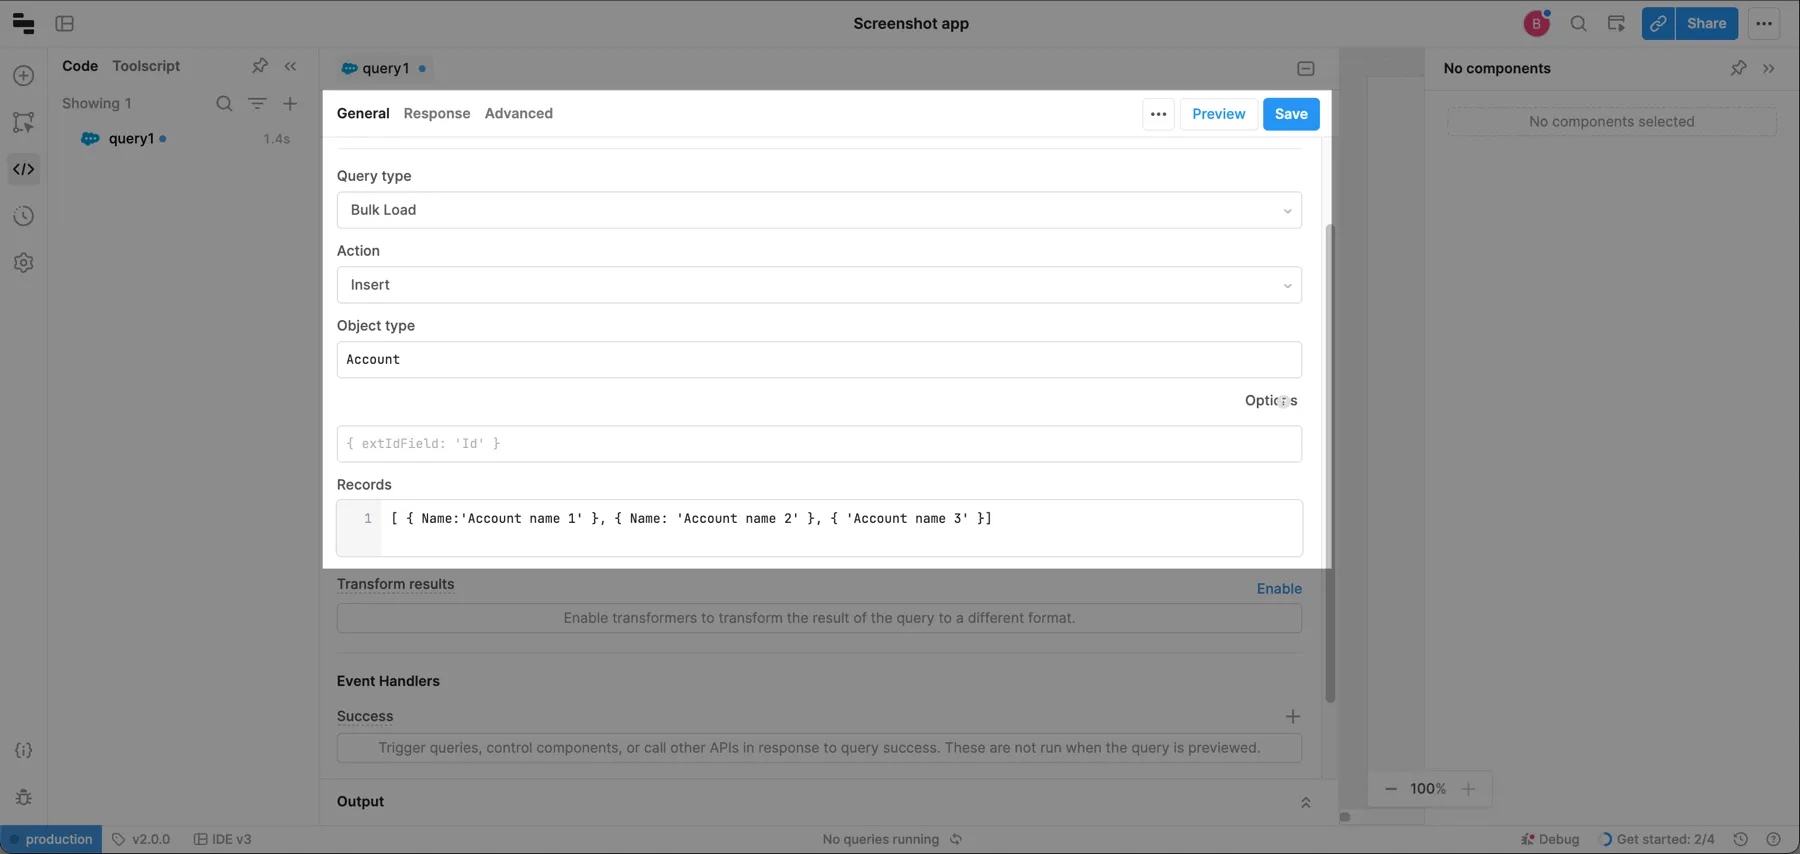
For example, the following query inserts Account objects.
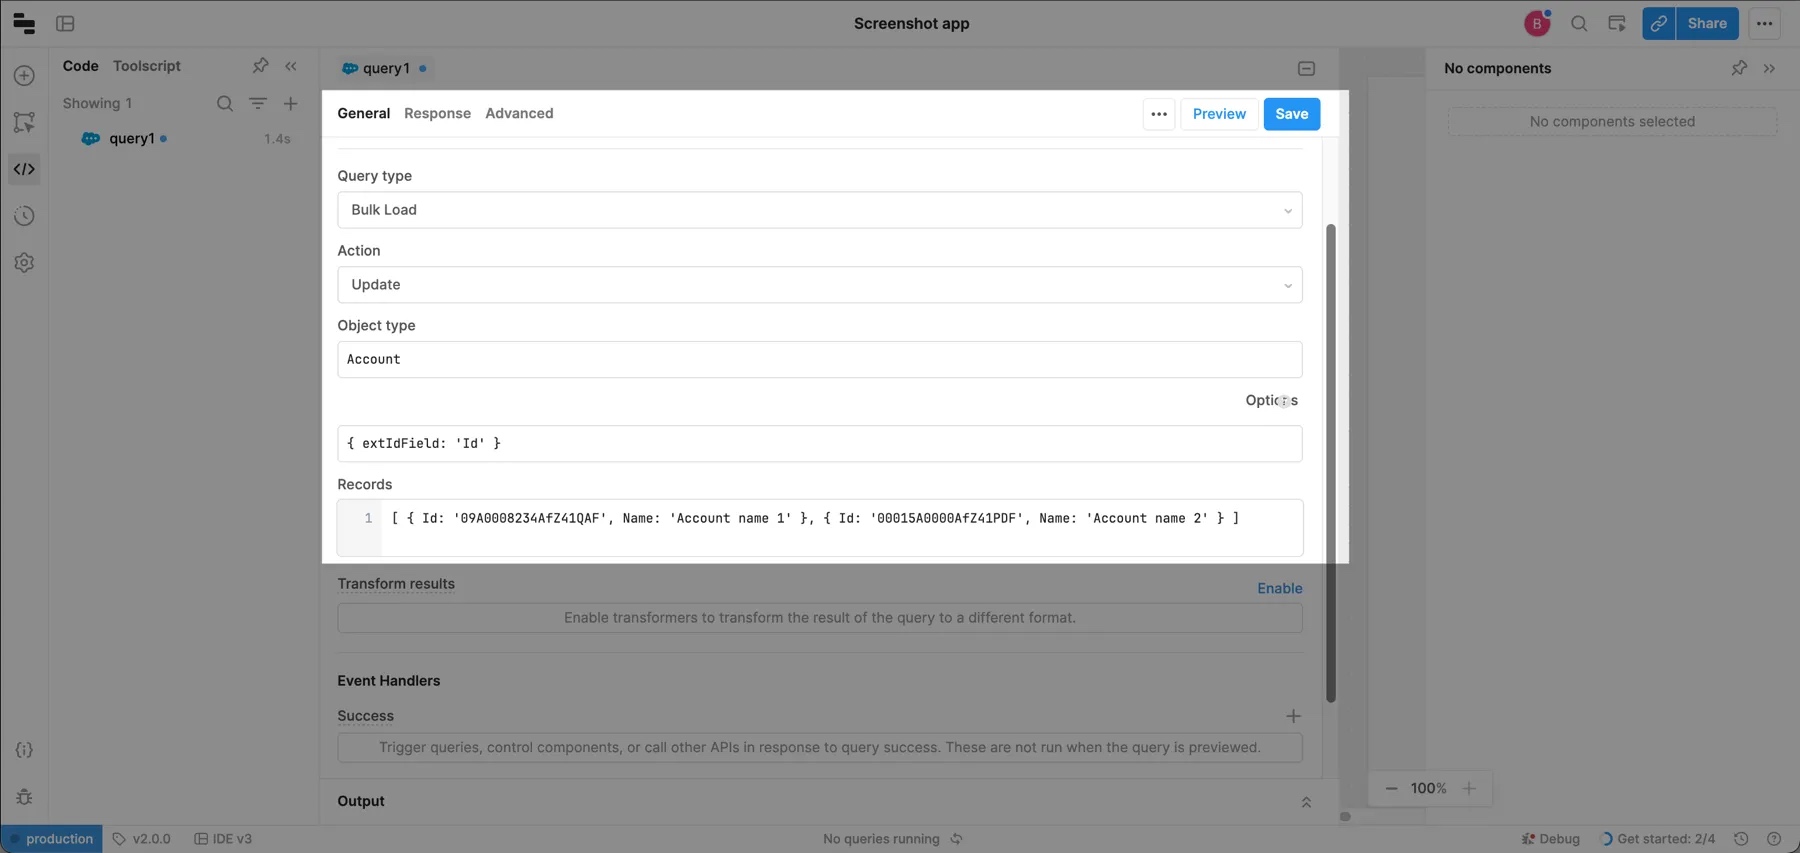
The following query updates Account objects. The extIdField option specifies the external ID field name.
Common use cases
The following examples demonstrate typical Salesforce operations in Retool apps.
query and display contacts
First, create a SOQL query to retrieve contacts.
SELECT Id, Name, Email, Phone, Account.Name, Title
FROM Contact
WHERE Account.Type = 'Customer'
ORDER BY CreatedDate DESC
LIMIT 100
Next, add a Table component to the app and set its Data property to {{ getContactsQuery.data }}.
create a new account
First, add a Form component (form1) with input fields for account data.
Next, create a CRUD Create query:
| Field | Value |
|---|---|
| Query type | CRUD Create |
| Object type | Account |
| Record data | See below |
{
  "Name": {{ form1.data.name }},
  "Type": {{ form1.data.type }},
  "Industry": {{ form1.data.industry }},
  "Phone": {{ form1.data.phone }},
  "Website": {{ form1.data.website }}
}
Then, add an event handler to the form's Submit event that runs the create query and displays a success notification.
update an opportunity
First, add a Form component with fields pre-populated from selected row data.
Next, create a CRUD Update query:
| Field | Value |
|---|---|
| Query type | CRUD Update |
| Object type | Opportunity |
| Record ID | {{ table1.selectedRow.data.Id }} |
| Record data | See below |
{
  "StageName": {{ stageSelect.value }},
  "Amount": {{ amountInput.value }},
  "CloseDate": {{ closeDatePicker.value }}
}
Then, add an event handler that runs the update query when the form is submitted and refreshes the data query.
delete a record with confirmation
First, add a Button component in your table's action column.
Next, create a CRUD Delete query:
| Field | Value |
|---|---|
| Query type | CRUD Delete |
| Object type | Lead |
| Record ID | {{ table1.selectedRow.data.Id }} |
Then, add an event handler to the button's Click event:
- Action: Show confirmation modal
- If confirmed, trigger the delete query
- Then refresh the data query
bulk upsert records
First, add a File Input component that accepts CSV files with parsed data.
Next, create a Bulk operation query:
| Field | Value |
|---|---|
| Query type | Bulk |
| Operation | Upsert |
| Object type | Contact |
| External ID field | Email |
| Records | See below |
{{
  fileInput1.parsedValue.map(row => ({
    Email: row.Email,
    FirstName: row.FirstName,
    LastName: row.LastName,
    Phone: row.Phone
  }))
}}
The query creates new contacts or updates existing contacts based on matching email addresses.
Best practices
Follow these best practices to keep Salesforce queries fast, efficient, and safe.
Performance
- Cache responses: For data that doesn't change frequently, enable query caching to reduce API calls and improve response times.
- Use pagination: Implement pagination for queries that return large datasets to reduce payload size and improve performance.
- Batch operations: When available, use Salesforce batch endpoints to combine multiple operations into fewer requests.
- Minimize payload size: Request only the fields you need using SOQL field selection instead of
SELECT \*. - Set appropriate timeouts: Configure query timeouts based on expected API response times to prevent hung requests.
Data integrity
- Validate user input: Sanitize and validate all user input before including it in a query to prevent injection attacks.
- Handle errors gracefully: Configure error notifications and fallback behavior for failed queries to improve user experience.
- Use idempotency keys: For upsert operations, use an external ID field to prevent duplicate records.
- Verify responses: Check response status codes and validate response data structure before using it in your app.
- Implement retry logic: For transient failures, use Retool's automatic retry settings or implement custom retry logic with exponential backoff.
- Log query activity: Enable query logging to track requests and responses for debugging and auditing.
Troubleshooting access tokens
If you see an expired access/refresh token error when running Salesforce queries, you may need to change a setting in Salesforce to allow Retool to generate valid access and refresh tokens.
- If you have Enforce IP restrictions set in your IP Relaxation settings, consider editing your policy to Refresh token is valid until revoked.
- Ensure you only enable the Connect to a sandbox organization resource setting if you are connecting to a developer sandbox organization.
- Ensure the Timeout value in your organization-wide settings is not too low.