Connect to Jira
Connect Jira to Retool and manage issues, projects, and workflows.
Jira is an issue and project tracking tool from Atlassian.
What you can do with Jira in Retool
After you create a Jira resource in Retool, you can:
- Retrieve issues, projects, and workflows from Jira Cloud.
- Create and update issues, including fields, comments, and transitions.
- Search for issues using Jira Query Language (JQL).
- Automate issue creation and updates from other systems.
Before you begin
To connect Jira to Retool, you need the following:
- Cloud
- Self-hosted
- Jira Cloud site: An Atlassian Jira Cloud site. Retool's Jira integration only supports Jira Cloud, not Jira Server or Data Center.
- Jira permissions: User account with appropriate permissions to access and manage the data you need.
- Retool permissions: Ability to create and manage resources in your organization.
- Jira Cloud site: An Atlassian Jira Cloud site. Retool's Jira integration only supports Jira Cloud, not Jira Server or Data Center.
- OAuth app: A custom app configured in the Jira Developer Console, since Retool's hosted OAuth app is only available on Cloud.
- OAuth callback URL: Your Retool instance's OAuth callback URL configured in the app's redirect URL settings.
- Jira permissions: User account with appropriate permissions to access and manage the data you need.
- Retool permissions: Ability to create and manage resources in your organization.
Create a Jira resource
Follow these steps to create a Jira resource in Retool.
1. Create a new resource
In your Retool organization, navigate to Resources in the main navigation and click Create new → Resource. Search for Jira and click the Jira tile to begin configuration.
2. Configure general settings
Specify a name and description for the resource that indicates what it's used for. The description provides more context to users about how to use the resource.
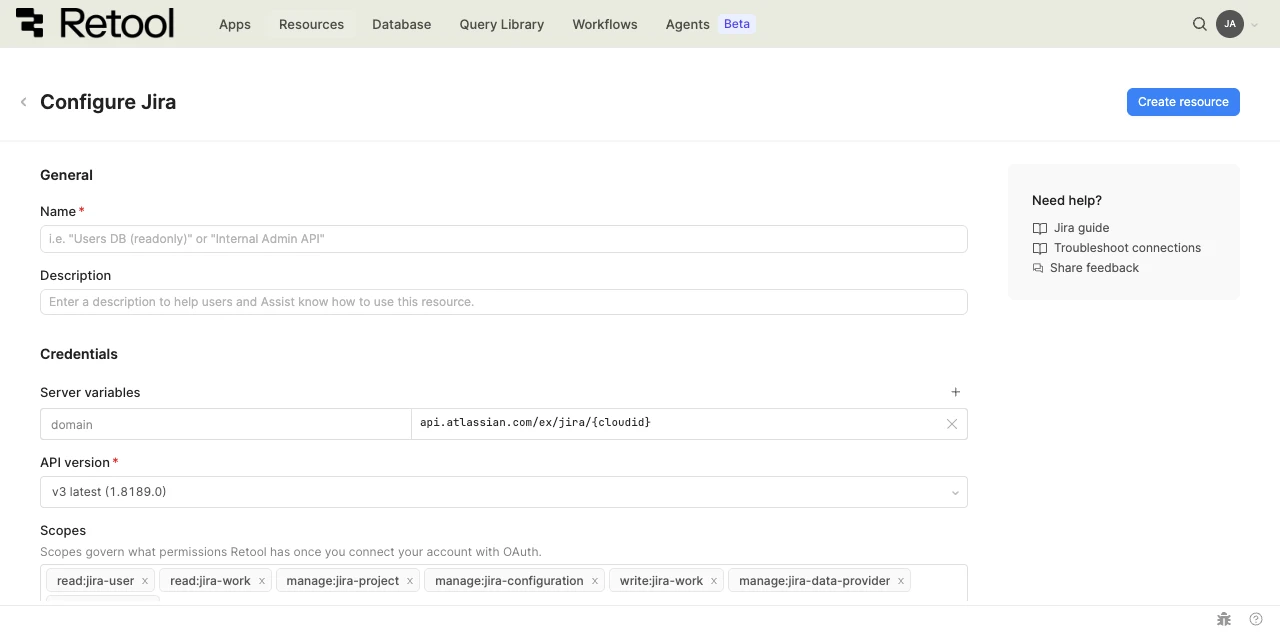
Jira resource configuration form.
Resource name and description
Choose a name and description that indicate which Jira Cloud site the resource connects to.
| Example name | Example description |
|---|---|
| Jira (Engineering) | Jira Cloud site used by the engineering team to track sprints and bugs. |
| Jira (Support) | Jira Cloud site used for tracking customer-reported issues. |
API version
Select the Jira API version to use. Retool defaults to the most recent stable version, but you can select an earlier version if your integration depends on it.
v3 latest (DEFAULT)
3. Configure resource credentials
Configure the connection settings for your Jira resource.
Domain
The request URL for your Jira Cloud site, including your Cloud ID. Refer to Atlassian's documentation to find your site's Cloud ID.
api.atlassian.com/ex/jira/<cloud-id>
4. Configure authentication
Jira uses OAuth 2.0 authentication.
- Cloud
- Self-hosted
Cloud organizations use Retool's pre-configured OAuth app, so no app setup is required in Jira.
- Under Scopes, select the permissions Retool needs, such as reading or writing issues and project data.
- Optionally enable Share credentials between users so all users of the resource authenticate as a single shared Jira account instead of individually.
- Save the resource.
- Click Connect with OAuth and grant permissions in Jira. Retool redirects you back once authorization completes.
Self-hosted instances must create a custom app in the Jira Developer Console, since Retool's hosted OAuth app is only available on Cloud.
Step 1: Create an app in the Jira Developer Console
Follow Atlassian's guide to create an app that supports OAuth 2.0 (3LO). Note the Client ID and Client secret the console generates for the app.
Step 2: Configure the resource in Retool
- Client ID: Paste the Client ID from the Jira Developer Console.
- Client secret: Paste the Client secret from the Jira Developer Console.
- Copy the OAuth callback URL Retool displays and add it to the app's authorization callback URL settings in the Jira Developer Console.
- Under Scopes, select the permissions Retool needs, such as reading or writing issues and project data.
- Optionally enable Share credentials between users so all users of the resource authenticate as a single shared Jira account instead of individually.
- Save the resource.
- Click Connect with OAuth and grant permissions in Jira.
5. Configure advanced options
- Cloud
Outbound region
If your organization uses outbound regions, select the region that should be used for requests to Jira. This controls which geographic region your requests originate from.
6. Verify the connection
Jira resources don't include a Test connection button. After you authorize the connection, Retool displays a Connected status once authentication succeeds. To further confirm your resource works, save the resource and run a simple query, such as retrieving your Jira projects.
7. Save the resource
Click Create resource to save your Jira resource. You can now use it in queries across your Retool apps and automations.
Interact with Jira data
Once you've created a Jira resource, you can interact with Jira data using Retool.
Retool recommends using the new app builder so you can use natural language to build React-based apps using AI.
- To use Jira data in the app builder, reference the resource in the prompt with
@, such as@Jira (Engineering). Refer to the data and functions documentation to learn more. - To use Jira data in a classic app, workflow, or agent, write a resource query. Refer to the Jira query tutorial to learn more.
Best practices
Follow these best practices to maintain the security of your Jira resource.
- Scope OAuth permissions narrowly: Select only the scopes your queries actually need. Avoid granting write scopes to a resource that only reads data.
- Rotate credentials regularly: Rotate the OAuth client secret for custom apps on a regular schedule.
- Avoid shared credentials for sensitive projects: Enable Share credentials between users only when it's acceptable for all users of the resource to act as the same Jira account. Otherwise, let each user authenticate individually.
- Use resource environments: Organizations on an Enterprise plan can configure multiple resource environments to maintain separate Jira credentials for production, staging, and development.
Related resources
Create a resource
Learn how to create and manage resources in Retool.
Resource environments
Configure separate credentials for production and non-production environments.
Configuration variables
Store sensitive values securely for use in queries and apps.
Retool community: Jira
Community discussions and solutions for Jira integrations.
Jira developer documentation
Official Jira Cloud REST API reference and developer console.