Getting started with the Calendar component
Learn how to display an interactive calendar in your classic app.
Use the Calendar component to display dates and times on an interactive interface. Calendar uses the FullCalendar library.
Features
Key features of the Calendar component include:
- Calendar events manually listed or dynamically generated.
- Event handlers triggered on user interaction.
- Customizable format and style.
Specify content options
The Content section of the Inspector contains settings that control the contents of the Calendar. Define the calendar events manually or dynamically by mapping to an array of data. Refer to the Define option lists guide for more information.
Use case: Integrate Google Calendar resource
You can show events from a Google Calendar on this component using Retool's Google Calendar integration. Use the instructions in this section to set up the Calendar component to display events from an external calendar.
The following method of integrating the Google Calendar API uses OAuth authentication and requires other Retool users to sign in to Google. Only users with whom you've shared a calendar will have access.
Create a Google Calendar resource
Create a Google Calendar resource. Authenticate the resource with an account that has access to the calendar that you want to use.
Create a resource query
Now you can update your classic app to use the Google Calendar data in the Calendar component.
Create a new resource query that accesses your Google Calendar resource. Set the Operation to GET /calendars/{calendarId}/events to return a list of events for a given calendar. In the calendarId path parameter, enter the ID of your calendar, which you can find in the settings for your Google Calendar.
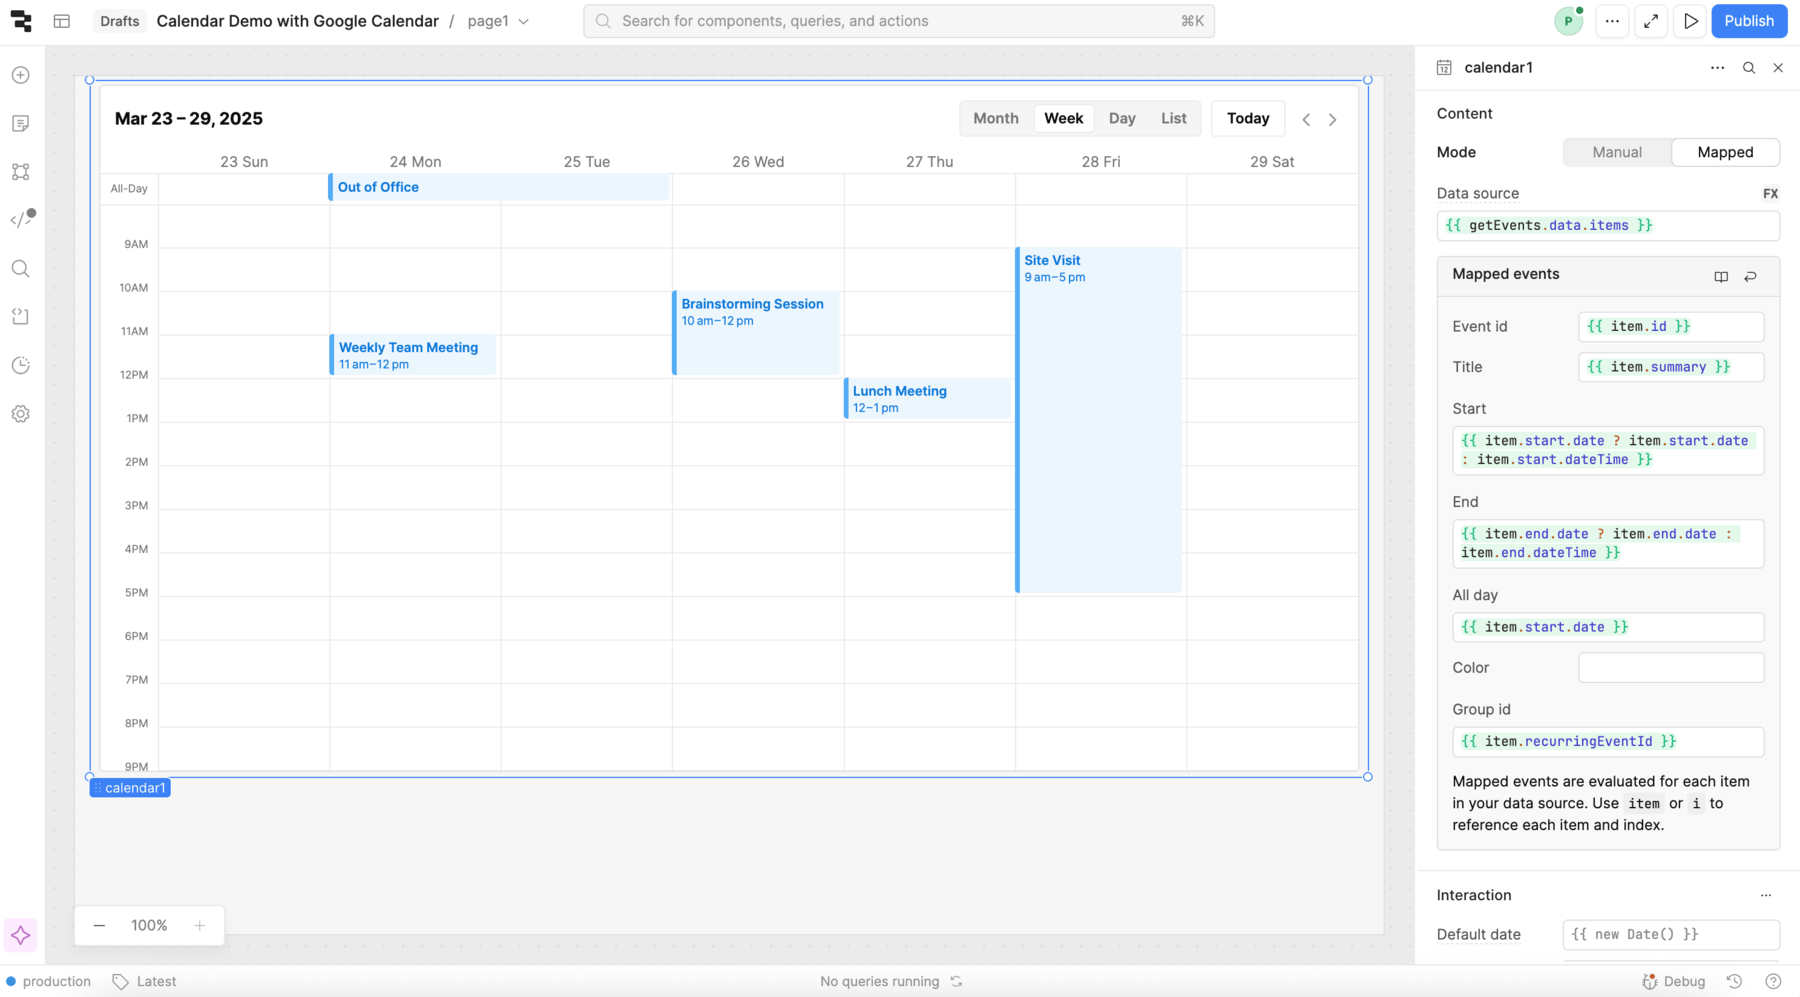
Configure the Calendar component
Configure the following settings in the Inspector:
- Mode: Mapped
- Data source:
{{ getEvents.data.items }} - Event id:
{{ item.id }} - Title:
{{ item.summary }} - Start:
{{ item.start.date ? item.start.date : item.start.dateTime }} - End:
{{ item.end.date ? item.end.date : item.end.dateTime }} - All day:
{{ item.start.date }} - Group id:
{{ item.recurringEventId }}
All-day events use date and time-bound events use dateTime to signify when the event begins and ends. This is why the ternary operation is necessary for the Start and End settings.
Display recurring events
To display recurring events, set Group id in the Inspector. Set the value of this setting to a shared identifier that is present for all recurring events.
For Google Calendar, set Group id value to {{ item.recurringEventId }}. You also need to edit the getEvents query: Add a query parameter with a key of showEvents and a value of true. This ensures that the API returns each ocurrence as a separate event.
Configure user interaction
The Interaction section of the Inspector contains settings that handle user interaction with the Calendar component.
The following settings are available in the Interaction section to configure the Calendar's behavior:
- Default date: The default date that the Calendar focuses on. Defaults to the current date.
- Default view: The default view of the Calendar. Possible options include Month, Week, Day, and List. Defaults to Week.
- List type: If the Default view is set to List, this setting controls how the events are categorized. Defaults to Week.
- Advanced Setting > Timezone: The timezone in which to display events. Defaults to local time.
- Advanced Setting > Start week on: The day of the week on which to begin the week. A number between 0 and 6, where 0 is Sunday and 6 is Saturday. Defaults to 0.
Event handlers listen for and handle interactions with your components. The Calendar component supports Create event, Click event, Change event, and Remove event event handlers. Refer to the following sections for more information about internal user interaction with the calendar.
Enable event creation
To enable users to create events, add a Create event event handler. This event triggers when a user selects a time interval on the Calendar interface.
Retool immediately triggers Create event when a user completes a selection. There is no message appears to confirm or finalize the change.
Selecting a time interval on the Calendar populates the values of the selectedInterval Calendar property. The following object shows an example:
{
  "allDay": false,
  "end": "2025-03-27T10:00:00.000Z",
  "start": "2025-03-27T09:00:00.000Z"
}
Create a new query that accesses these properties and creates a new event on a connected calendar. Set the event handler's Action to trigger this query.
Enable event changes
To enable users to change events, add a Change event event handler. This event triggers when a user selects and moves an existing event on the calendar. Moving an event populates the values of the changeset Calendar property. If the event is recurring, the changeset contains all of the recurrences. The following object shows an example changeset, which is identified by the event ID:
{
   "6nt7smomc81s2jfsdsfvkkph88": {
      "allDay": false,
      "end": "2025-03-27T11:00:00.000Z",
      "id": "6nt7smomc81s2jfsdsfvkkph88",
      "start": "2025-03-27T10:00:00.000Z"
   }
}
Create a new query that accesses this property and edits an event on the connected calendar. Set the event handler's Action to trigger this query.
Changes to subsequent events overwrite the contents of changeset.
Enable event deletion
To enable users to delete events, add a Remove event event handler. This event triggers when a user selects an existing event and presses or .
Clicking an event populates the selectedEvent property. Create a new query that accesses the selectedEvent.id and deletes the event on the connected calendar. Set the event handler's Action to trigger this query.
Customize appearance
You can customize the presentation of your component in the Spacing and Appearance sections of the Inspector.
All components have a Hidden setting, which you can dynamically control with a truthy value that evaluates to true or false. You can also control the hidden property for a component using the .setHidden() method from event handlers and JavaScript queries.
You can also create custom style rules using the Styles setting. Each component has different styles that you can configure, but common ones include colors, fonts, and text styles. Use app-level or organization-level themes to set these styles across all components.
Click ••• to open the Advanced Settings of the Appearance section to edit other settings, such as Use 24 hour time, Show event times, and Show all-day slot.