Inventory Management App
This laboratory focuses on developing a simple inventory management using single page applicatios that provides create, read, update and delete capabilities using Retool Database. The use of Retool Resources, Workflows, AI and Email will also be demonstrated as part of inventory management reordering.
NOTE: Retool has deprecated single page applications as of v3.148.0. Multipage applications, the default going forward, provides improved performance and simplified design.
Steps
The following steps focus on accessing Retool and using Retool Database, Retool Workflow, Retool Email, and Retool Web Apps to provide a base understanding of the Retool Platform.
Create a Retool account and login
Create a Retool account and login to your account as shown below.
Create a table in Retool Database using CSV files
A key component in the inventory management application is to define a schema / set of data that represents current inventory. Using the following common separate value (CSV) files, the schema can be identified along with sample data into Retool table(s). In this step of the laboratory, two comma separated value files will be used to populate a Retool Database creating two separate tables. The following files need to be downloaded to your computer, in order to perform the following steps.
Once the files are downloaded, edit the CSV file, inventory_vendor.csv to modify the vendor_contact / email address, your_email_here@xyx.com to your email.
Next we can create tables in the database:
- In the Retool Home Screen, select Database.
- In Retool Database, select + > Import CSV.
- Select file inventory.csv.
- Change id, quantity and replenish field type to #int4 in the CSV Import dialog.
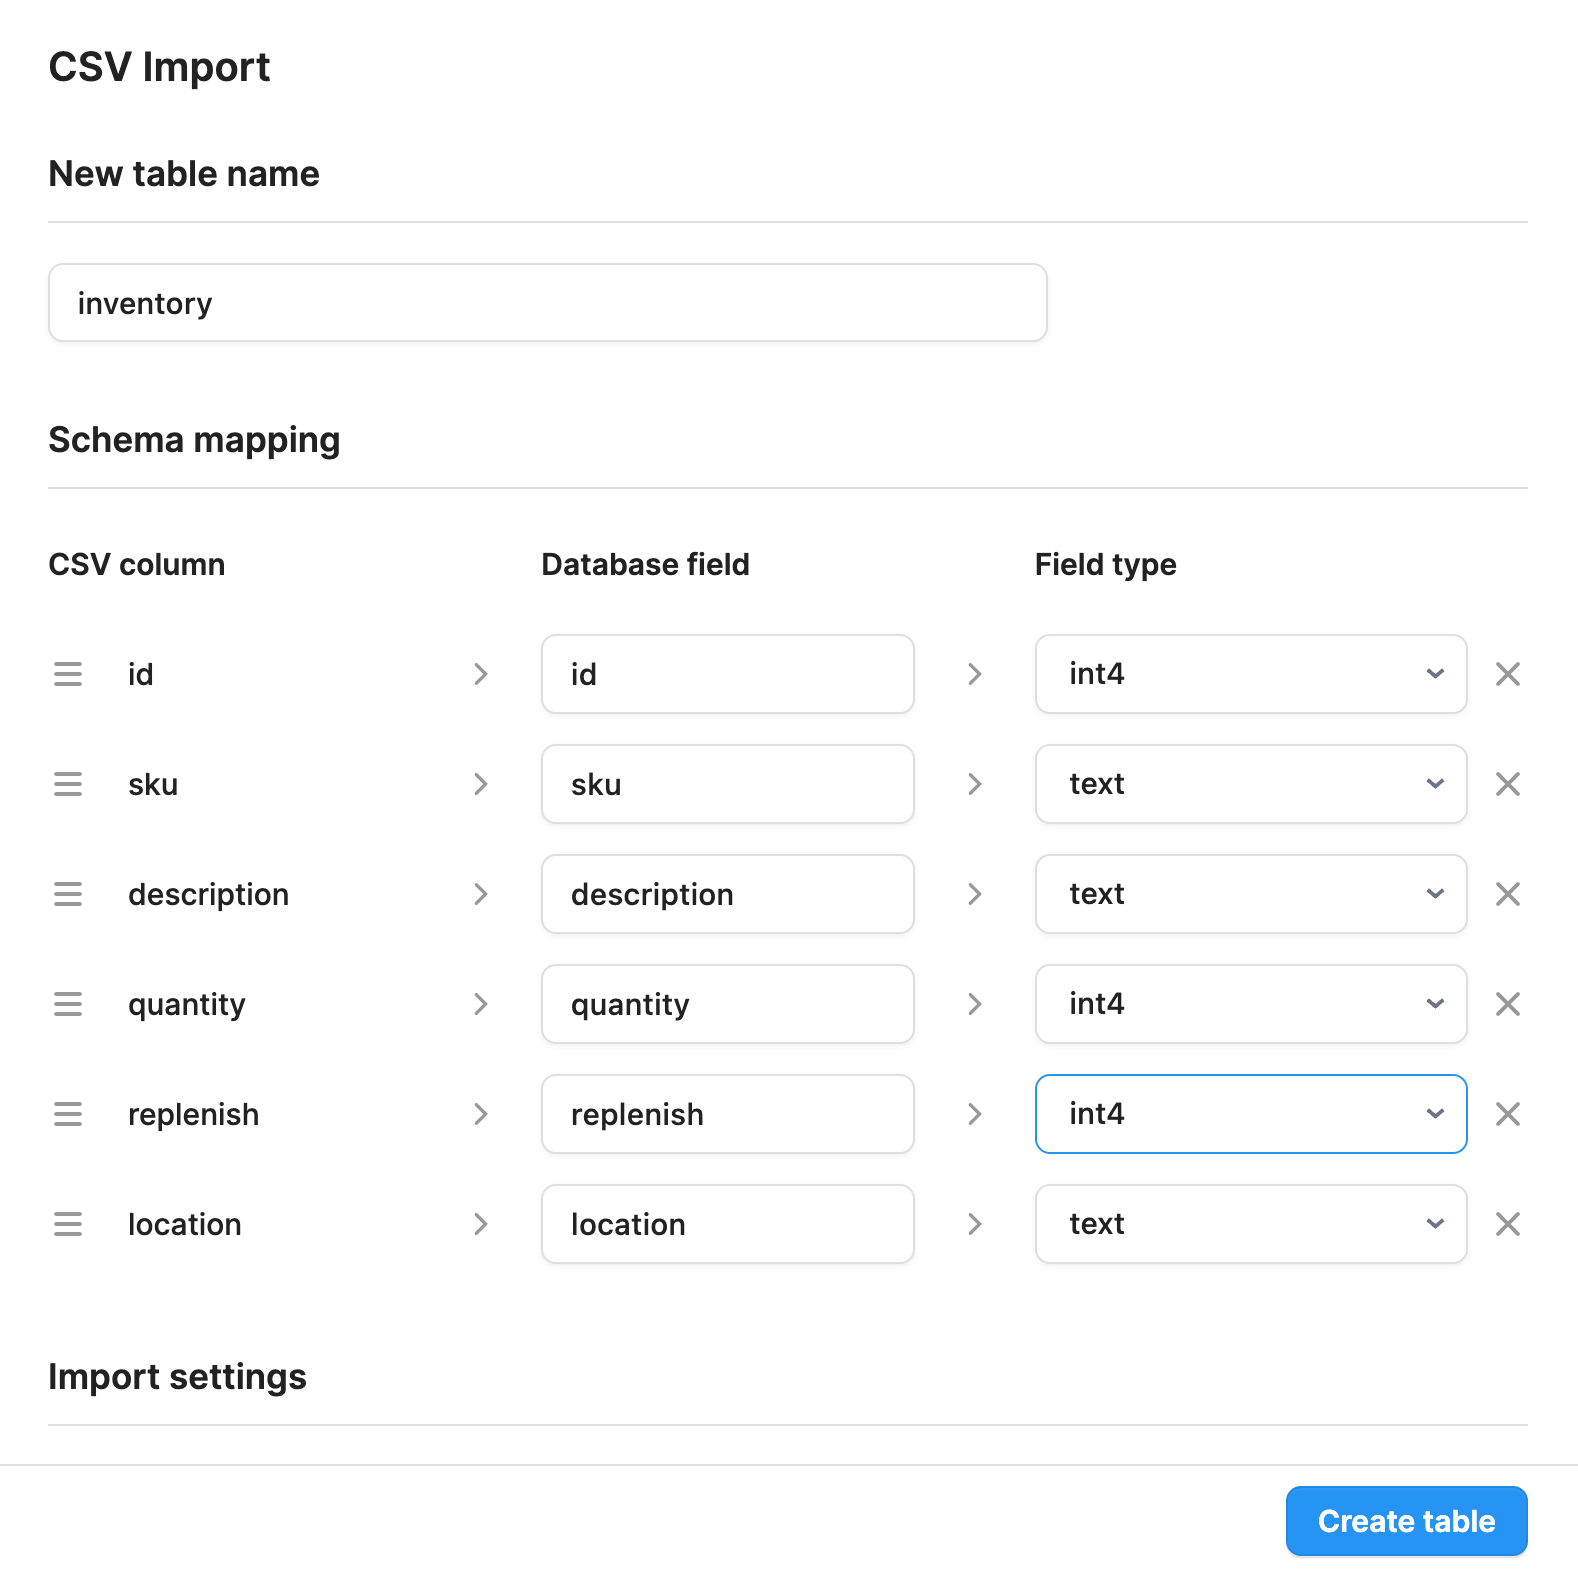
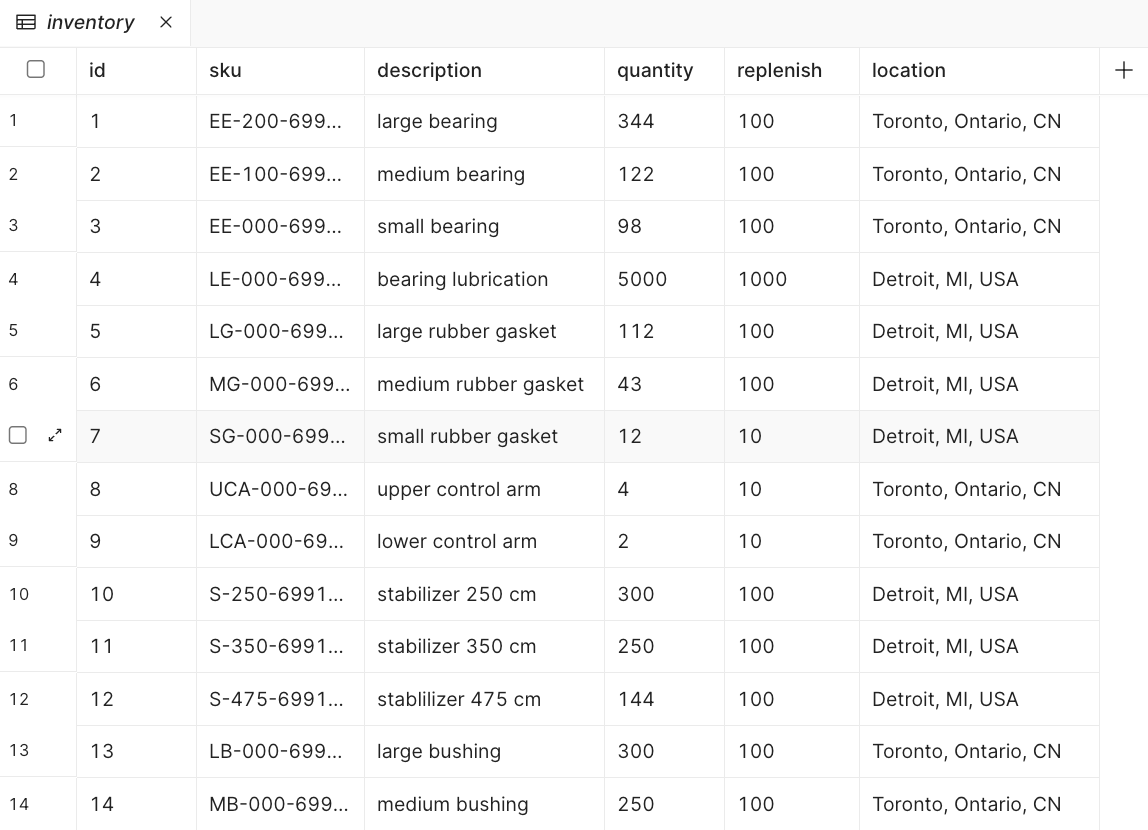
- Select Create table and the table will update as shown in the following figure.
- Repeat the CSV Import process with the file
inventory_vendor.csvby creating an inventory_vendor table. - Update the fields id and quantity to
#int4.
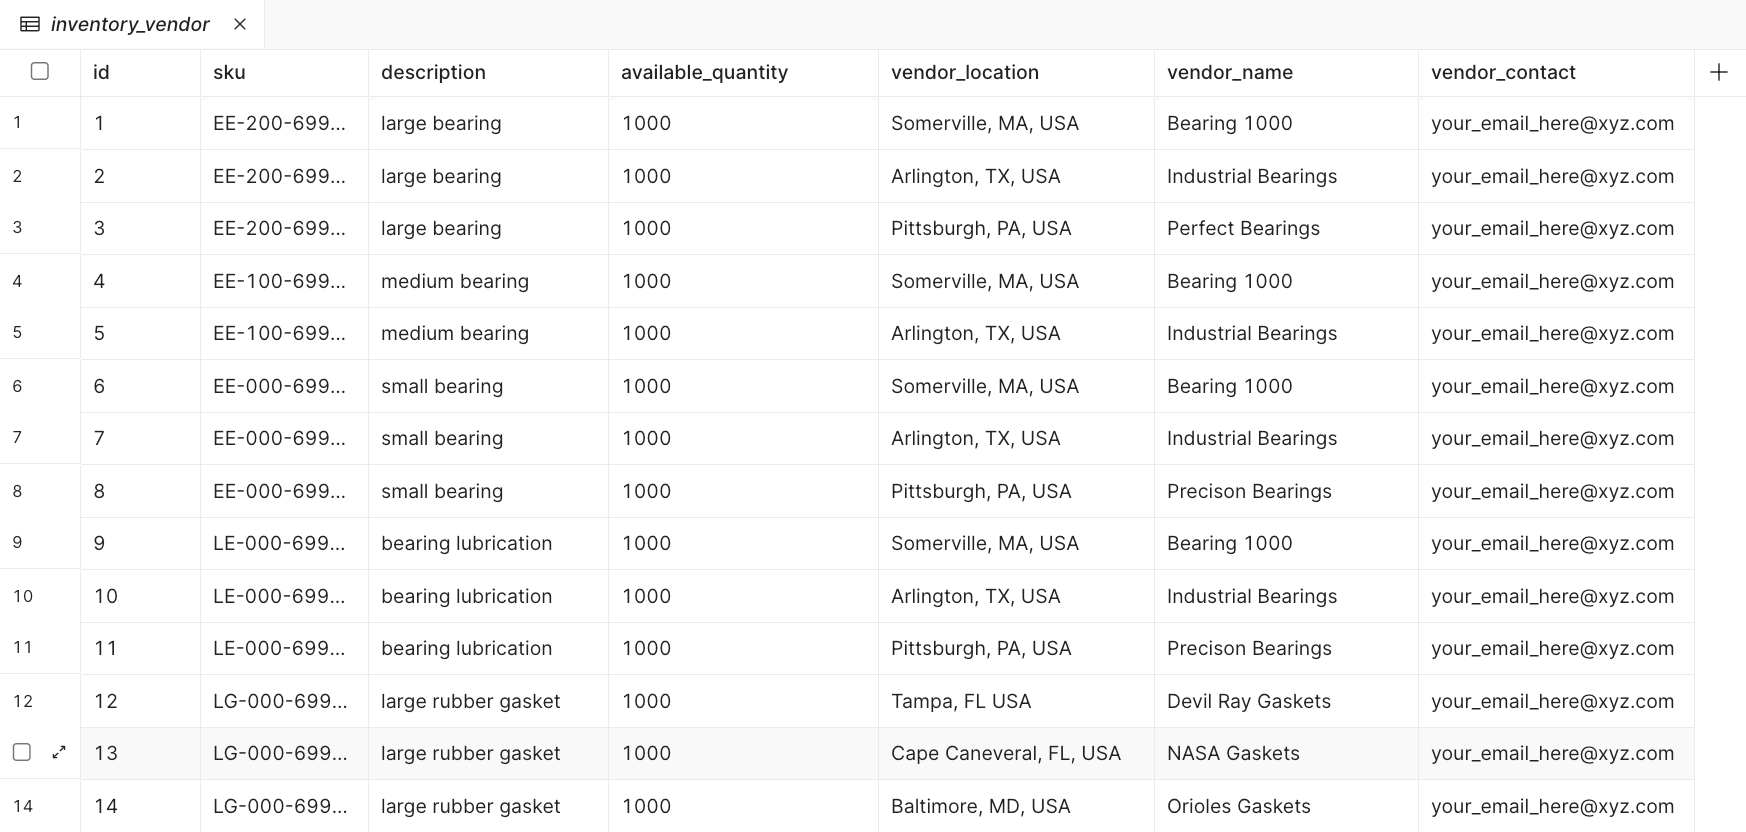
The vendor_contact field needs to be updated to a working email for the Workflow portion of this lab to function properly. If it is left in the default state, the Lab will error.
Create Show Inventory app
The first application that will be created focuses on displaying current inventory available at two warehouses.
- Login to your Retool account and go to Retool Home.
- Under Apps, select Create Web App. Enter web app name
Acme Show Inventoryand specify a value Add to folder with your first initial + last name (e.g., jsmith). - Create a new tab and go to the Retool Home page in the new tab.
- Under Apps, select Create Web App. Enter web app name
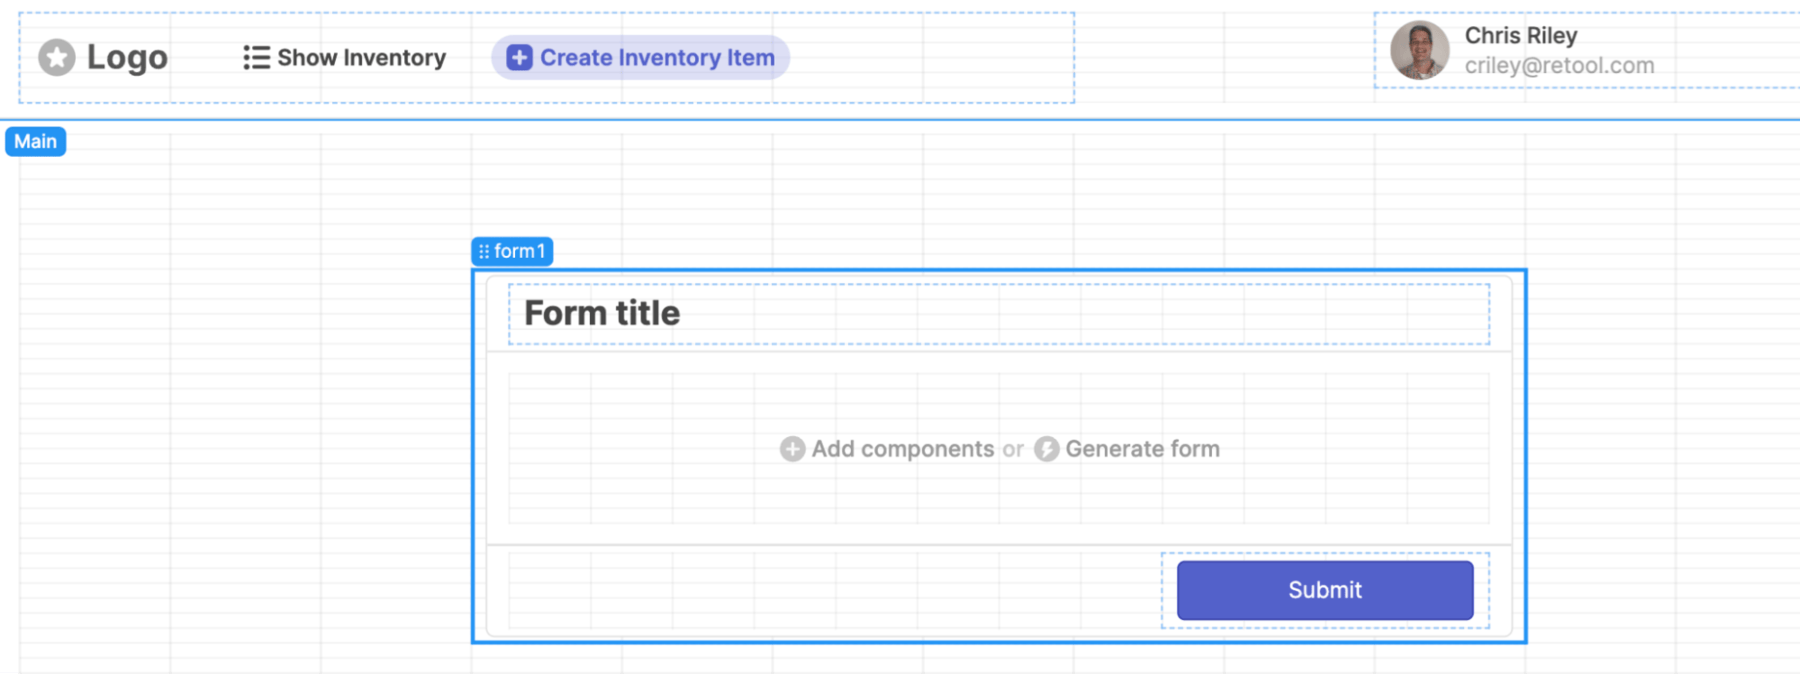
Acme Create Inventoryand specify a value Add to folder with your first initial + last name (e.g., jsmith). - Enable a Header for the app by selecting Outline > Header > Create. This will update the Canvas with a Logo and three Menu Options via a navigation component.
- Select the Menu Items in the navigation component and perform the following actions.
- Rename Menu Item 1, currently set to Home, to Show Inventory, specify App URL to the current app, and change logo to list.
- Rename Menu Item 2, currently set to Customers, to Create Inventory Item, specify App URL (when completed in later step), and change logo to new.
- Remove Menu Item 3 by selecting Settings > ... > Delete.
- Reduce the size of the Navbar component by graphically dragging the right corner and move it left.
- Drag and drop an Avatar component to the right of the Navbar component.
- Repeat the steps to add a header to the secondary Web App with same configuration. Confirm both apps Navbar/Avatar appear as below.

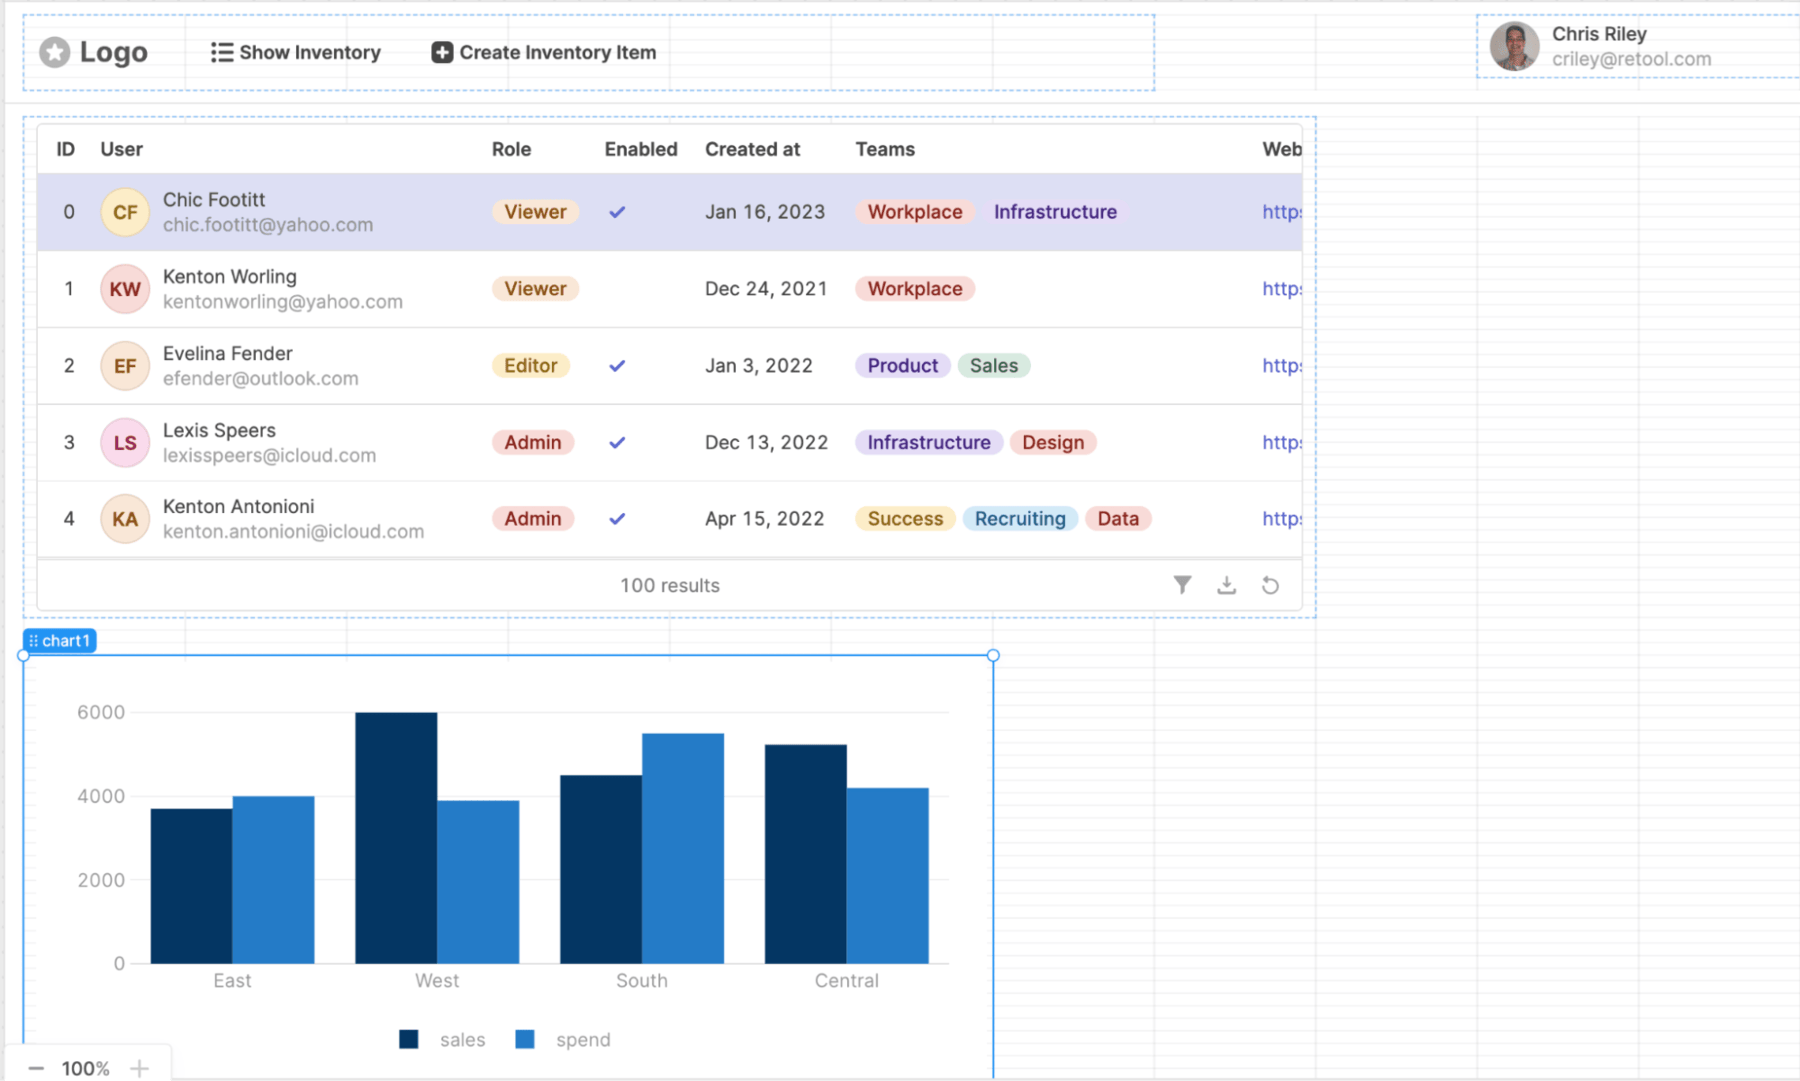
- Drag a Table component onto the Canvas below the Navbar.
- Drag a Chart component onto the Canvas below the Table component. It should appear as below:
Notice the chart, table and navbar each have a label associated with in the upper left corner. This is a variable and is how we can refer to the component later for our database queries and javascript code.
Create Create Items app
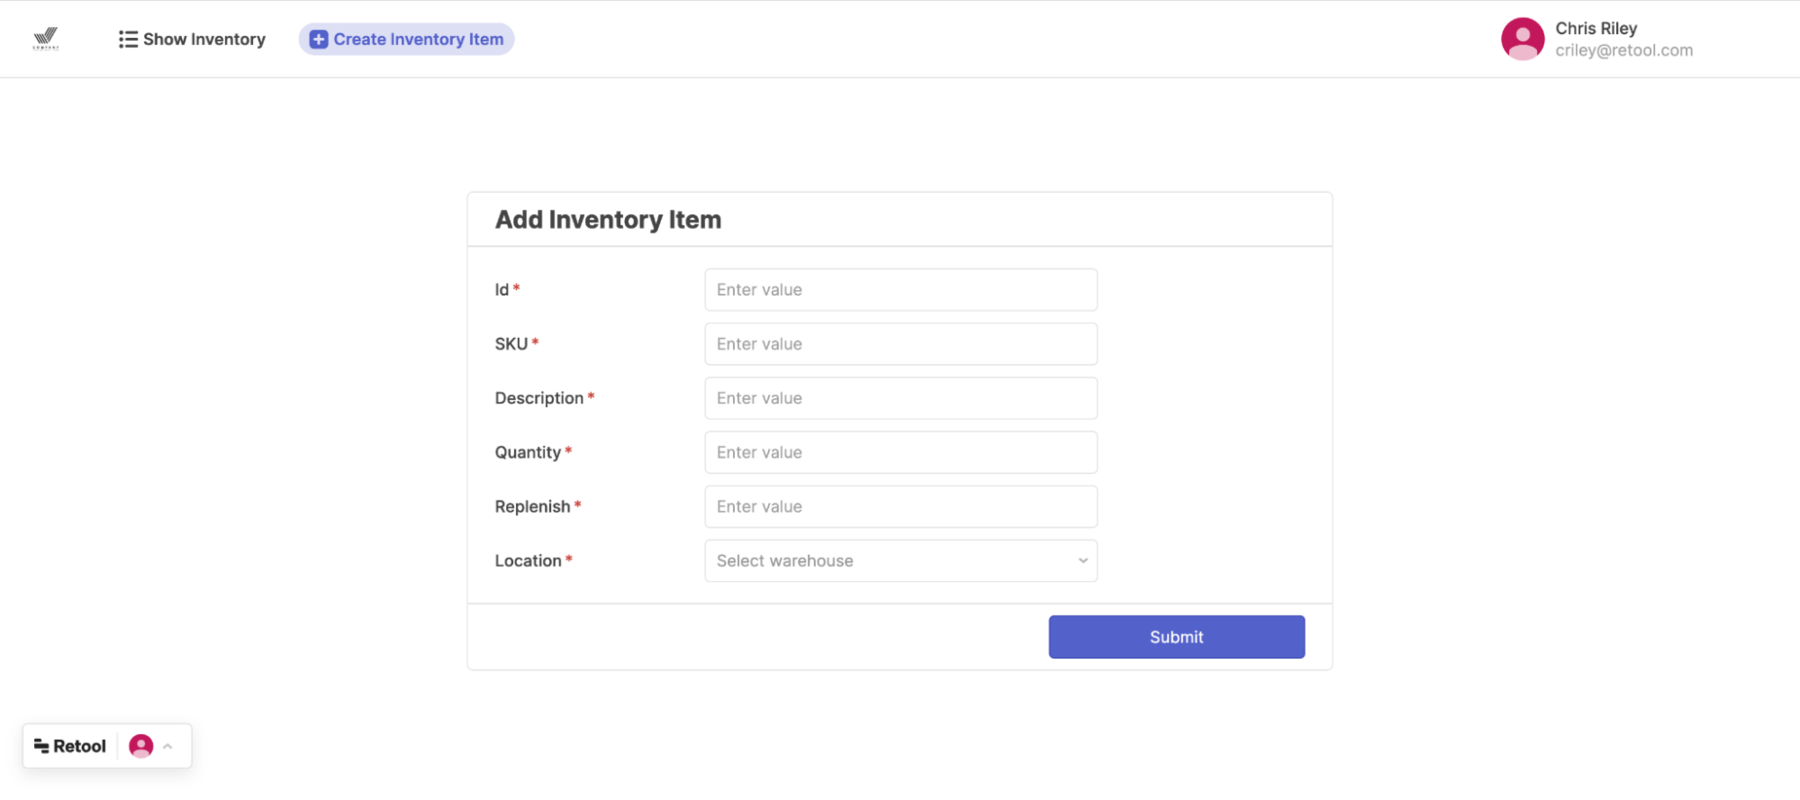
The second application that will be created allows a user to add a new inventory stock keeping unit (SKU) when it is received at a warehouse.
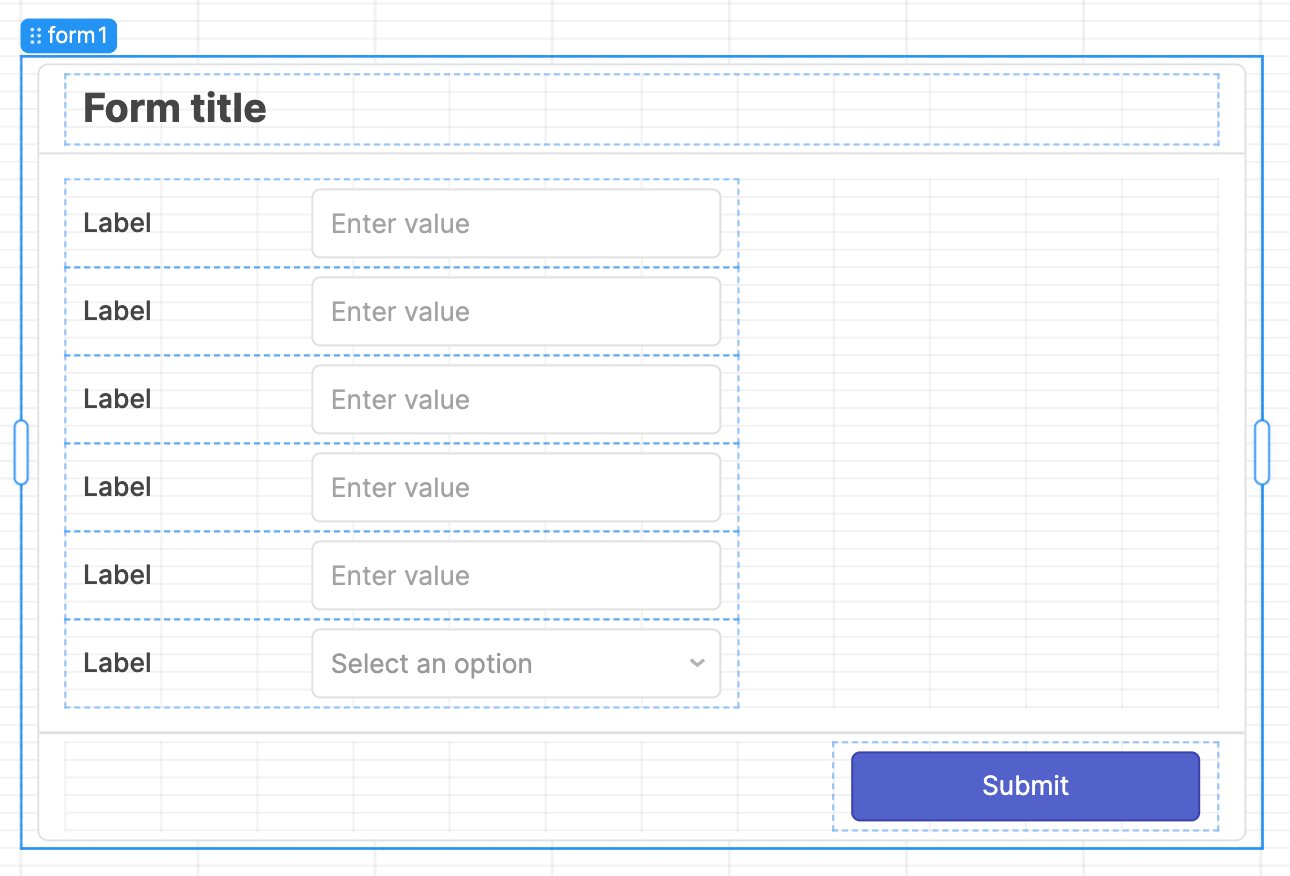
- Drag the Form component onto the Canvas.
- Select Add components and drag and drop
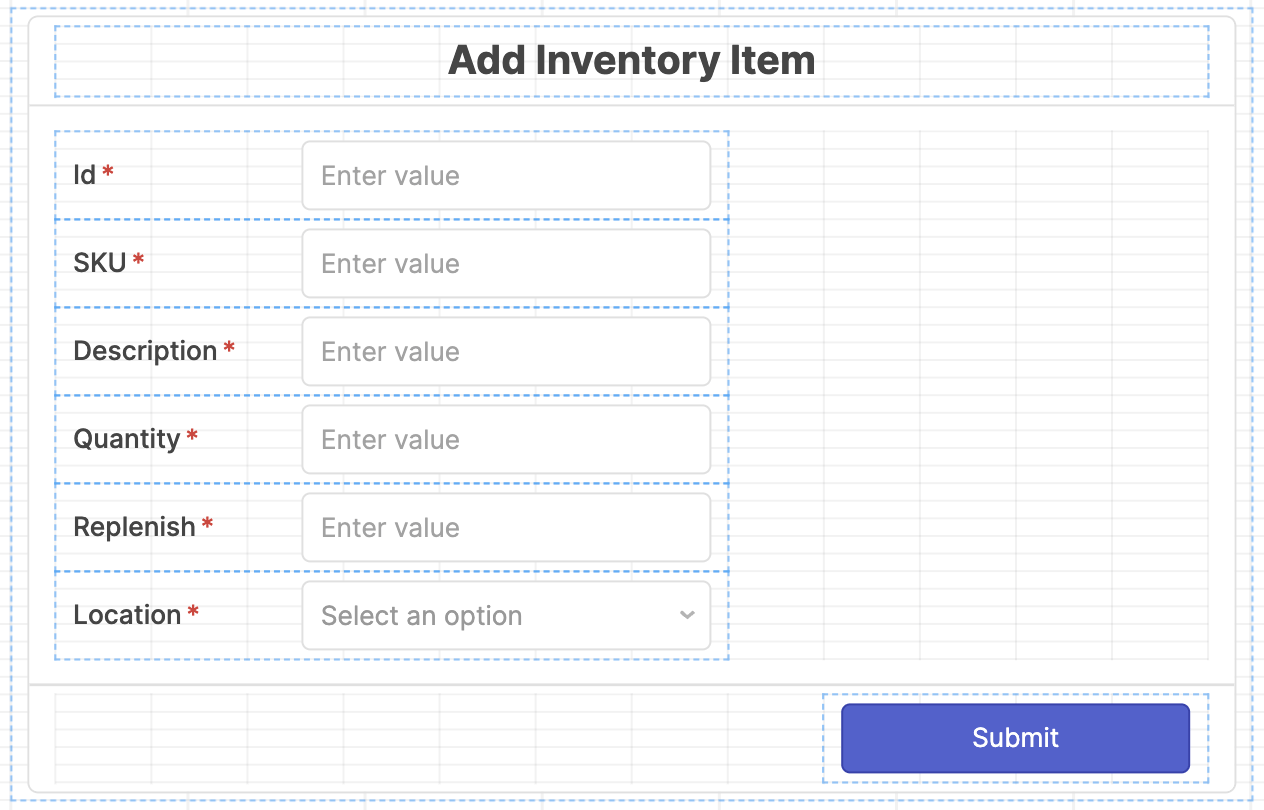
Text inputcomponent into the form. Copy and paste this component repeatedly to create 4 more Text input components for a total of five Text input components. Drag and drop a Select component below the last Text input component as shown in the following figure.
- Edit the Labels to Id, SKU, Description, Quantity, Replenish and Location.
- Edit the Text input component tags to id, sku, desc, quantity, replenish and location.
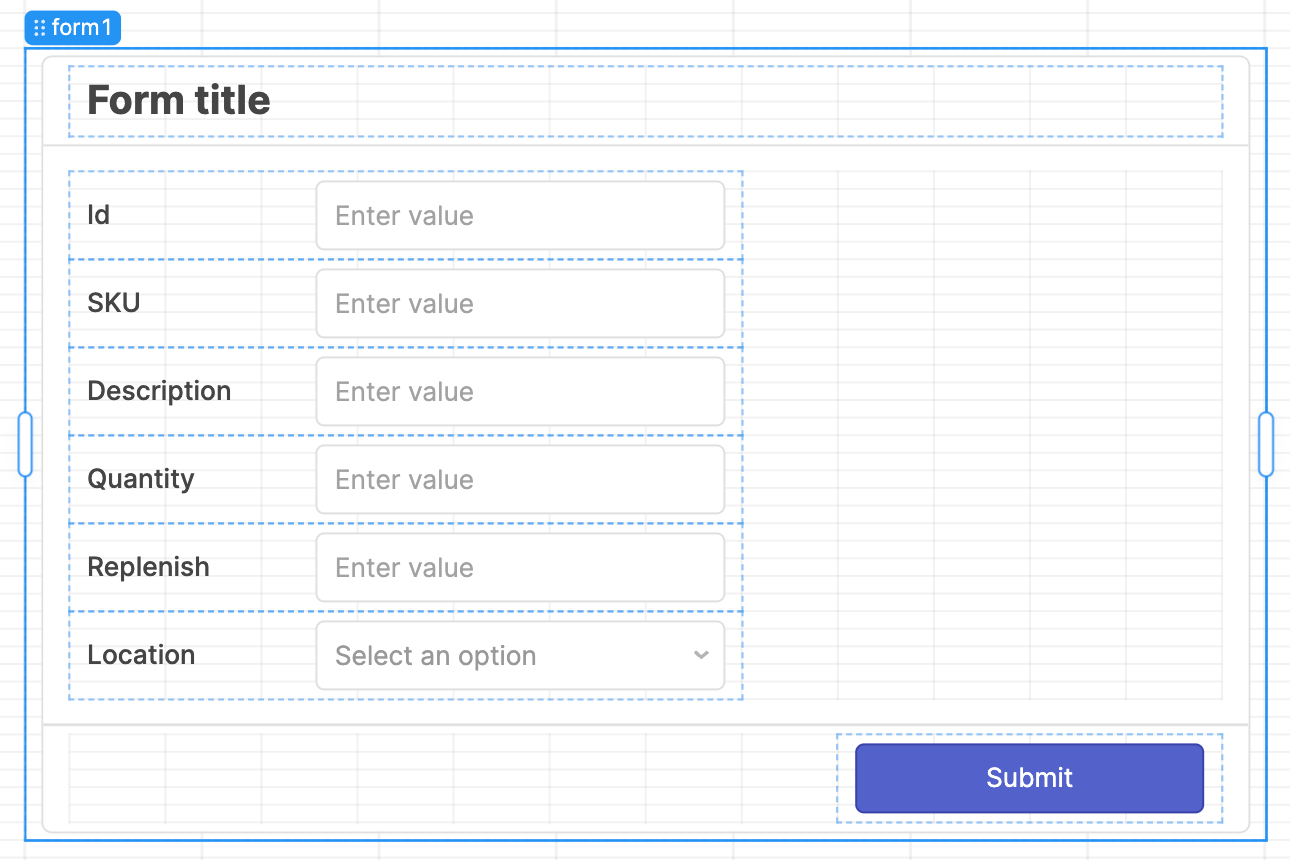
- Update the form title to Add Inventory Item and select Alignment > Center.
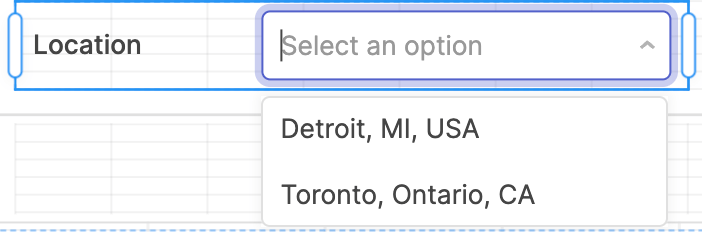
- Select the Select component and alter the options to Detroit, MI, USA and Toronto, Ontario, CA and delete the third option. The following figure shows what it looks like when complete.
- For each component, select Interaction > Validation rules > Required. This enables input validation for each field and will verify that all fields are populated.
Create queries for Show Inventory app
In this step, Retool queries are created to access data in the previously created Tables in Retool Database.
- Make sure you are in the
Acme Show Inventoryapp. If not, select the Retool icon / Back to home in the upper left corner which will bring you to the home page. - Use search to find the app, select it and then select Edit app.
- Create a new query,
getTableSizeto count database items for server side pagination. - Select Code > + > Resource query.
- Specify Resource Retool Database, use SQL Mode to specify the following query and then use Preview (should return 21) and then Save & Run.
select count(*) from inventory;
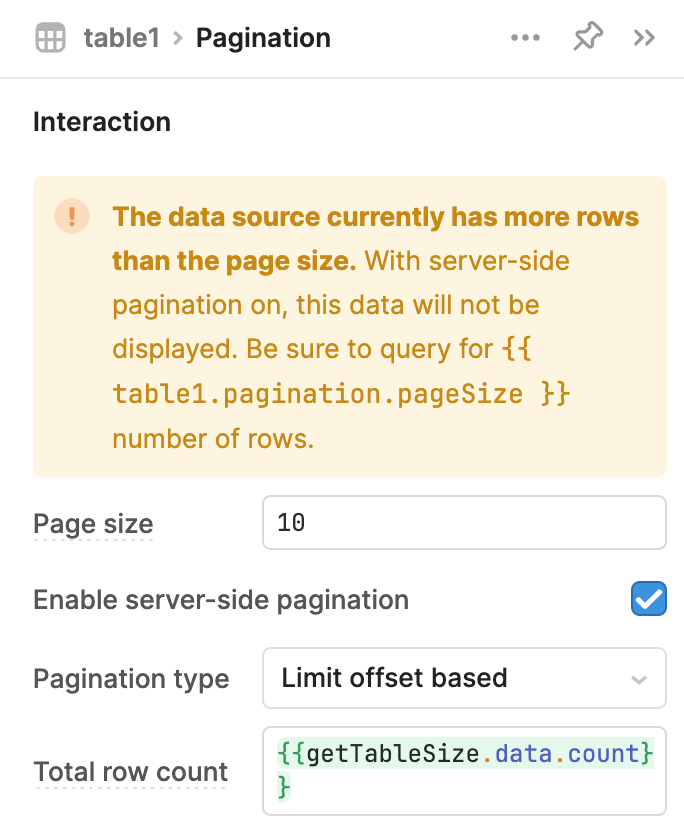
- In Acme Show Inventory app, select table1 and in the Inspector, select Add-ons > + > Pagination.
- Select > to access the pagination details. Specify:
- Page size of
10 - Enable
server-side pagination - Pagination type =
Limit offset based - Total row count =
{{getTableSize.data.count}}
- Page size of
- Create a query, getInventory from the Retool Database table, inventory.
- Select Code > + > Resource query.
- Specify Resource Retool Database, use SQL Mode to specify the following query and then use Preview (should return inventory rows) and then Save & Run.
select * from inventory order by id limit {{table1.pagination.pageSize}} offset {{table1.pagination.offset}};
NOTE: Filter by and Changeset will be red as currently there are no changesets to process, this will be covered later.
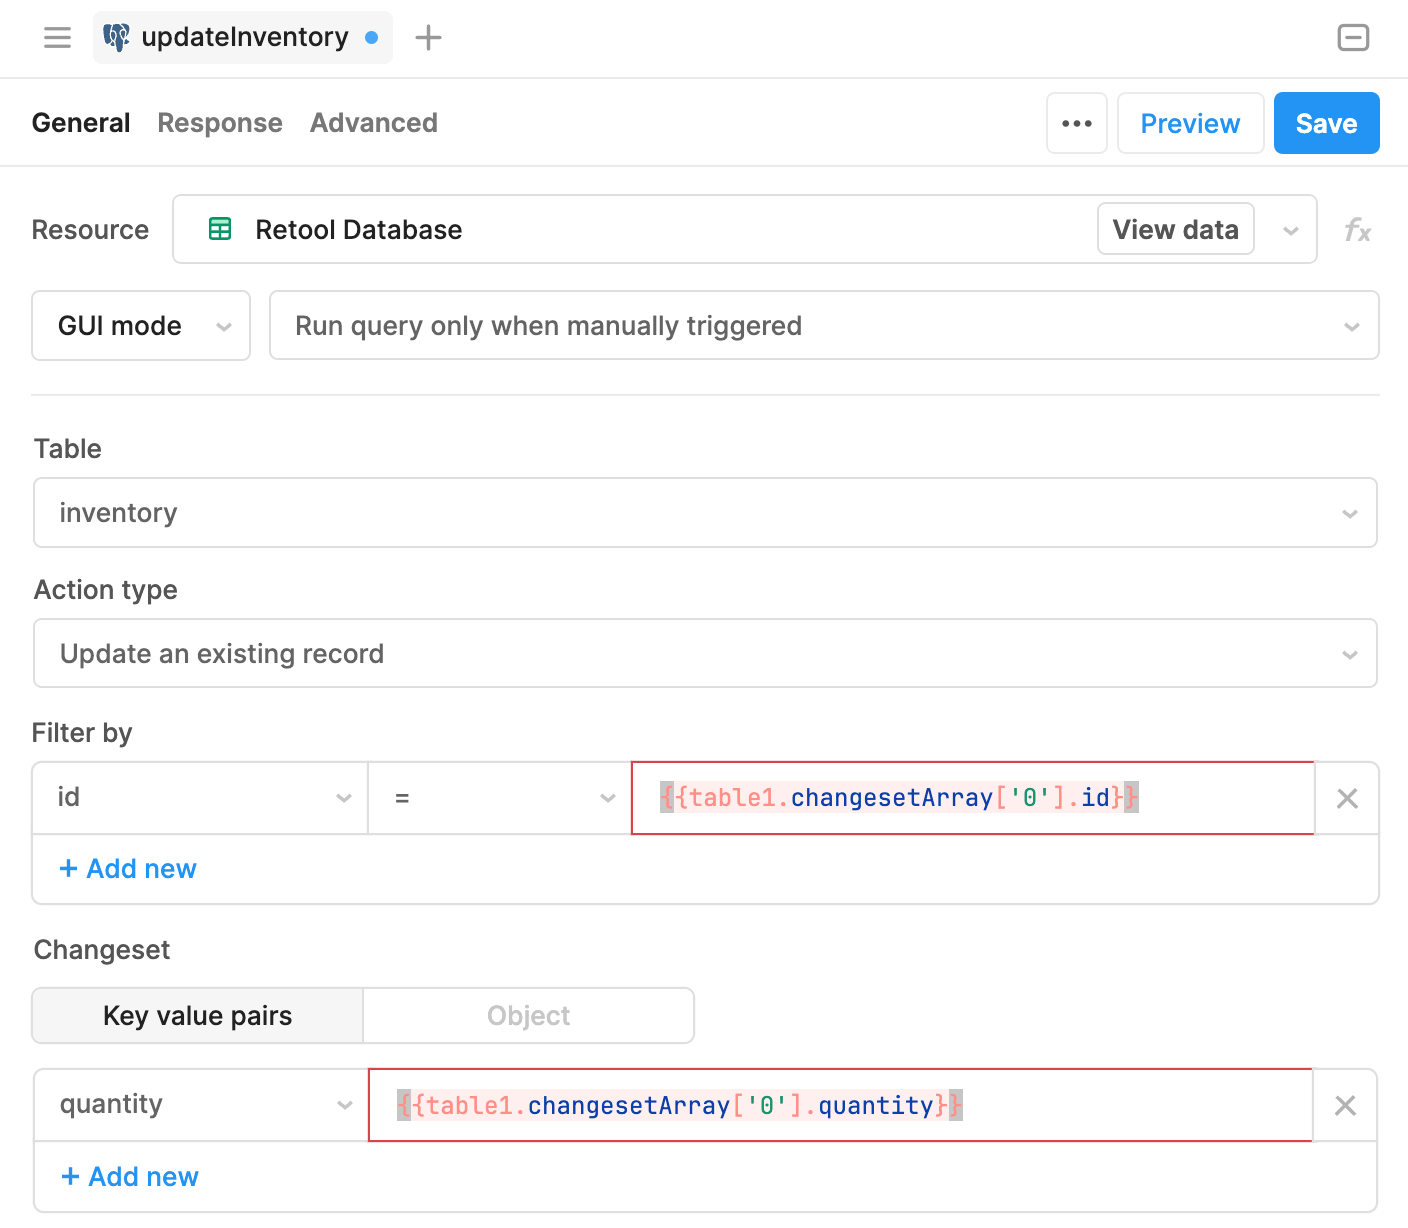
- Create a new query, updateInventory for table using GUI Mode. The following image shows the values that are used.
- Resource =
Retool Database - Table =
inventory - Action type =
Update an existing record - Filter by =
{{table1.changesetArray['0'].id}} - Changeset =
{{table1.changesetArray['0'].quantity}} - Event Handlers / Success =
getInventory.trigger()
- Resource =
- Create a new query, deleteInventory for table using GUI Mode. The following image shows the values that are used.
- Resource =
Retool Database - Table =
inventory - Action type =
Delete a record - Filter by =
{{table1.selectedRow.id}} - Event Handlers / Success =
getInventory.trigger()
- Resource =
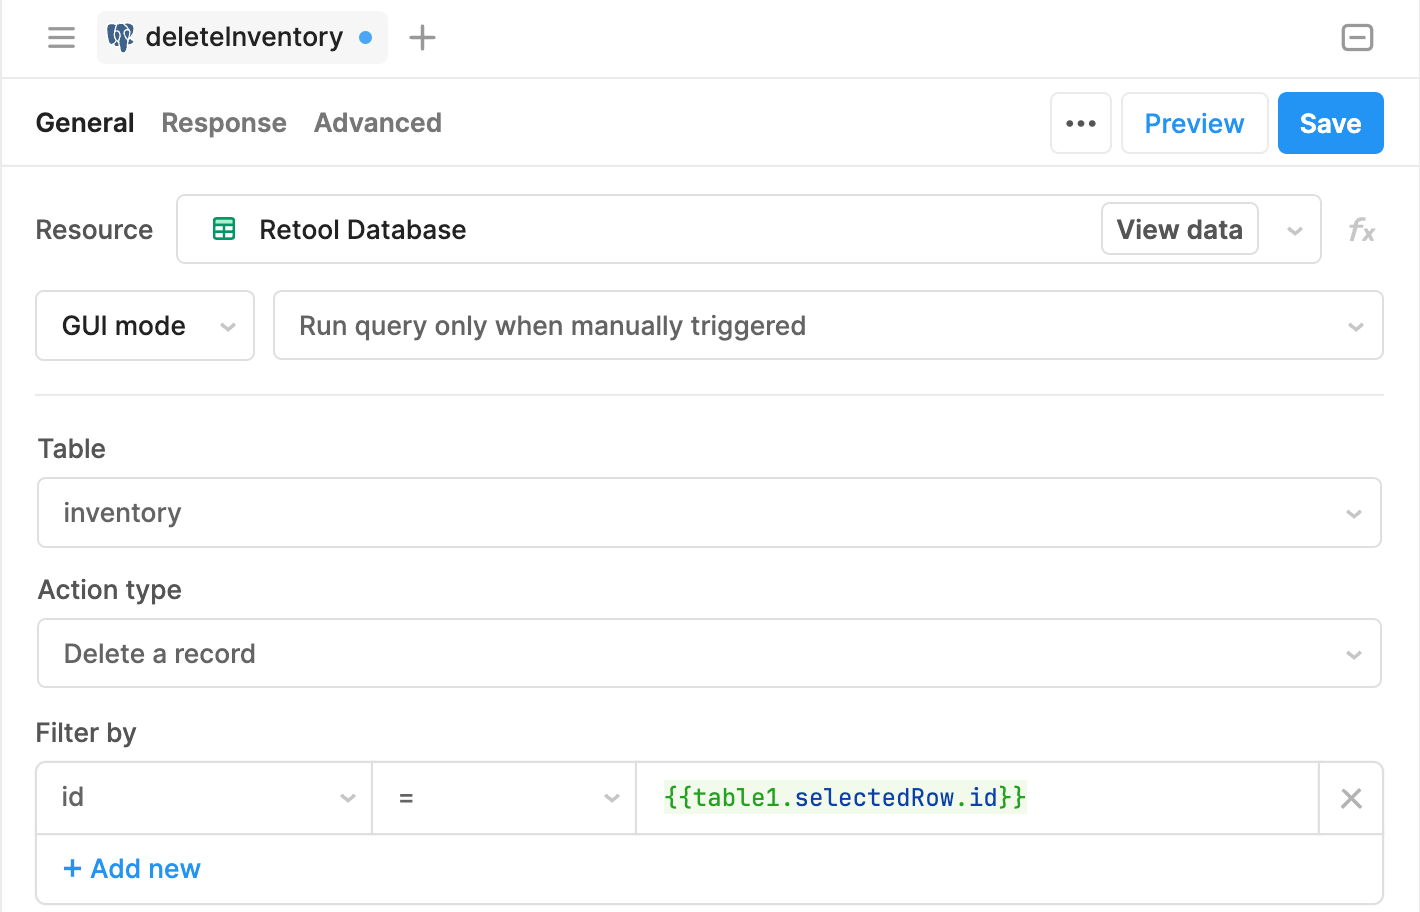
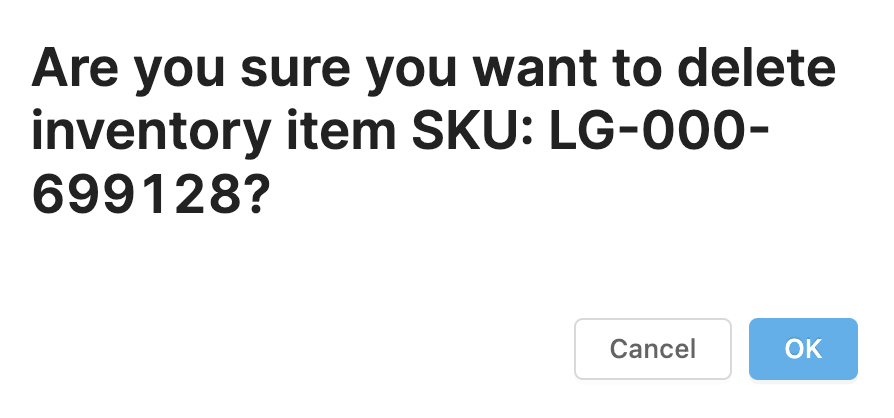
- Select Advanced and under Query Running Feedback, select Show a confirmation modal before running. For the confirmation message specify the following:
## Are you sure you want to delete inventory item SKU: {{table1.selectedRow.sku}}?
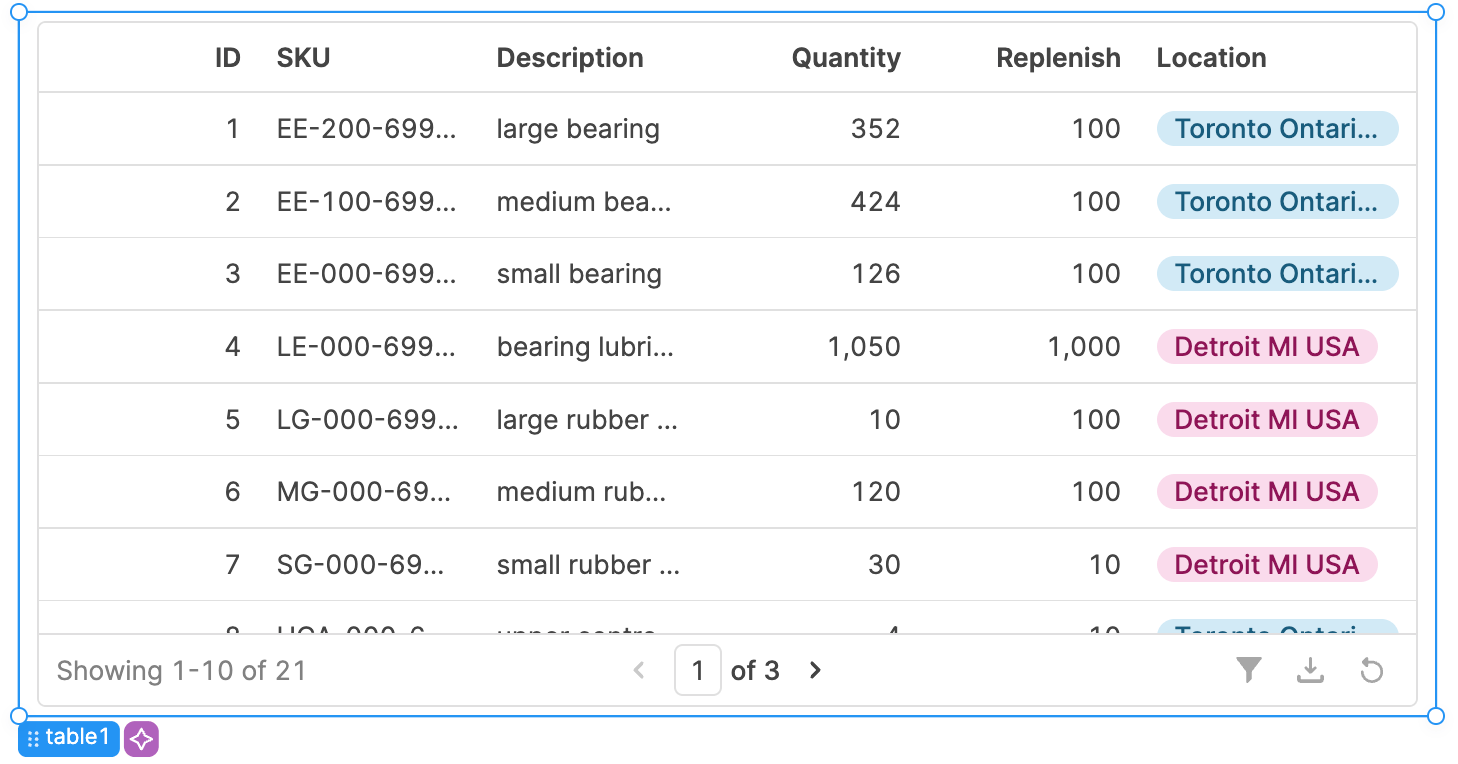
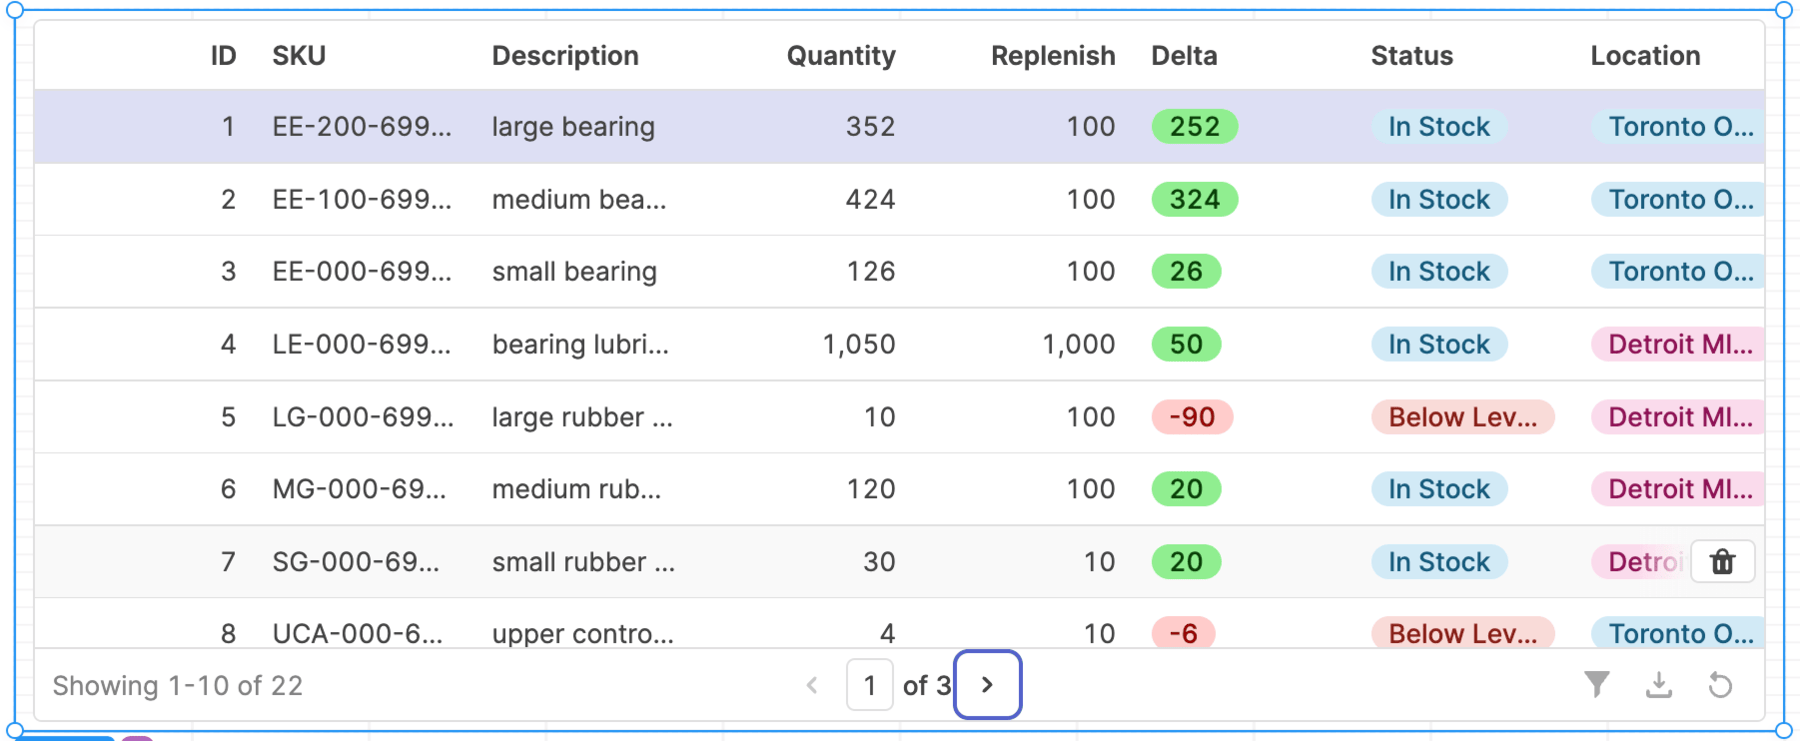
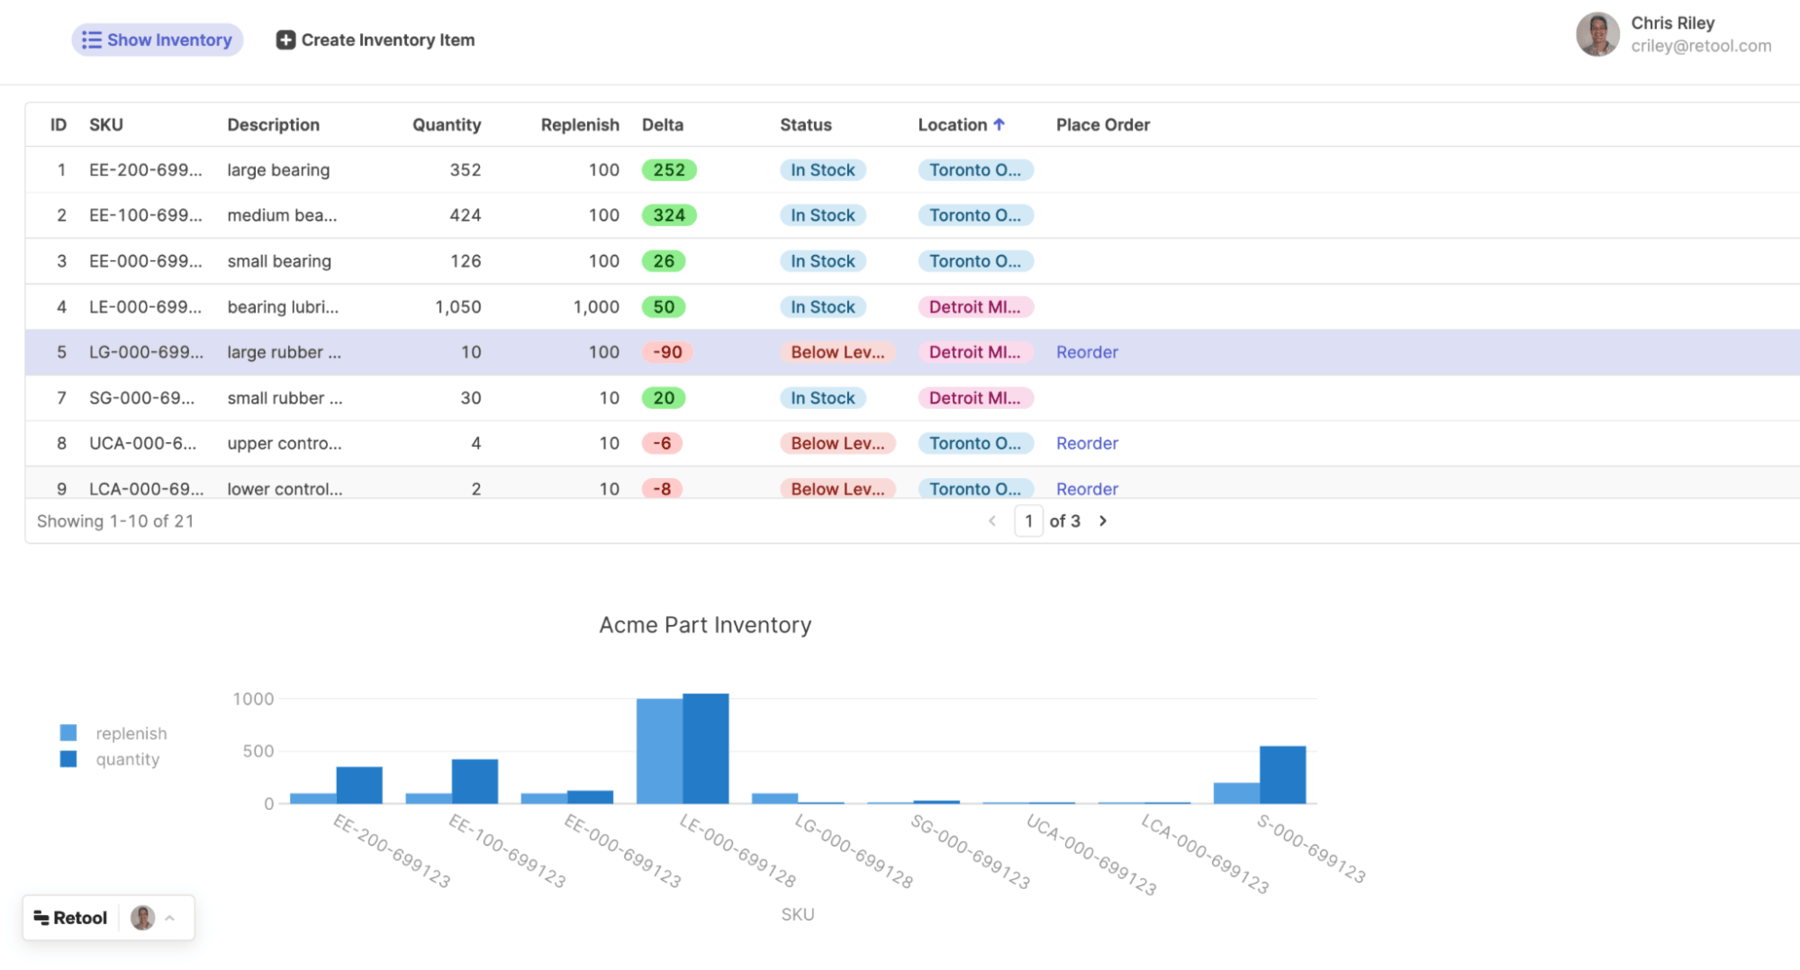
- Update the Table component to use the getInventory query for its data. Select table1 and in the Inspector, under Content > Data source specify getInventory. This will update the table1 with a paginated inventory result as shown in the following figure.
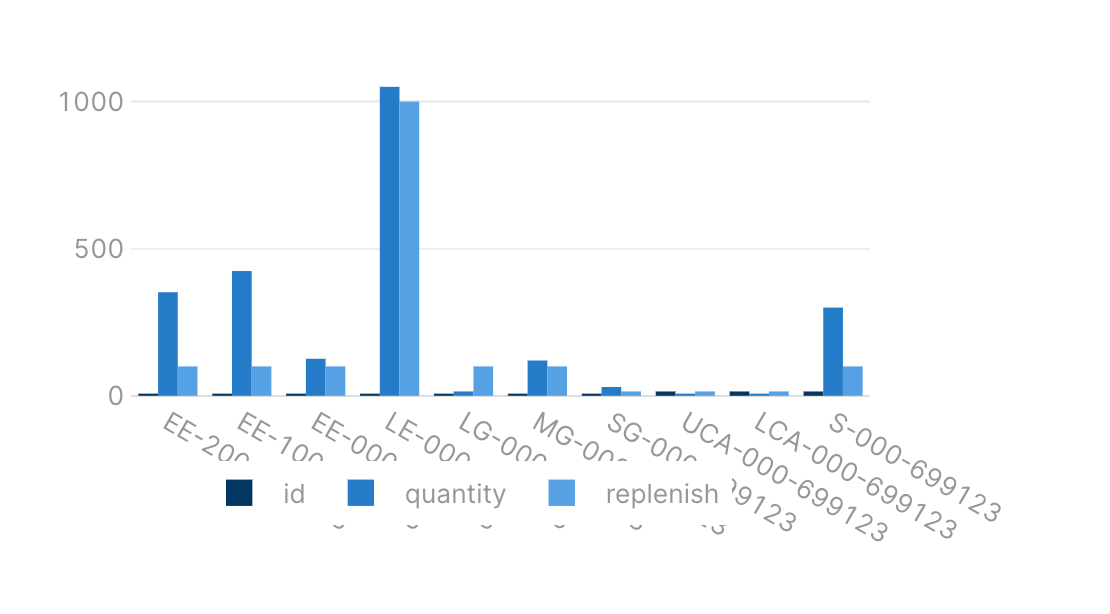
Update the Chart component to use the same query by selecting the component and in Inspector, update Data source to {{getInventory.data}}. The chart will update as shown below:
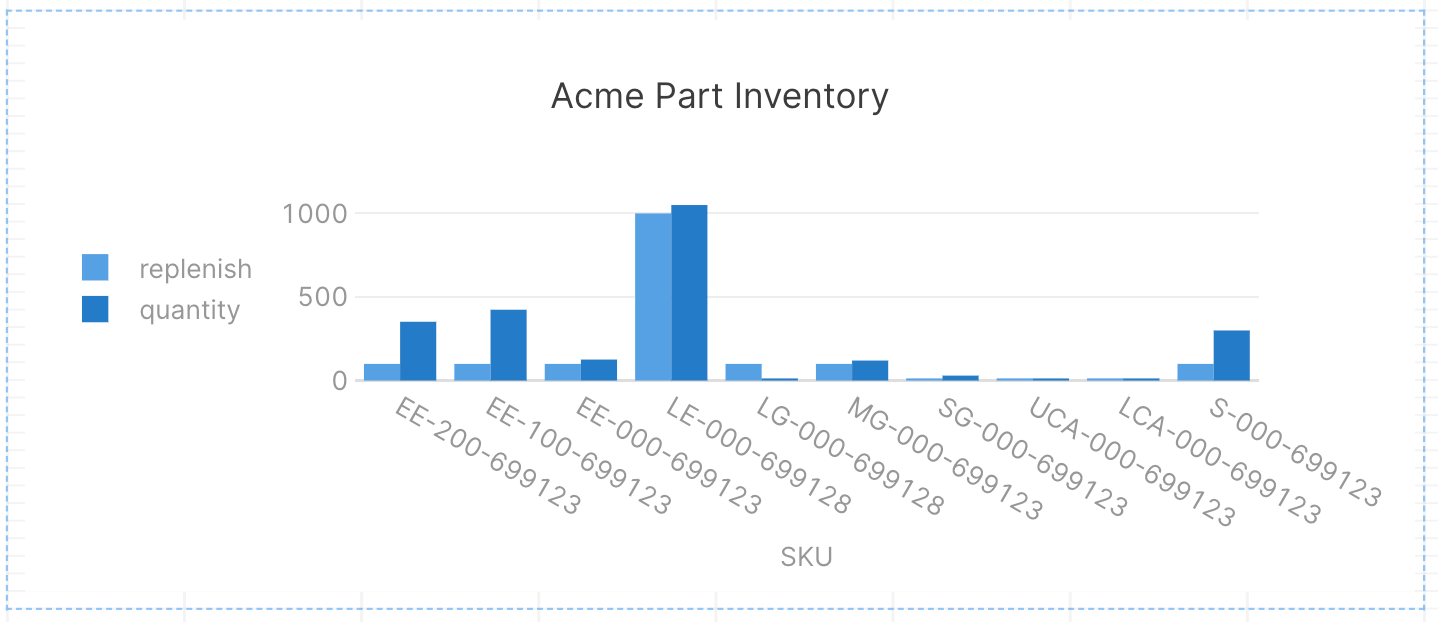
Format the chart to make it more legible by setting the following attributes in Inspector:
- Drag the chart to make equal in width to table1.
- Datasets =
select id and in the id dialog select Remove dataset. - Legend position =
Left - Title =
Acme Part Inventory - X-axis Title =
SKU
- Datasets =
Create Query for Create Inventory
- Make sure you are in the Acme Create Inventory Item app. If not, select the Retool icon / Back to home in the upper left corner which will bring you to the home page.
- Use search to find the app, select it and then select Edit app.
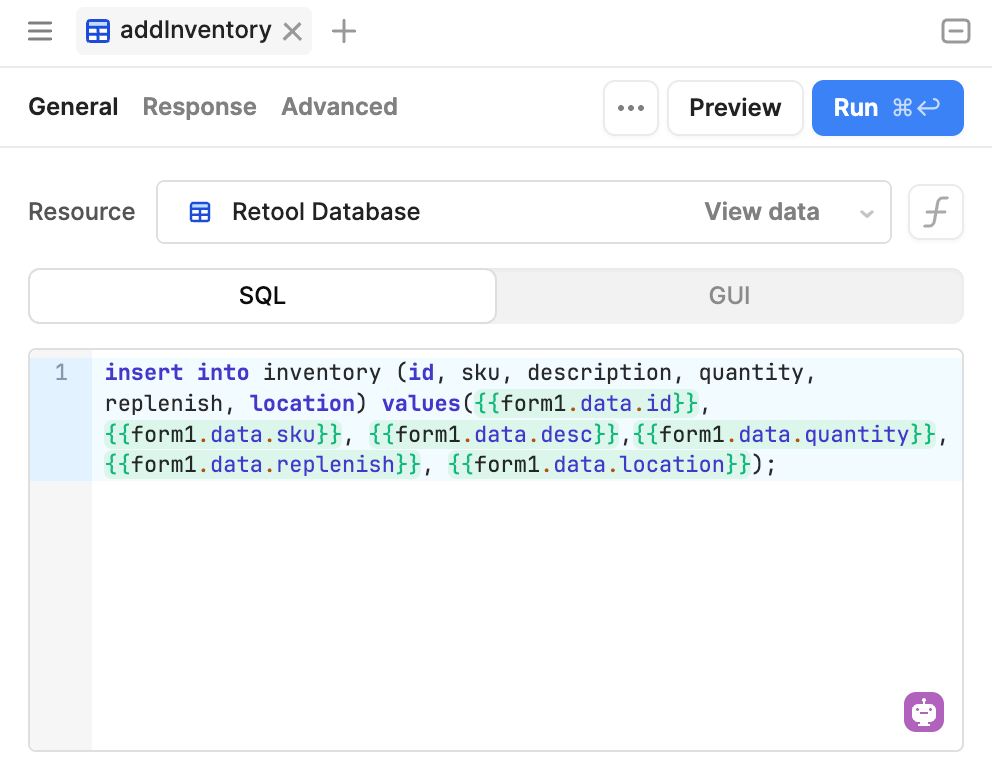
- Create a new query, addInventory to create items in the Retool database.
- Select Code > + > Resource query.
- Specify Resource Retool Database, use SQL Mode to specify the following query.
insert into inventory (id, sku, description, quantity, replenish, location) values({{form1.data.id}}, {{form1.data.sku}}, {{form1.data.desc}},{{form1.data.quantity}},{{form1.data.replenish}}, {{form1.data.location}});
- Use Preview and then Save & Run within the query editor.
Create Event Handler for Create Inventory
Make sure you are in the Acme Create Inventory app. If not, select the Retool icon / Back to home in the upper left corner which will bring you to the home page.
- Use search to find the app, select it and then select Edit app.
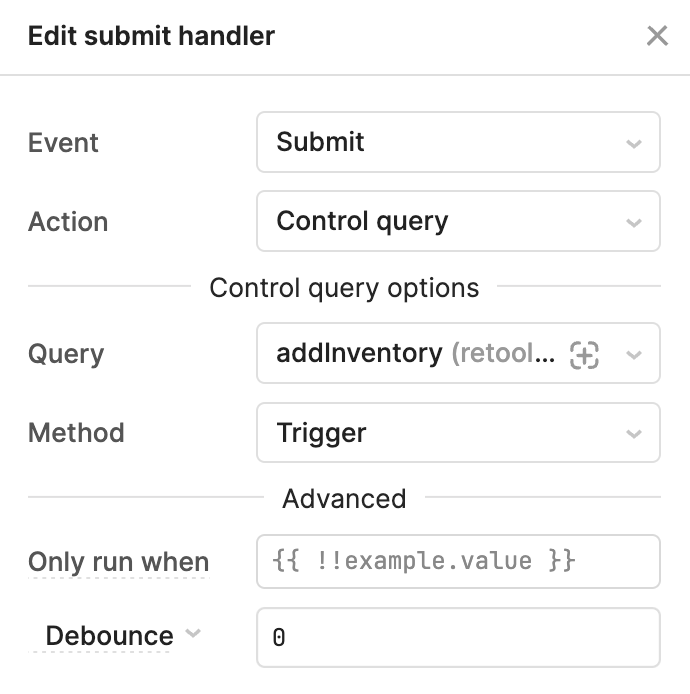
- Select the form1 component. In Inspector, select Event handlers > + . This may auto-populate the Edit submit handler dialog using the Submit event on the Button component to trigger the Query, addInventory.
- Test the component by filling out the form with the following information:
- Id =
25 - Sku =
FA-111-699300 - Description =
Front Axle - Quantity =
125 - Replenish =
100 - Location =
Toronto, Ontario, CA
- Id =
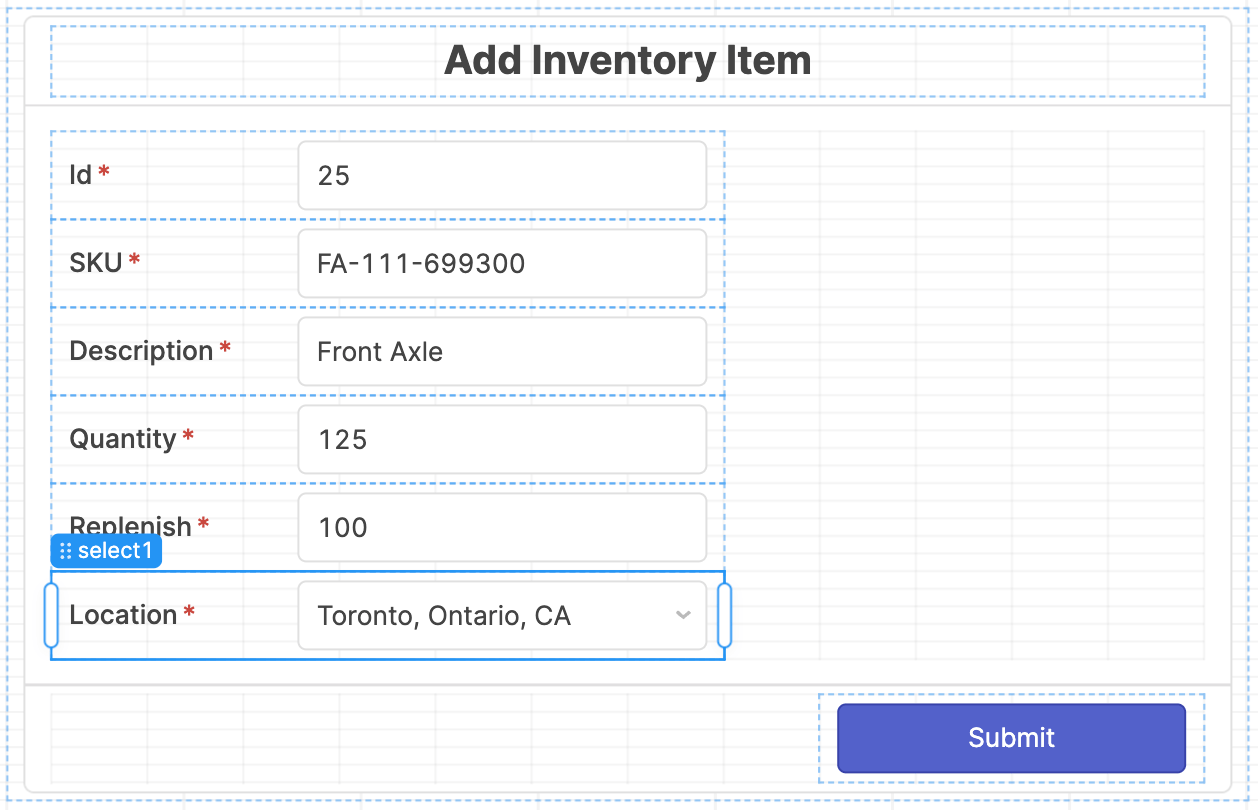
- Check the Retool Database and confirm the entry has been created. The following figure shows the result:

Event Handlers / Scripts for Show Inventory
We will use JavaScript to provide visibility on what SKUs are above or below the replenish levels. This helps simplify the user's experience by highlighting which inventory needs reordering.
- Make sure you are in the
Acme Show Inventoryapp. If not, select the Retool icon / Back to home in the upper left corner which will bring you to the home page. - Use search to find the app, select it and then select Edit app.
- Select table1 component.
- In the Inspector, add a column by selecting Columns > +.
- Specify the following for the column properties:
- ID =
delta - Format =
Tag - Label =
Delta - Value =
{{currentSourceRow.quantity - currentSourceRow.replenish}} - Appearance / Assign tag colors automatically =
disabled - Appearance / Color =
{{(currentSourceRow.quantity - currentSourceRow.replenish) > 0 ? '#90EE90':'#ffcccb' }}
- ID =

- Select table1 component.
- In the Inspector add a column by selecting Columns > + .
- Specify the following for the column properties:
- ID =
status - Format =
Tag - Label =
Status - Value =
{{(currentSourceRow.quantity - currentSourceRow.replenish) > 0 ? 'In Stock' : 'Below Levels'}}
- ID =

Next we will add the ability to edit the quantity field and use an event handler / Save Action to invoke the updateInventory query.
- Select table1 component and in the Inspector, hover over the Quantity column and select the ... icon when it appears. Select Make editable. This will enable quantity values to be adjusted up or down.
- Select Add-ons > Save actions. Specify the following values:
- Event handlers =
updateInventory.trigger - Disable save =
false - Clear changeset on successful save =
enabled
- Event handlers =
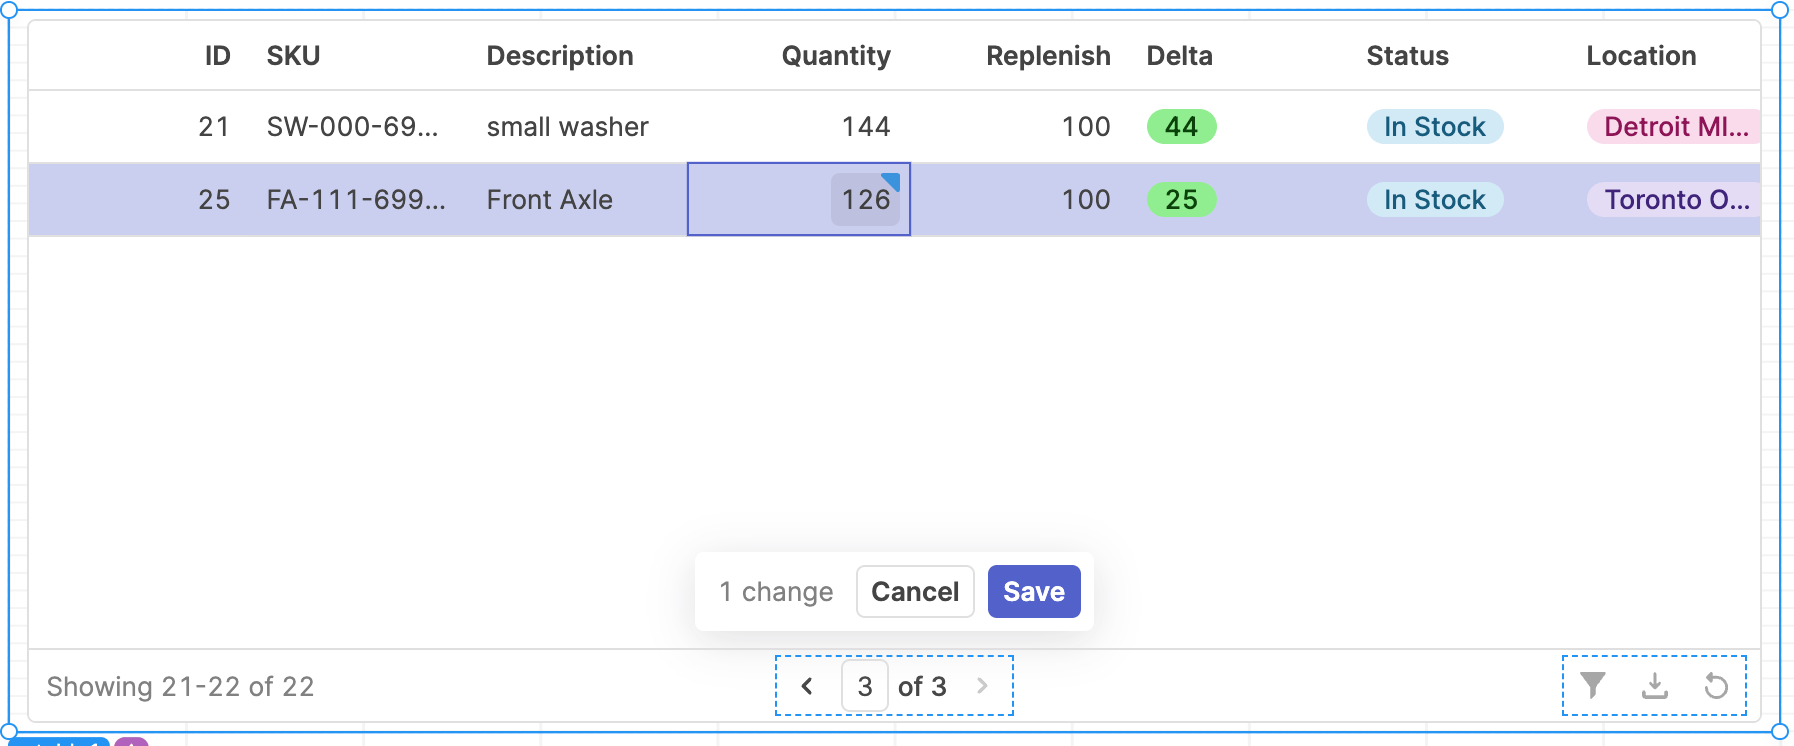
- Test the ability to edit a quantity field by editing the quantity for id = 25.
- Use the pagination fields at the bottom of table to show page 3.
- Edit the quantity to 126 and then select Save. This will execute the updateInventory query.
Let's examine the use of the State viewer.
- Select the
{i}from the Left panel. This will display state in the app. - Select the hamburger icon to specify table1 as shown in the following figure.
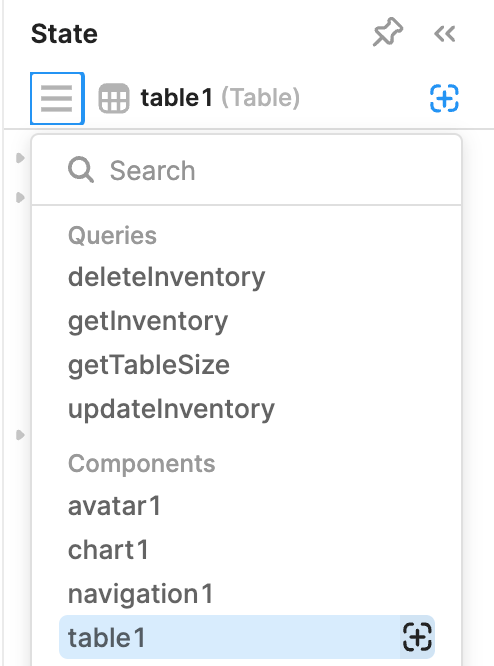
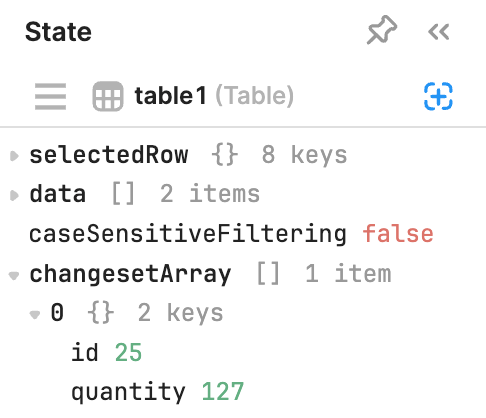
This will then display the current variables for table1. The one of interest is the changeSetArray that is populated when you increment the editable quantity field from its original value. Below you can see the id of the inventory item and the quantity that has been changed.
When you select Save for the changed quantity. The state is cleared and appears as the following:

The last step is to add the ability to delete an inventory item.
- Select the table1 component.
- In the Inspector, select Actions > + . Specify the following values:
- Label =
Delete Inventory - Icon =
Interface Delete Bin 2 - Event Handlers =
deleteInventory.trigger()
- Label =
Test by hovering over a row and select the trash can icon.
This will present a warning modal that you can either accept or cancel:
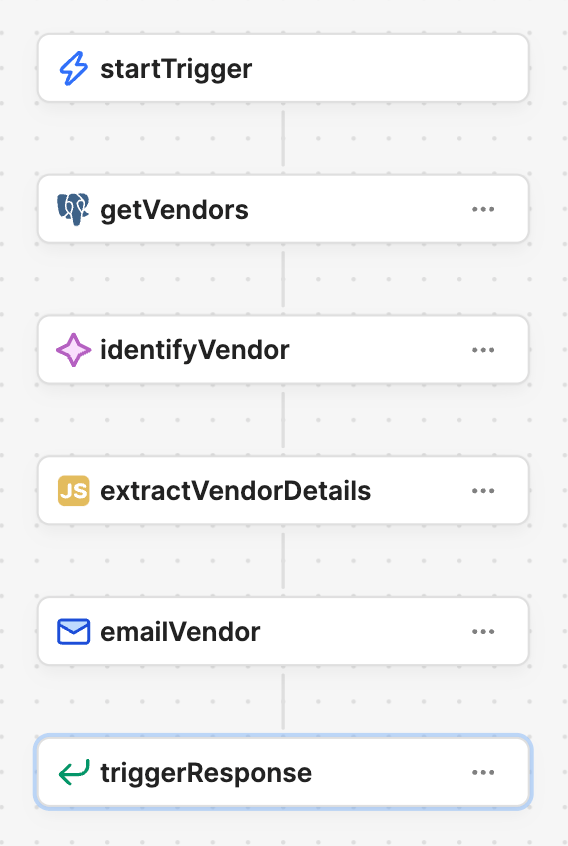
Automate Reorder Inventory Workflow
To help automate the reordering process, a Retool Workflow will be created and integrated with the Show Inventory app.
- Create a Workflow by selecting the Retool icon to get back to the Home screen.
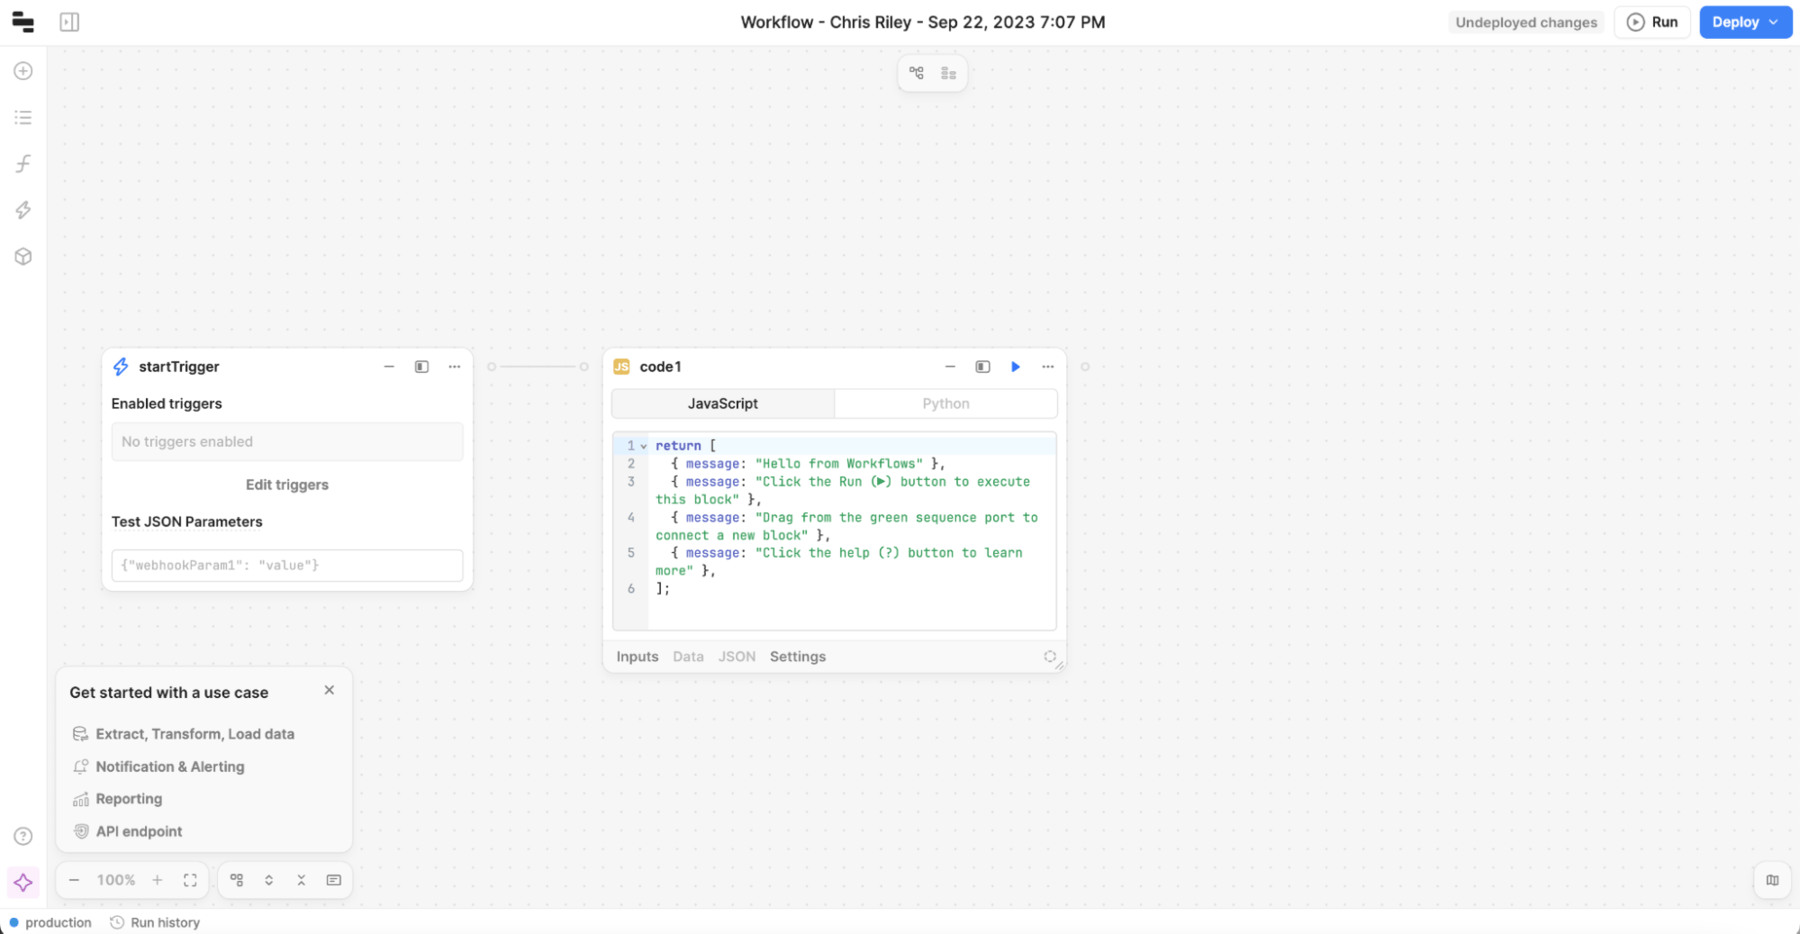
- Select Workflow > Create workflow. The workflow will be created as shown in the figure.
- Select the Workflow name and edit to
ReorderWorkflow. - Select Edit Triggers and enable Webhook.
- Delete the Code Block.
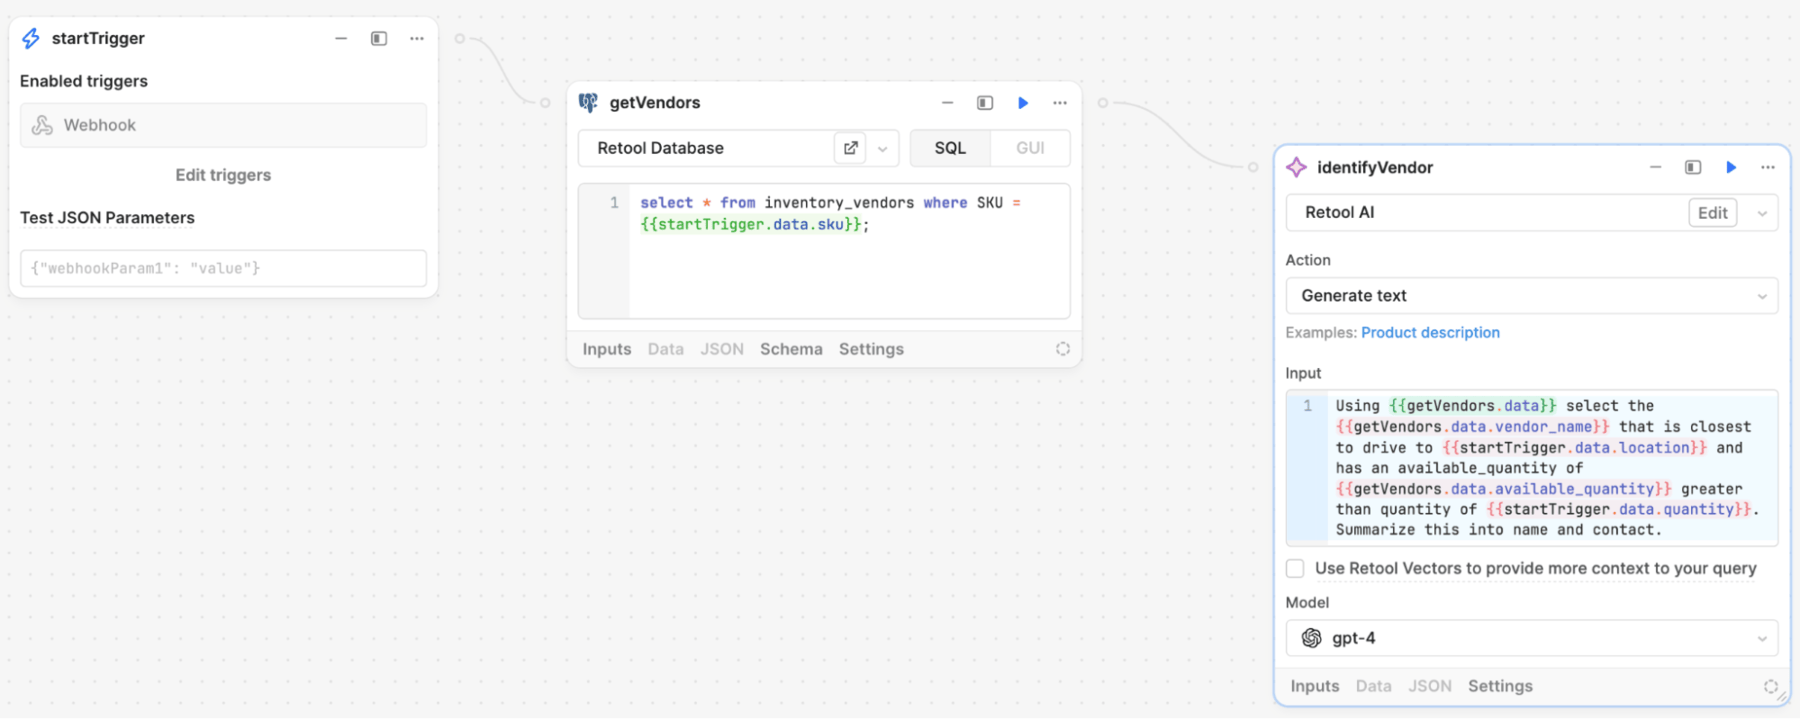
- Select the + to add a Resource query Block.
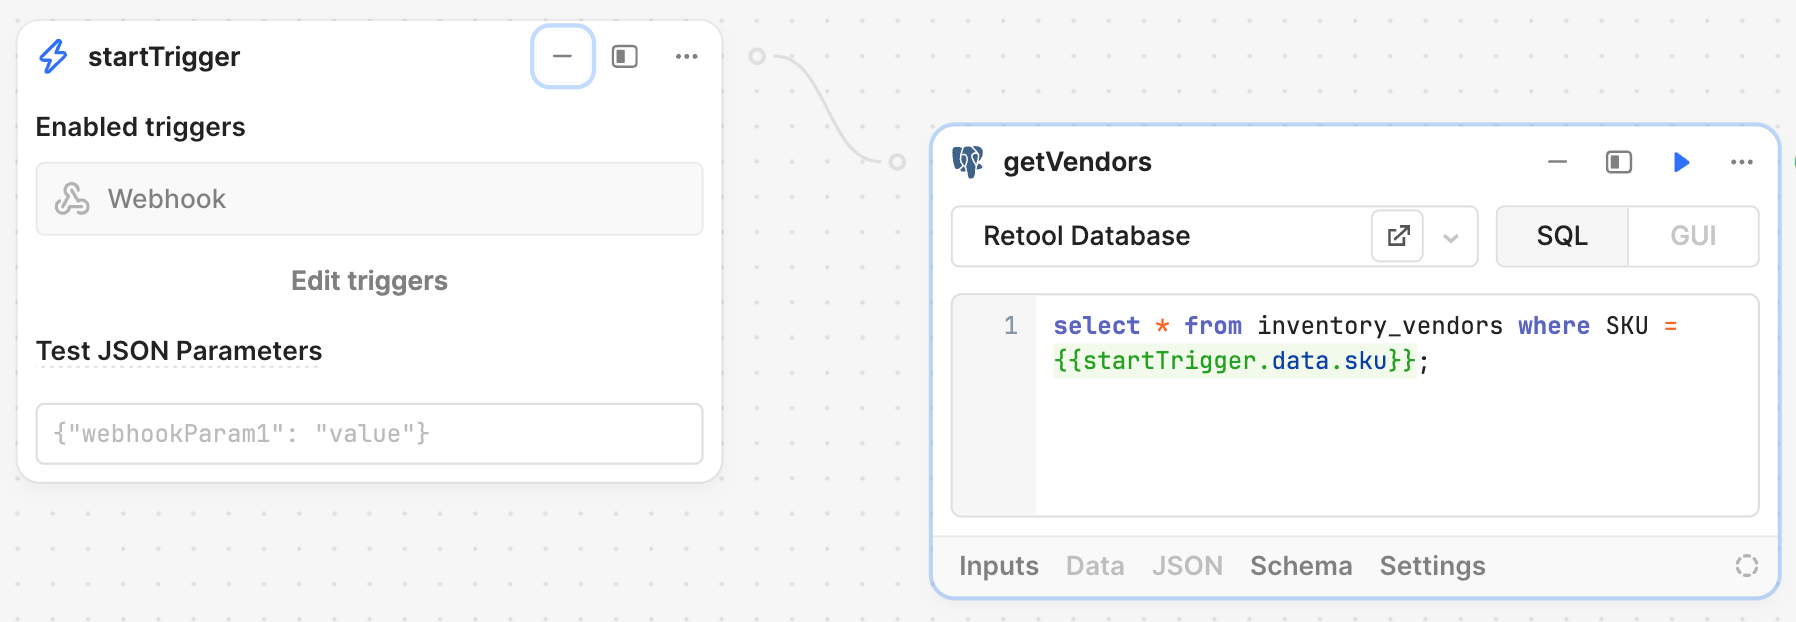
- Connect the startTrigger block to the Resource query block.
- Change the block name to getVendors. Specify a SQL query of:
select * from inventory_vendor where SKU = {{startTrigger.data.sku}};
- Deploy the workflow by selecting Deploy > Deploy Workflow.
- Next, connect the
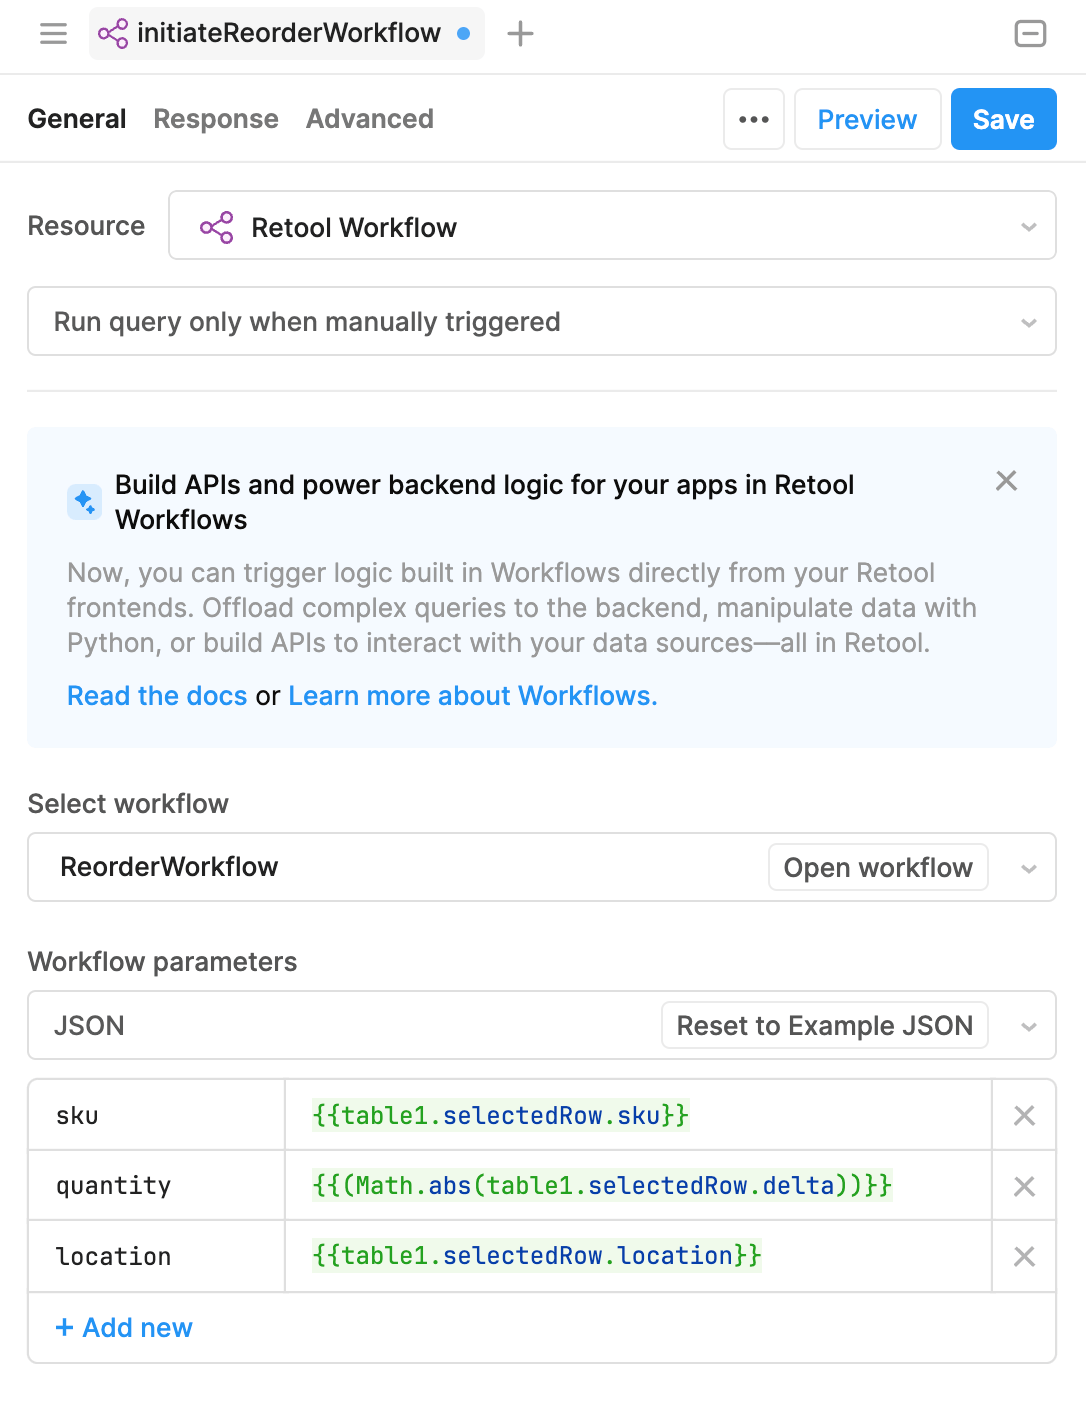
Show InventoryWeb App with the Reorder Workflow. Make sure you are in theAcme Show Inventoryapp. If not, select the Retool icon / Back to home in the upper left corner which will bring you to the home page. Use search to find the app, select it and then select Edit app. - Create a new query by selecting Code > + > Resource query and name it
initiateReorderWorkflow.- Resource =
Retool Workflow - Select Workflow =
ReorderWorkflow - Workflow Parameters (JSON)
- sku =
{{table1.selectedRow.sku}} - quantity =
{{Math.abs(table1.selectedRow.delta)}} - location =
{{table1.selectedRow.location}}
- sku =
- Resource =
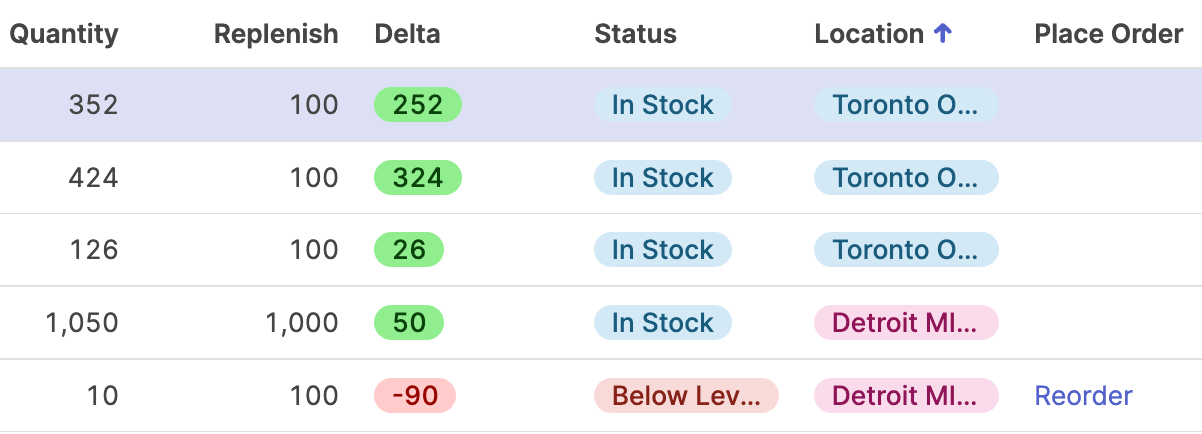
- Select table1. Add a new column, Place Order, by selecting Columns > + to add a Reorder link for SKUs that are below Replenish as shown in the following figure.
- Id =
placeOrder - Label =
Place Order - Format =
Link - Value =
{{(currentSourceRow.quantity-currentSourceRow.replenish) < 0 ? "Reorder":""}}
- Id =
- Create an event handler that connects clicking the link with the Retool Workflows Resource / Query. Select Event handler > + as shown in the following figure.
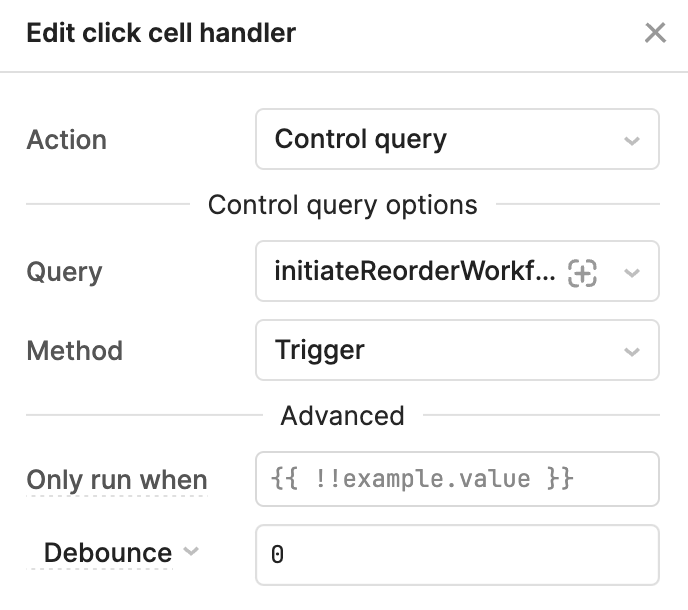
- Test to make sure the event handler / query initiates the workflow by selecting the Reorder link under the Place Order column. This will initiate the workflow and the execution run is displayed in the Workflow Logs in the Workflows console. The following figure shows the startTrigger JSON payload, matching the row details in the
Show Inventoryapp.
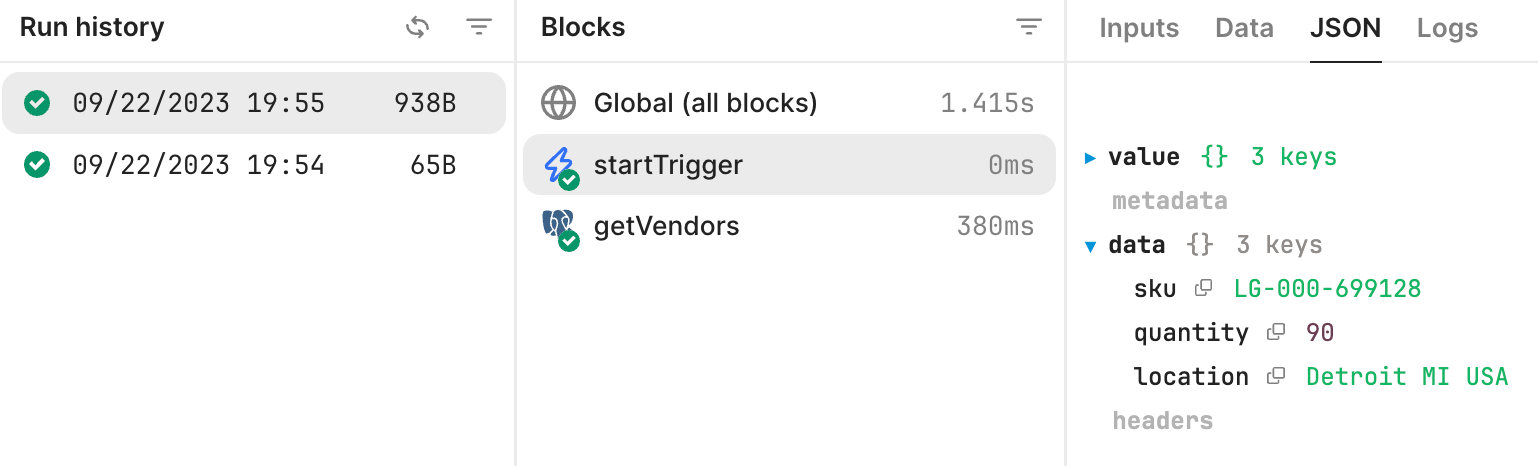
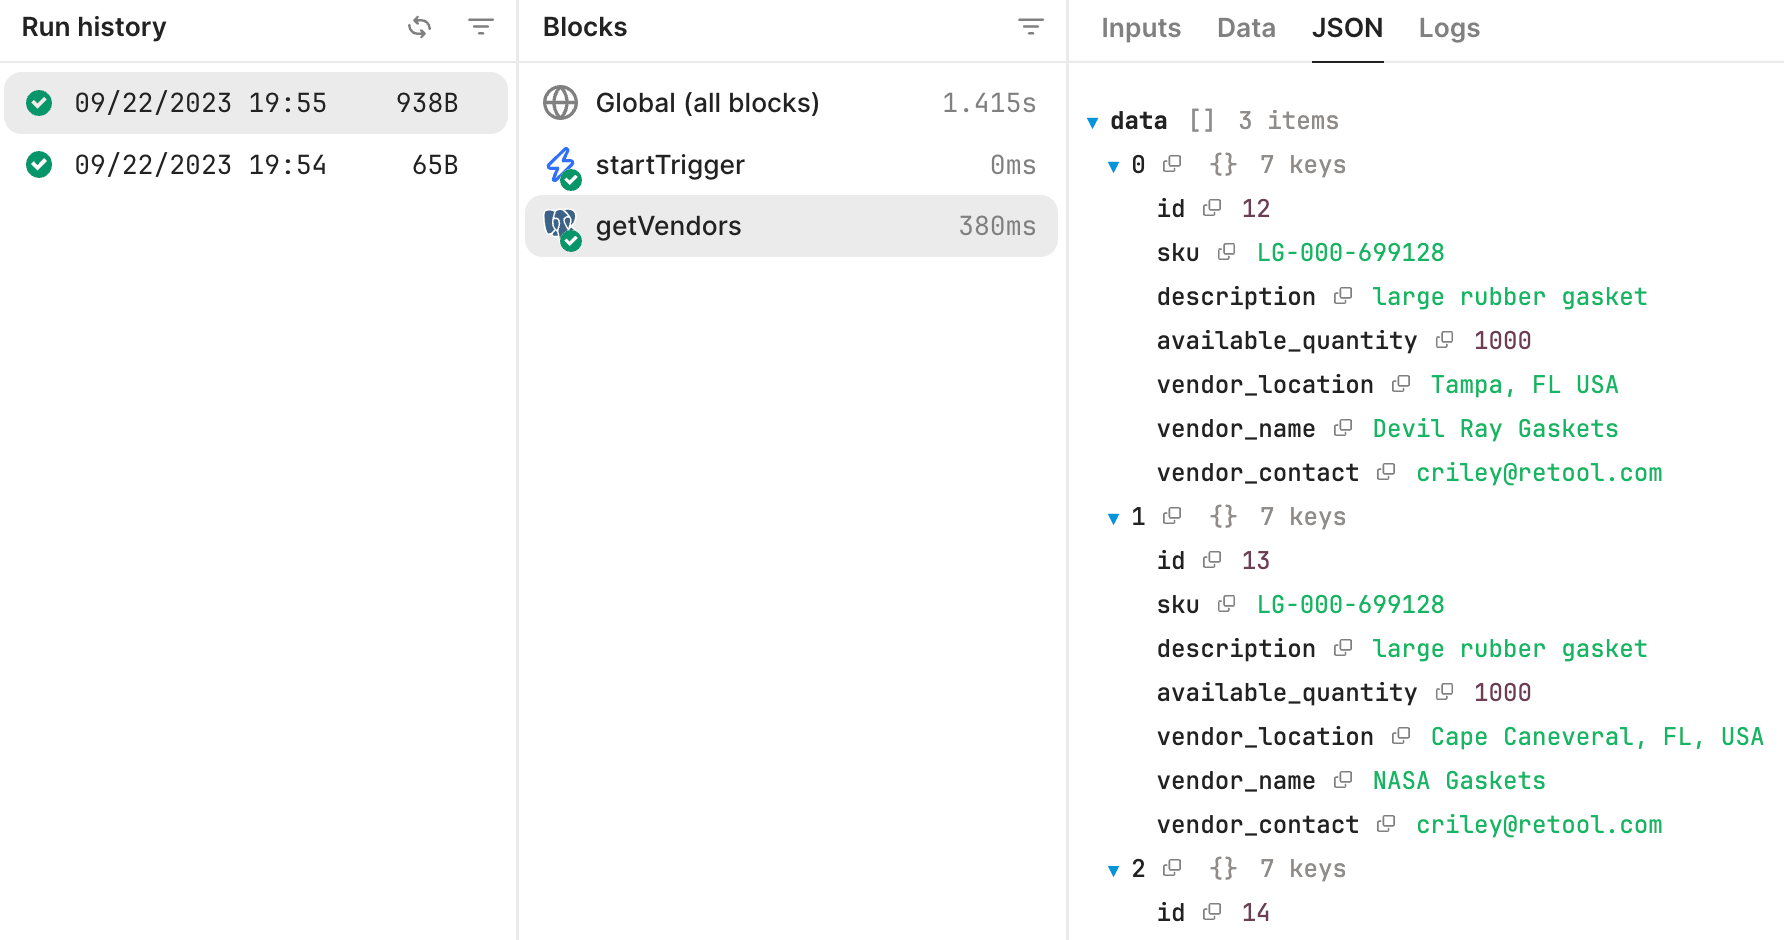
- Select getVendors and the SQL query using the SKU will be displayed. It should show 2 or more records.
- Add an AI Action that examines the content returned from getVendors and determines which vendor will provide the best option for replenishment of the SKU.
- Select Blocks > + > AI Action and drag and drop after the Resource query block, getVendors.
- Action =
Generate text - Input = (Copy the text that follows)
- Action =
Using {{getVendors.data}} select the {{getVendors.data.vendor_name}} that is closest to drive to {{startTrigger.data.location}} and has an available_quantity of {{getVendors.data.available_quantity}} greater than quantity of {{startTrigger.data.quantity}}. Summarize this into name and contact.
- Change the block name to identifyVendor.
- Deploy the current workflow by selecting Deploy > Deploy workflow.
- Rerun the test from the Show Inventory app and examine the new Workflow logs / JSON (See following example).

Within the data element, the AI Action returns the following:
“Choosing a vendor that is closer to a certain location requires knowledge of the geographical layout of the United States. With the information provided, it seems like the vendor with the location in Baltimore, MD, USA will be closer to drive to from Detroit, MI, USA. Vendor Information: - Vendor Name: Orioles Gaskets - SKU: LG-000-699128 - Description: Large rubber gasket - Available Quantity: 1000 - Vendor Location: Baltimore, MD, USA - Vendor Contact: criley@retool.com Please note this is an approximate estimation based on geography, actual distances can differ based on specific locations within the cities or the route taken.”
Following the AI Action, it is necessary to parse the result, retrieve the vendor contact and send an email with request for a purchase order providing the SKU and Quantity.
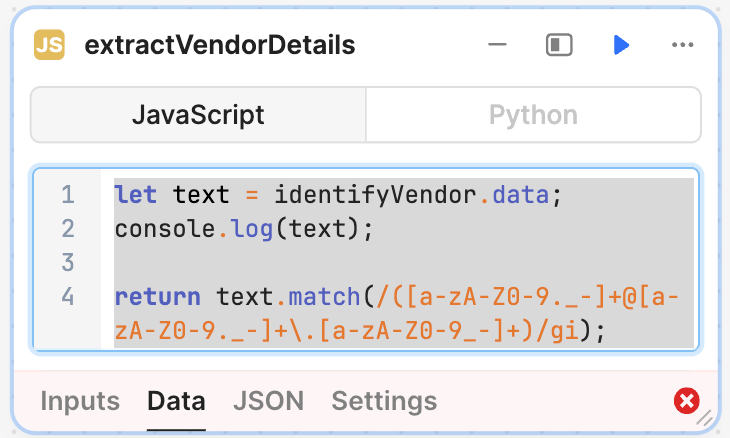
- Drag and drop a Code block, connect to the AI Action and rename extractVendorDetails.
- Specify the following code:
let text = identifyVendor.data;
console.log(text);
return text.match(/([a-zA-Z0-9._-]+@[a-zA-Z0-9._-]+\.[a-zA-Z0-9_-]+)/gi);
- Drag and drop a Resource query block, connect to the Code block and rename emailVendor.
- Specify Resource type = Retool Email
- To =
{{extractVendorDetails.data[0]}} - Subject =
Inventory Order for SKU: {{startTrigger.data.sku}} - Body =
Please provide a PO for: SKU: {{startTrigger.data.sku}} and Quantity: {{startTrigger.data.quantity}}
- To =
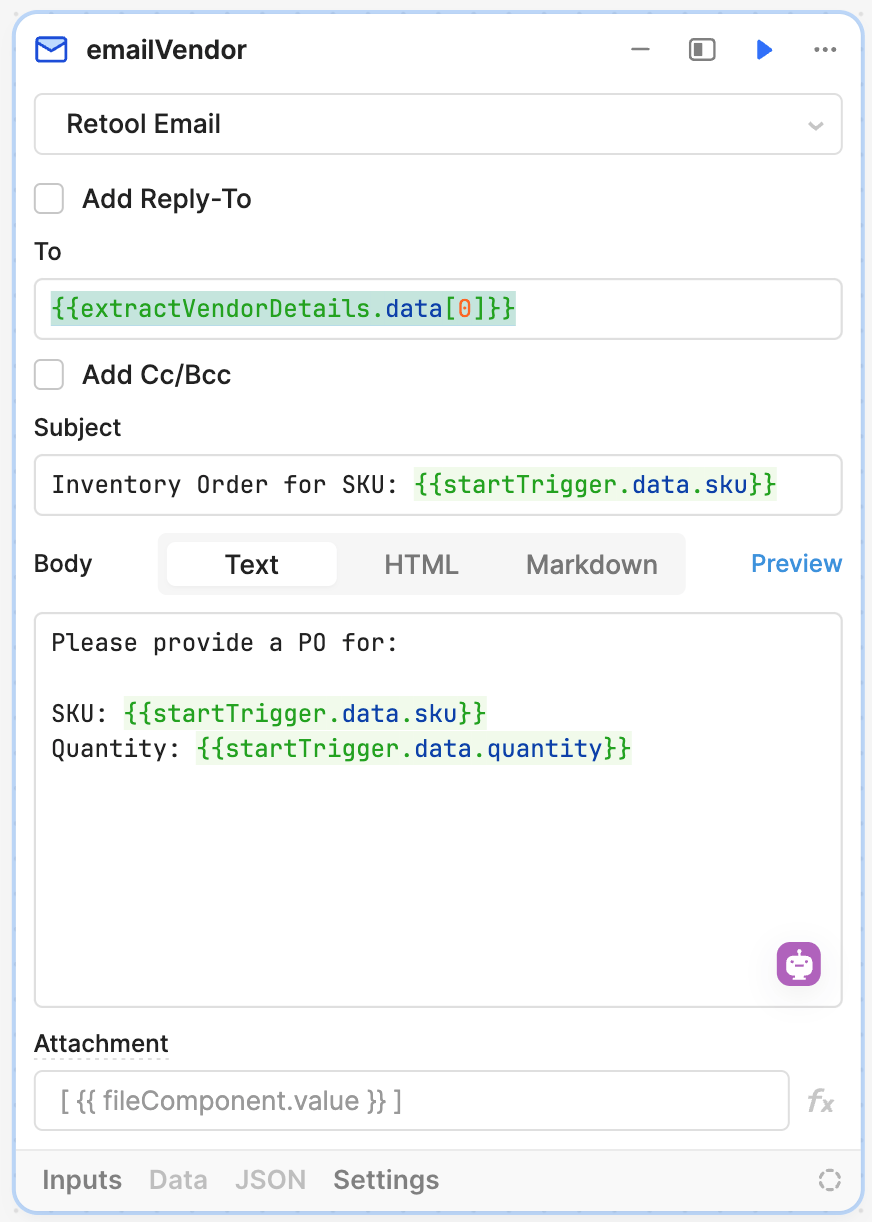
- Drag and drop a Webhook Response block, connect to emailVendor and rename triggerResponse.
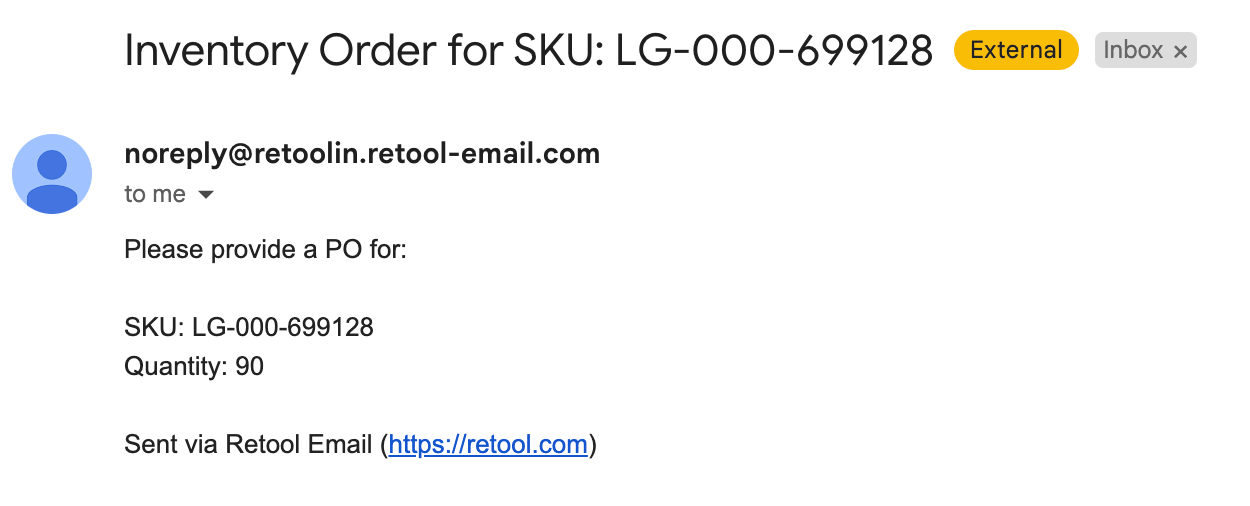
- Deploy the current workflow by selecting Deploy > Deploy workflow. Test the workflow by selecting the Reorder link in the
Show Inventoryapp and confirm the email is sent to the email listed. Examine the Workflow logs to see how data is sent and processed in each block.
Completed examples
You can import these completed examples to compare but it will require that you configure the database table inventory and inventory_vendor:
- Workflow: ReorderWorkflow.json
- Show Inventory App: AcmeShowInventoryApp.zip
- Create Inventory App: AcmeCreateInventoryApp.zip
- Inventory App Module: AcmeInventoryModule.zip
Appendix
Completed Show Inventory Screen
Completed Create Inventory Screen
Completed Reorder Workflow