Ticketing Workflow and App
This laboratory focuses on creating a lightweight Extract, Transform, Load (ETL) Retool workflow process to pull ticket information from an external public API into a database. Once the data is accessible in a database, a Retool App can display ticket details.
Steps
Execute the following steps to perform ETL and visibility of tickets through a Retool App.
Create a Retool account and login
Create a Retool account and login to your account as shown below.
- Retool Database
- PostgreSQL
Create a table in Retool Database
Create table / define schema
To store ticketing information, RetoolDB will be employed.
- Once you are logged into the Retool Home Screen, select Database > +.
- Create a table called tickets. Select Add column to add
user_name,ticket_summaryandticket_descriptionfields. - Select Create to create the table.
The following shows using the AI Assist to use a natural language prompt.
Create a table in PostgreSQL using pgAdmin
Configure PostgreSQL Resource
Retool by default does not have a configured PostgreSQL Resource. Use the following documentation instructions with your Retool Administrator to create and configure permissions for the resource.
Create table / define schema
To store ticketing information, the PostgreSQL resource and pgAdmin 4 will be employed.
- Login to pgAdmin / PostgreSQL.
- Select Tools > Query Tool. Enter the following SQL statement and run it to create the table.
CREATE TABLE tickets (
    id SERIAL PRIMARY KEY,
    user_name TEXT,
    ticket_description TEXT,
    ticket_summary TEXT
);
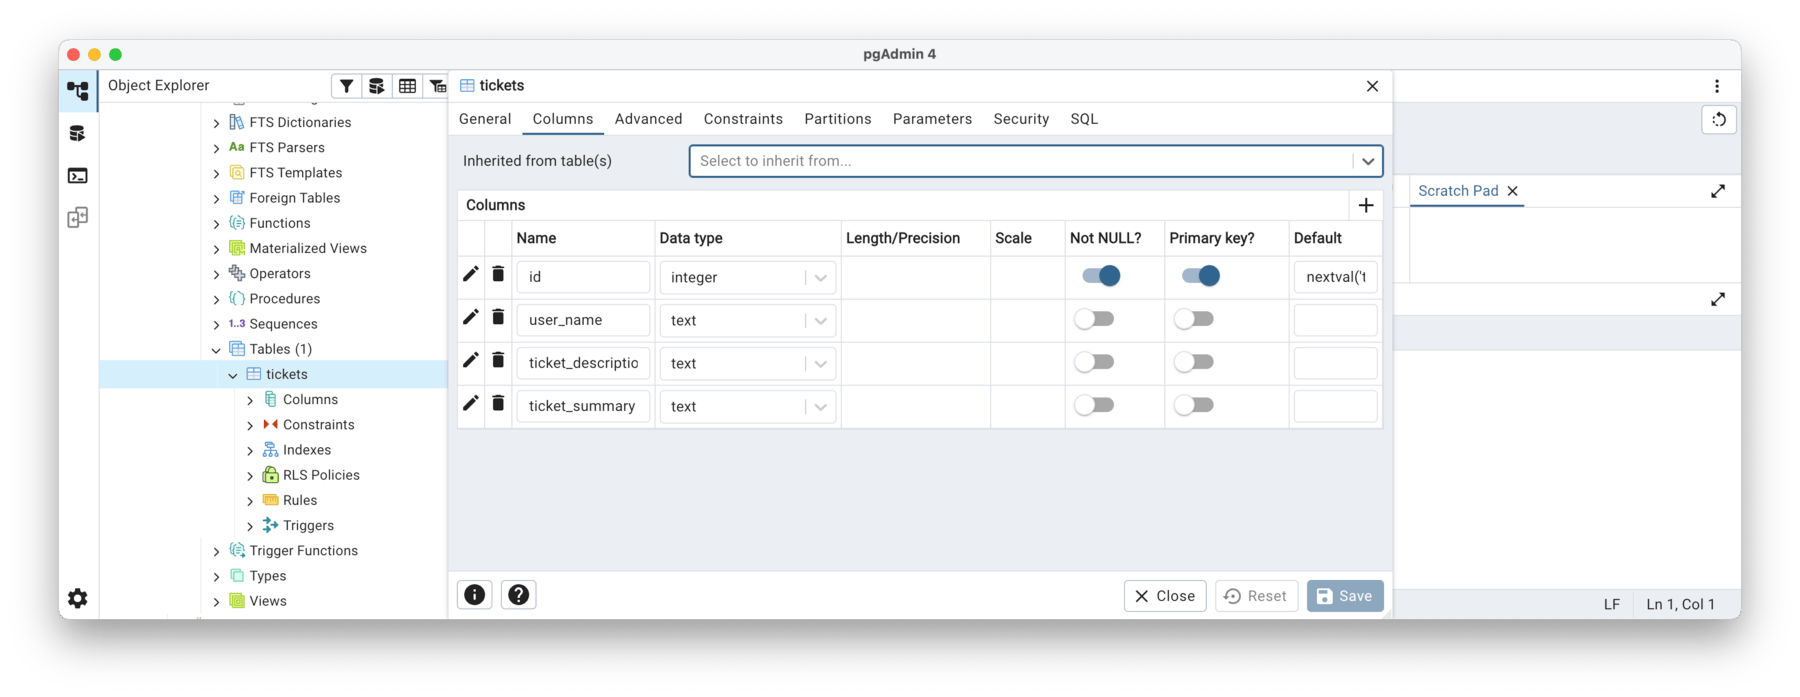
- Confirm the database table has been created by using the Object Explorer to see the
ticketsschema. - Right-click and select Properties to confirm the schema is defined as shown in the following image.
Create a Retool Workflow
Retool Workflow provides a way to develop automated tasks. In this example, we are interested in getting a ticket using an API and storing within RetoolDB.
- Select the Retool icon to return to the Retool Home screen.
- Select Workflows.
- Select Create new > Workflow. This will create a base workflow with a Start Trigger object and Code block.
- Select the Code block, right-click and select Delete.
Modify Start Trigger to use Schedule
The Start Trigger supports webhook and a scheduler to initiate a workflow.
- Select the Start Trigger, select Edit triggers and enable the Schedule.
- Specify a time to run this workflow as shown in the following figure.

Create Resource query block to call API
In this step, we will add a Resource query block to invoke the ticketing system API.
- Select Add > Resource query and place to the right of the Start Trigger.
- Connect the Start Trigger and Resource query block.
- Rename the Resource query to
callTicketInfoAPI. - Resource should default to
REST APIandGETmethod, leave these values. - Update the Resource query URL to:
https://a78ua3zdyg.execute-api.us-east-2.amazonaws.com/default/getTicketInfo
- Select the Run icon to confirm the API returns a result.
Create AI Action block to summarize
In this step, we will leverage an AI Action block to take the ticket description from the previous step and summarize it.
- Select Add > AI Action and place to the right of the Resource query block.
- Rename the AI Action to
aiSummarizeDescription. - Connect the Resource query and AI Action block.
- Select Action > Summarize Text.
- Specify the input as
{{callTicketInfoAPI.data.caseDetails}}. - Leave the Model at the default value (e.g., gpt-4o-mini).
Create Resource query block to email notification
In this step, we will create a notification using Retool Email.
- Select Add > Resource query and place to the right of the AI Action block.
- Specify the Resource as Retool Email.
- Rename the Resource query to
emailUser. - Connect the AI Action to the Resource query block.
- Specify
Towith your email address. - Specify
SubjectwithReceived new ticket. - Specify
BodywithThe following is a ticket summary: {{aiSummarizeDescription.data}}
Create Resource query block to insert ticket into Database
In this step, we will perform a database insert into RetoolDB or PostgreSQL table tickets.
- Select Add > Resource query and place to the right of the AI Action block, below the Resource query block, emailUser.
- Specify the Resource as Retool Database or PostgreSQL.
- Rename the Resource query to
insertTicketIntoDB. - Specify the following SQL to insert the ticket into the Database:
insert into tickets (user_name,ticket_summary,ticket_description) values ({{callTicketInfoAPI.data.user}},{{aiSummarizeDescription.data}},{{callTicketInfoAPI.data.caseDetails}});
Run Workflow to populate Database
Once the workflow is complete,
- Select the Run button to execute the workflow.
- Examine the Workflow logs to confirm all steps executed properly.
- Examine Retool Database or PostgreSQL tickets table for new entries.
- Select the Run button several more times to generate several more records in RetoolDB.
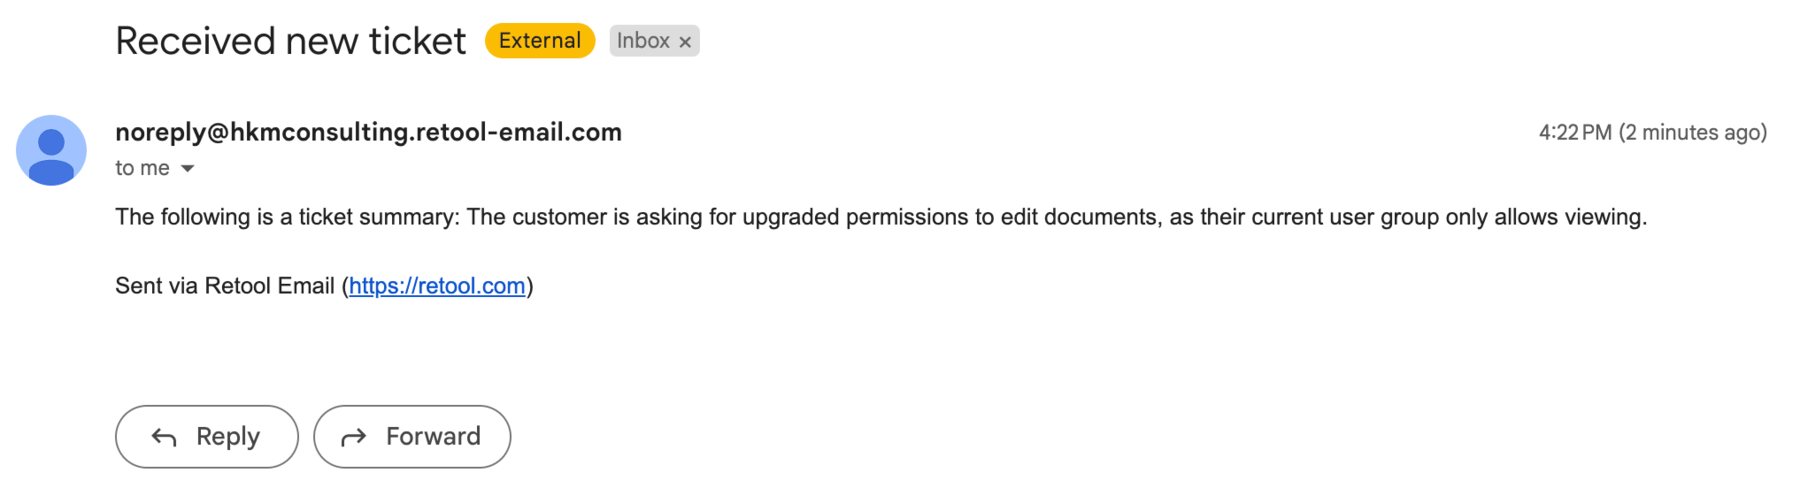
- Confirm you are receiving emails for each run as shown in the following image.
- Canvas
- Assist (AppGen)
Create a Retool Web App using Canvas
With the Retool Workflow inserting tickets into the database, a Retool Web App is the final piece to providing a ticket dashboard.
- Create Retool Web App by selecting the Retool icon > Apps > Create > App
- Select the X to remove the Get started panel. This should clear the canvas.
- Change the name to
TicketsAppfrom "User - Date" that it defaults to.
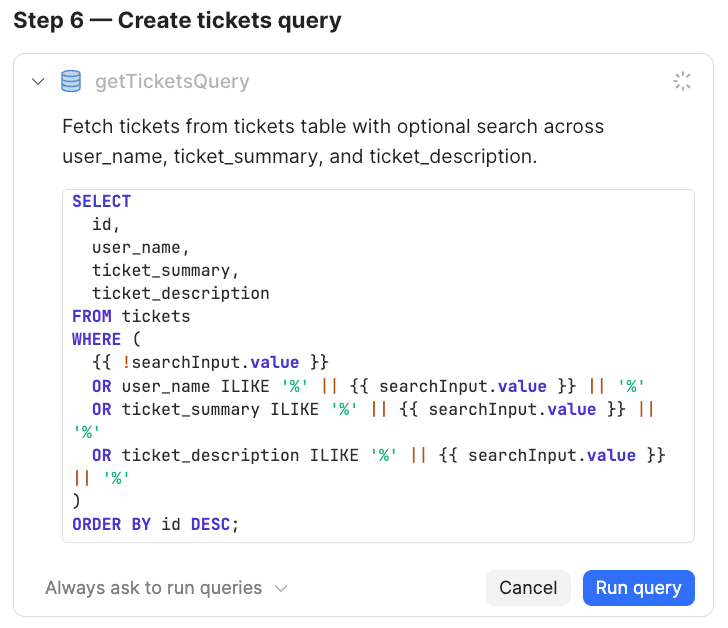
Create query to get ticket information from RetoolDB
To populate the Retool App, a query to get all tickets needs to be created.
- Select Code > + > page1 > Resource query
- Right click on
query1and select Rename to change query name togetTickets. - In the query editor, specify the Retool Database or PostgreSQL resource.
- Specify a SQL query of:
SELECT * from tickets;
- Select Save & Run
- The Output tab should display the table and current contents will display in the Query Editor.
Create table and set to query results
Next a table component needs to be added to the canvas and have its to data set to getTickets.
- Select Add > Components > Table and drag to the canvas.
- Select the table1 tag. This will expose the component inspector on the right.
- Select Data source > getTickets in the right-panel.
Hide columns to simplify table
This step focused on simplifying the table view by hiding the ticket description column.
- Select
table1so that the Columns are displayed in the right-panel. - Select Ticket description > ... > Hide column
Enable expandable rows to display Ticket Description
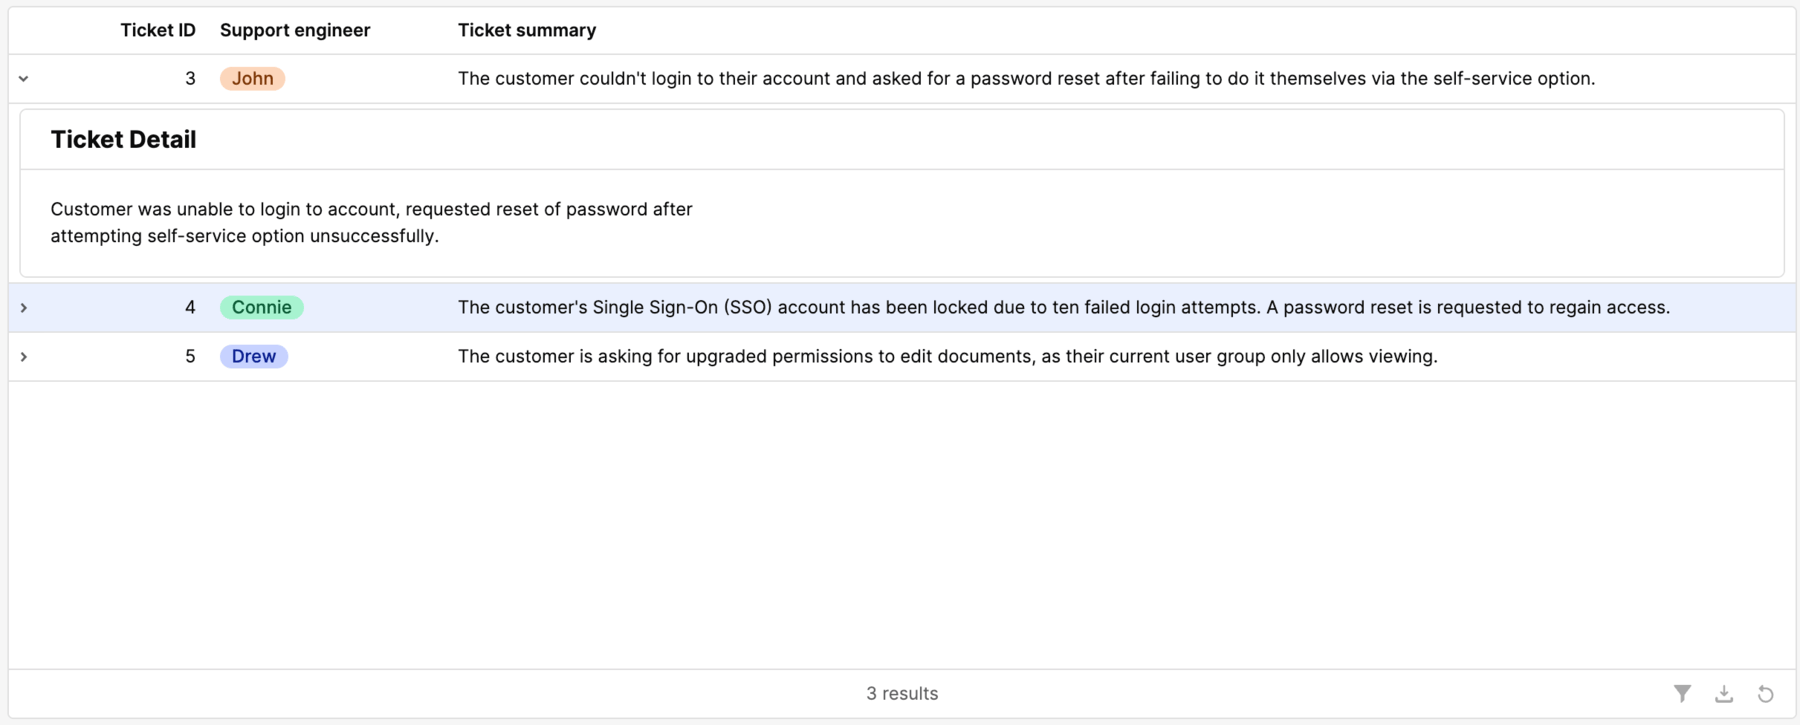
This step will help introduce expandable rows in the table where we will display the ticket description details.
- Select
table1so the right-panel displays its properties. - Select ... in the Content section. This will display a dialog with a property Enable expandable rows. Select the checkbox as shown in the following image.

- Expand a row and Add component > Container.
- Within container1, select Add component > Text.
- In component inspector for text1, specify a value of
{{table1.data[i].ticket_description}}. - Update containerTitle1 to specify value of
##### Ticket Detail.
Update table to improve UX
The default table component will now be modified to show the ticket id, the support engineer, and ticket summary.
- Select the table1 tag. This will expose the component inspector on the right.
- Hide the ticket description.
- Change the
idlabel toTicket ID - Change the
user_namelabel toSupport engineer. - Change the column type for
Support engineerto Tag format. - Change the
ticket_summarylabel toTicket summary.
Create a Retool Web App using Assist�
An alternative approach in building apps is to use Assist to prompt an application. Let's use this to develop an app using the Ticket database table.
- Create Retool Web App by selecting the Retool icon > Apps > Create > App
- The
Start anywhere with Assist[Beta]dialog should appear in the left of the IDE. - In the prompt area (bottom of Assist panel), enter the following prompt, replacing @database_resource_here, with what you have configured:
Create a ticket dashboard that uses @database_resource_here and the tickets table to
display a read only view. Also provide a search input area that can be used to
filter the entries.
Assist will take several minutes to process the prompt, define a plan, and then execute the various steps in the plan to generate the App. During this process it will request the ability to run queries, this is call Human-in-the-Loop, and provides users the ability to control what Assist performs.
- During the generation process, Assist may request approval to run queries that will populate the dashboard as shown below. Run the query to allow Assist to complete the app.
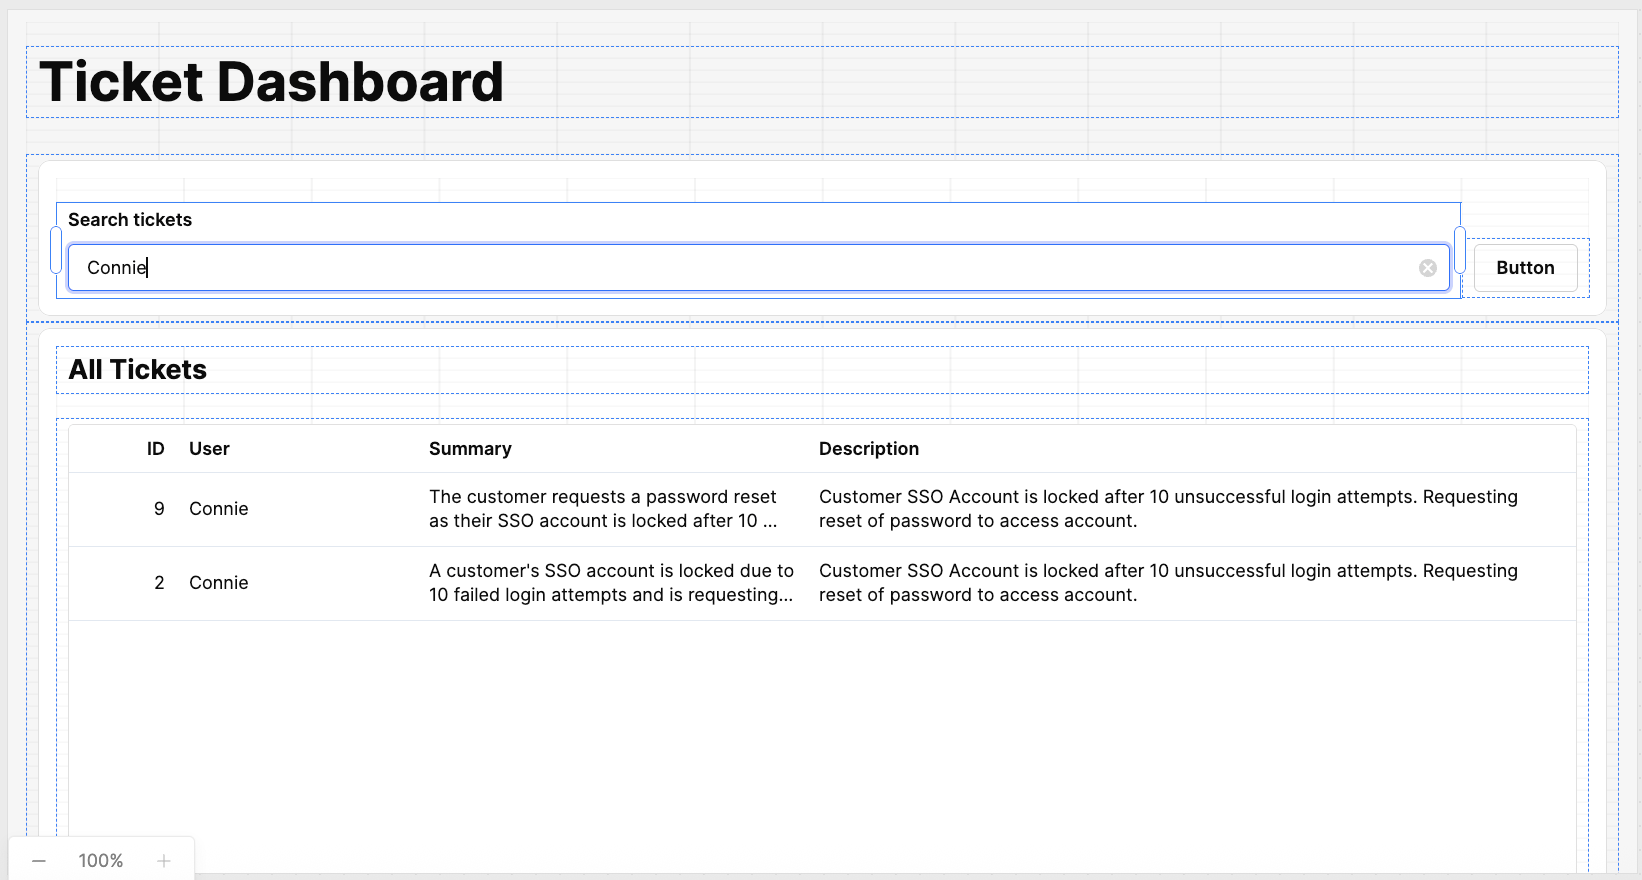
- When the generation is complete, the following app is displayed:
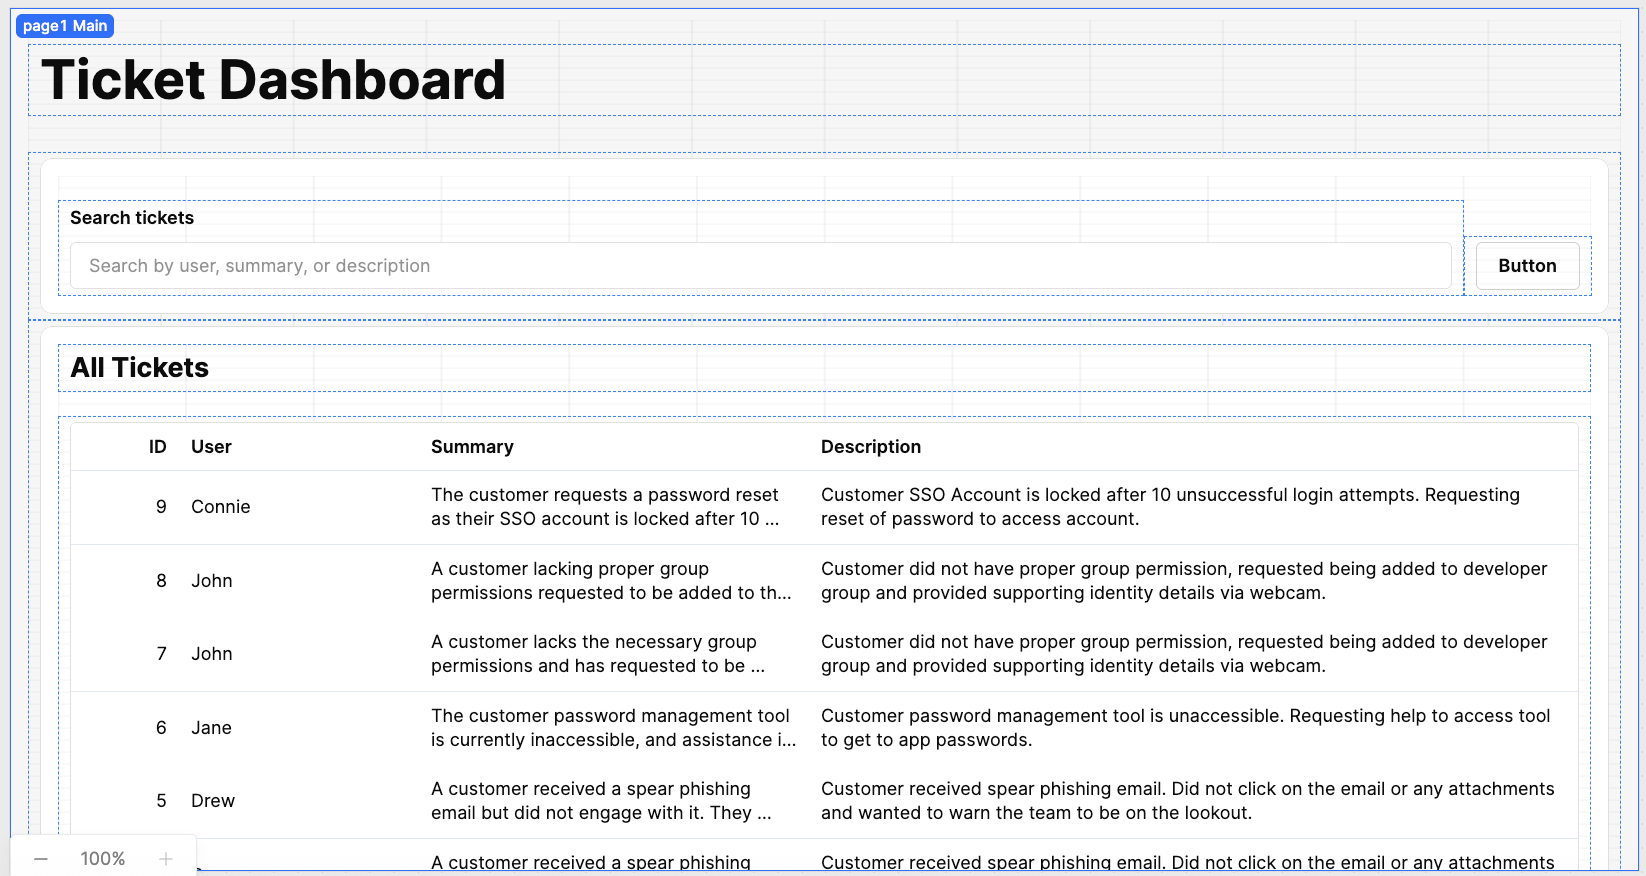
- Test the Search input and confirm that it filters the results in the table.
- In the search field enter a value to verify that filtering works. In this example,
Conniewas an entry that was used to test filtering.
- In the search field enter a value to verify that filtering works. In this example,
Completed examples
You can import these completed examples to compare but it will require that you configure the database table tickets:
- Workflow: etl-tickets.json
- App: TicketsApp.zip