Shipment Processing Workflow
This laboratory focuses on developing an advanced workflow that needs to integrate with an unreliable paginated API.
Steps
The following steps focus on developing a Retool Workflow with advanced resource settings, error handling logic, looping to support the paginated API, JS coding, integration of a JS function, filtering, notifications and subflows.
Create a Retool account and login
Create a Retool account and login to your account as shown below.
Develop Primary Workflow
The primary workflow focuses on checking on a scheduled basis for urgent priority shipments. The following table and subsequent image identifies the steps and order of execution (top to bottom):
| Name of Step | Description |
|---|---|
| startTrigger | This step initiates the workflow using a scheduled time of 12:00 am |
| paginatedAPIFunction | This step calls the shipping API n-number of times to collect all current shipments |
| executeNotificationWorkflow | This step is called if there is a failure in invoking the shipping API |
| filterUrgentShipments | This step loops through the paginatedAPIFunction response and returns shipments where priority == urgent. |
| processUrgentShippingRequests | A loop block to process each urgent shipment. |
| processIndividualShipments Function | A multi-step function that is comprised of createShippingDocs and notifyCustomer. |
| createShippingDocs | This step invokes a function to calculate shipping costs and generates and output with the customer details, shipping provider, and costs. |
| notifyCustomer | This step sends a parameterized email to the customers with the shipping details. |

startTrigger and paginatedAPIFunction block
This required portion of the lab is available as a separate artifact in Paginated API. Complete this first before continuing with the rest of the instructions.
paginatedAPIFunction Settings Overview
The paginated shipping API is an unreliable source of data. In order to make the Retool Workflow more flexible, we will employ Resource Settings. This provides a means to define a number of retries or attempts if the API returns an error or it takes too long. The following figure shows the Resource Settings:
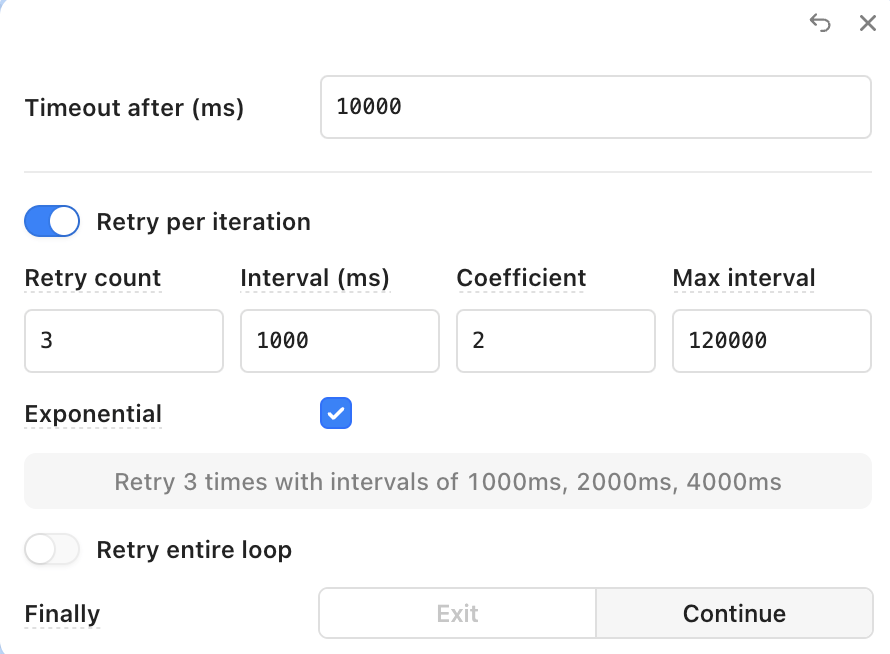
The following table provides details on what you should set for the value, when you build the Workflow:
| Resource Setting | Description | Recommended Value for Lab |
|---|---|---|
| Timeout after | Duration to wait before the block times out. | 60000 |
| Retry count | The maximum number of attempts to retry the query if an error is returned. | 3 |
| Interval | The minimum length of time to wait between query retries. This is useful if a query is triggering a rate limit. | 1000 |
| Coefficient | When exponential backoff is enabled, the constant factor by which the time delay between retry attempts increases after each failure. | 2 |
| Max interval | When exponential backoff is enabled, the maximum time to delay between retries. | 12000 |
| Exponential | Retries are attempted using an exponential backoff doubling the interval between each try | Enabled |
| Finally | Whether to stop the workflow and return an error if the block fails, or continue to allow an error handler to run. | Continue |
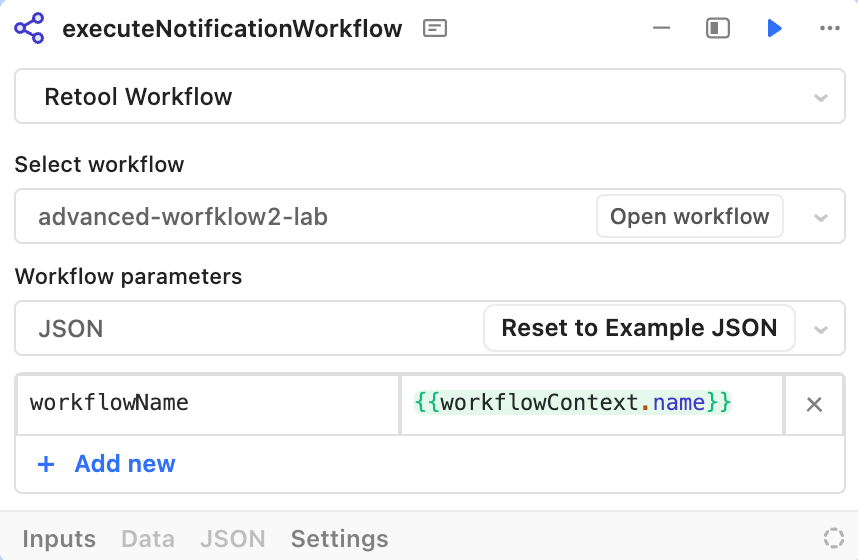
executeNotificationWorkflow block
Error handling in Workflows can happen locally at the block level or you can define a Global Error Handler. In this example we focus on the failure of the Code Block and enable the Continue selection in the Settings to execute a subflow. Within the Workflow, selecting Continue enables connecting a block, in his example a Workflow Block, that is initiated when the Resource Block settings are exceeded. This workflow block is identified as executeNotificationWorkflow. The following image shows this block selecting another Workflow and a parameter that is passed from this Workflow into the next workflowName.
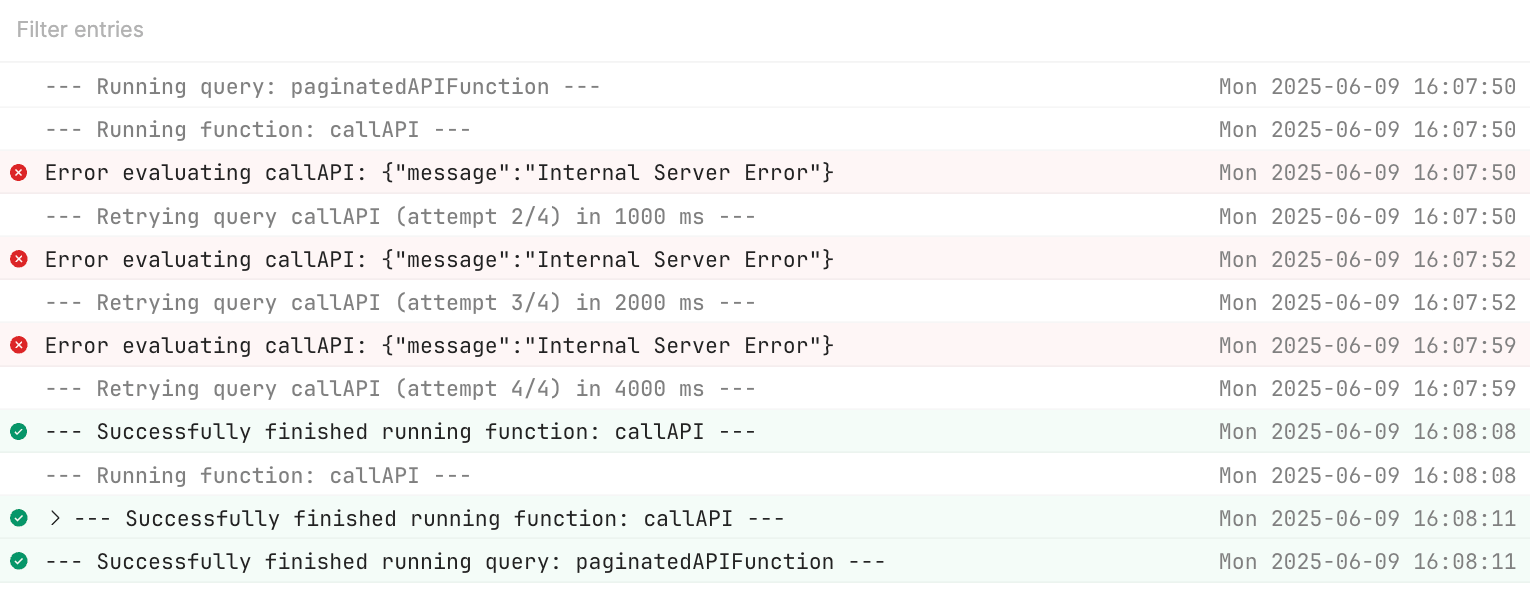
The following image provides a simple demonstration of the Resource Block Retries being executed, the result of each attempt.
filterUrgentShipments block
If no errors occur in calling the paginated API, the filterUrgentShipments block will execute and filter down to shipments that a priority value of urgent.
- Select + and drag and drop a Filter Block to the right of the Code Block (paginatedAPIFunction). Connect the circle from the Code Block to the Filter Block and rename the block,
filterUrgentShipments. - Specify the Filter input as
paginatedAPIFunction. - Enter an Expression of
value.priority === 'urgent'.
The following image shows a completed Filter Block.

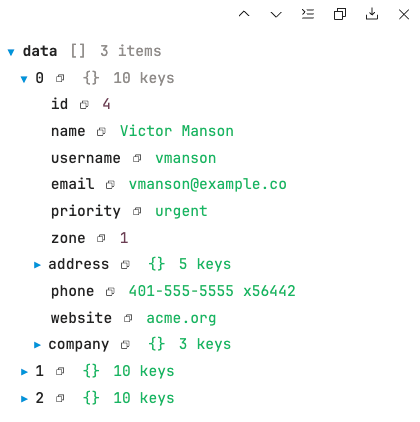
The result of this filter block when executed appears as the following:
processUrgentShippingRequests block
Post the filtering of orders into an array of urgent orders, a Loop Block is used to then process each order individually. The following image shows the completed Loop block with parameters.
- First add a Loop Block to the right of the filterUrgentShipments block. Connect the two blocks.
- Update the name to
processUrgentShippingRequests. - For Execution mode select
Sequential. - For Loop runner select
Create Multi-step function. This will display the multi-step function editor as seen below. Rename the function toprocessIndividualShipments.

processIndividualShipments Multi-step Function
In this step we will update the inputs into the multi-step function that will update the processUrgentShippingRequests block with those same inputs.
- In the params block select + Add parameter. Create parameters for
name,username,email,priority,customer, andzone. It will appears as shown in the following image.

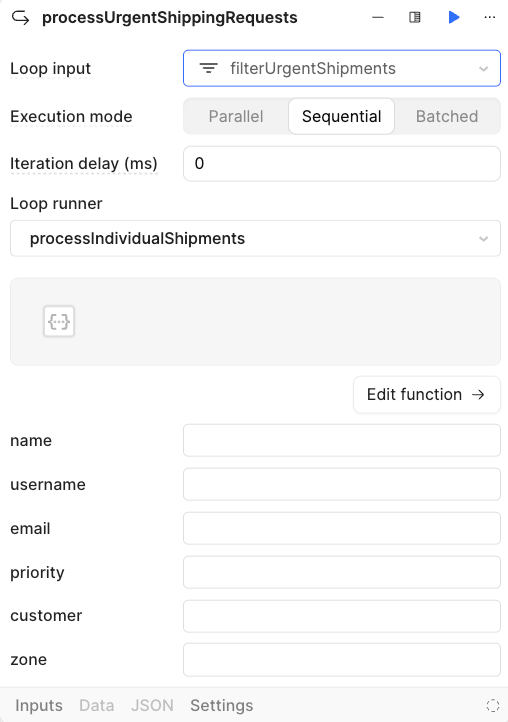
- Return to the parent workflow, by selecting Return to workflow as shown in the following image.

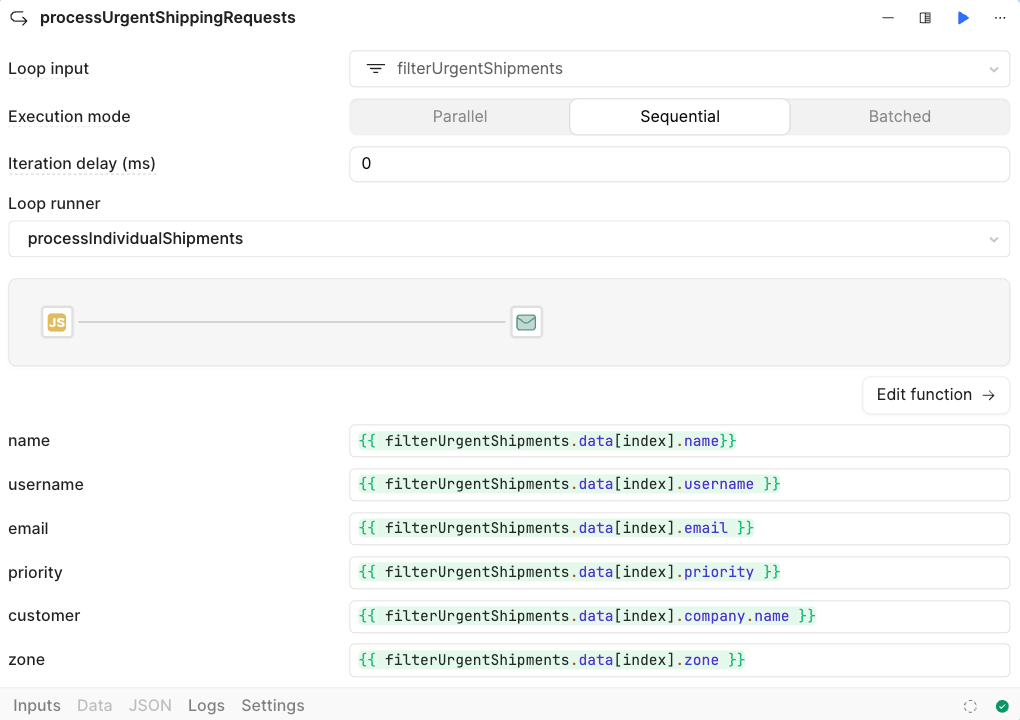
- In the processUrgentShippingRequests block, the params specified in the multi-step function will now appear as shown in the following diagram:
- Populate each param as shown in the following diagram to pull the value from the filterUrgentShipments block. Looking at the syntax, index is used to get the current increment id that the loop is operating on.
- Once the params are populated, return to the multi-step function by selecting Edit function in the
processUrgentShippingRequestsblock.
calculateShippingCosts Single-step Function
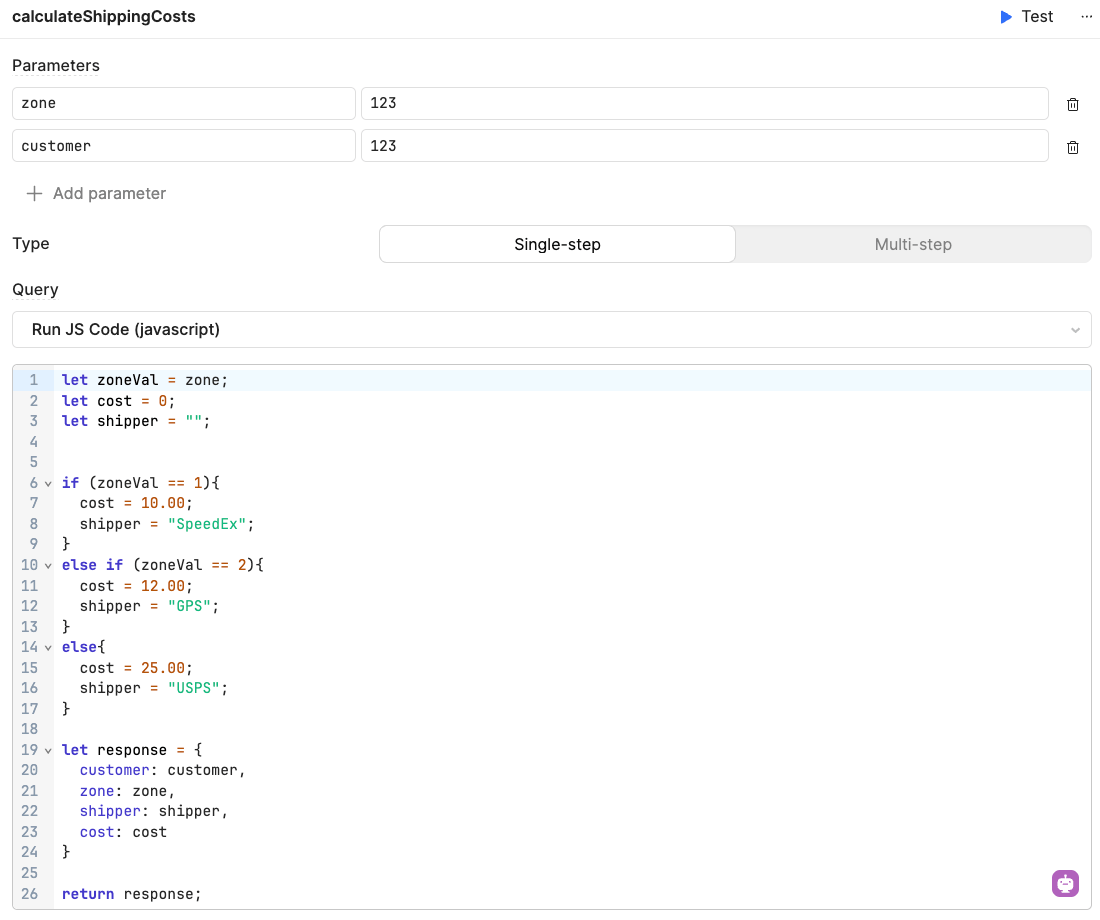
Once the multi-step function has been created, within this function we want to calculate the individual shipping costs based on their zone. Calling this function will return the customer details, zone, shipper and cost. Since this logic is reusable, a single-step function is employed and demonstrated in this step.
- Select Function and specify the name of the function as
calculateCostsFunctionand leave type asSingle-step. - Copy and paste the following code into the Function Query area, making sure that Run JS Query is selected.
let zoneVal = zone;
let cost = 0;
let shipper = "";


if (zoneVal == 1){
  cost = 10.00;
  shipper = "SpeedEx";
}
else if (zoneVal == 2){
  cost = 12.00;
  shipper = "GPS";
}
else{
  cost = 25.00;
  shipper = "USPS";
}

let response = {
  customer: customer,
  zone: zone,
  shipper: shipper,
  cost: cost
}

return response;
- Specify two input parameters to the function,
zoneset to123andcustomerset to123. - The following image shows the completed function.
createShippingDocs block
- Next we need to invoke the function and this will be done via a Code Block. Make sure you are in the Multi-step function,
processIndividualShipments. If you are not there select the Edit function in theprocessUrgentShippingRequestsloop block. - Select + and drag and drop a Code Block to the right of the Params Block. Connect the circle from the Params Block to the Code Block and rename the block,
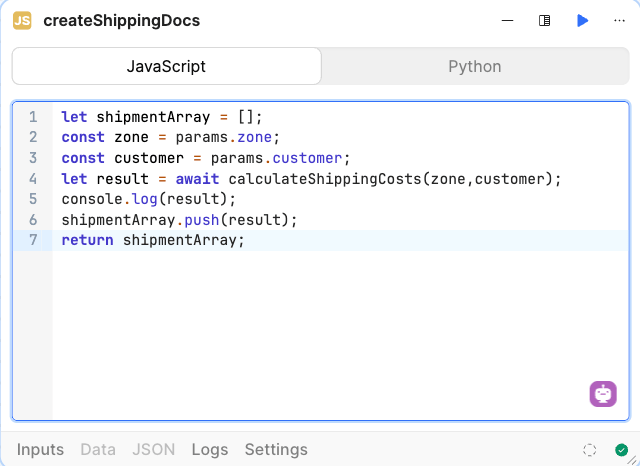
createShippingDocs. - Copy and paste the following JavaScript snippet into the Code Block.
let shipmentArray = [];
const zone = params.zone;
const customer = params.customer;
let result = await calculateShippingCosts(zone,customer);
console.log(result);
shipmentArray.push(result);
return shipmentArray;
The following image shows the completed block.
notifyCustomer block
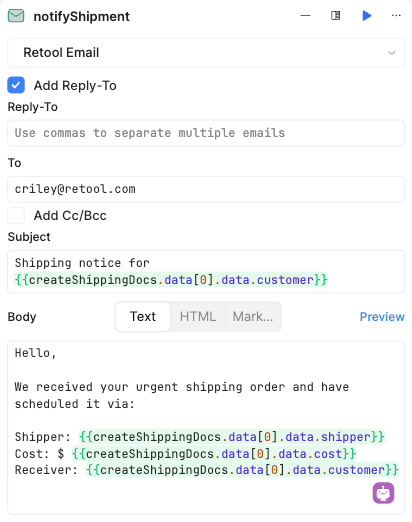
In this step, we leverage a Resource Query block with Retool Email to send a notification to each of the customers. Since this is a simulated step, the email is statically set to your personal email so you can view the results.
- Select + and drag and drop a Resource Query block to the right of the Code Block (createShippingDocs). Connect the circle from the Code Block to the Loop Block and rename the block,
notifyCustomer. - Select
Retool Emailfor the resource. - Specify your email for the To address.
- Specify for Subject the following:
Shipping notice for {{createShippingDocs.data[0].data.customer}}
- Specify for the Body the following:
Hello,

We received your urgent shipping order and have scheduled it via:

Shipper: {{createShippingDocs.data[0].data.shipper}}
Cost: {{createShippingDocs.data[0].data.cost}}
Receiver: {{createShippingDocs.data[0].data.customer}}
The following image shows the completed form.
Develop Secondary Error-Handling Workflow
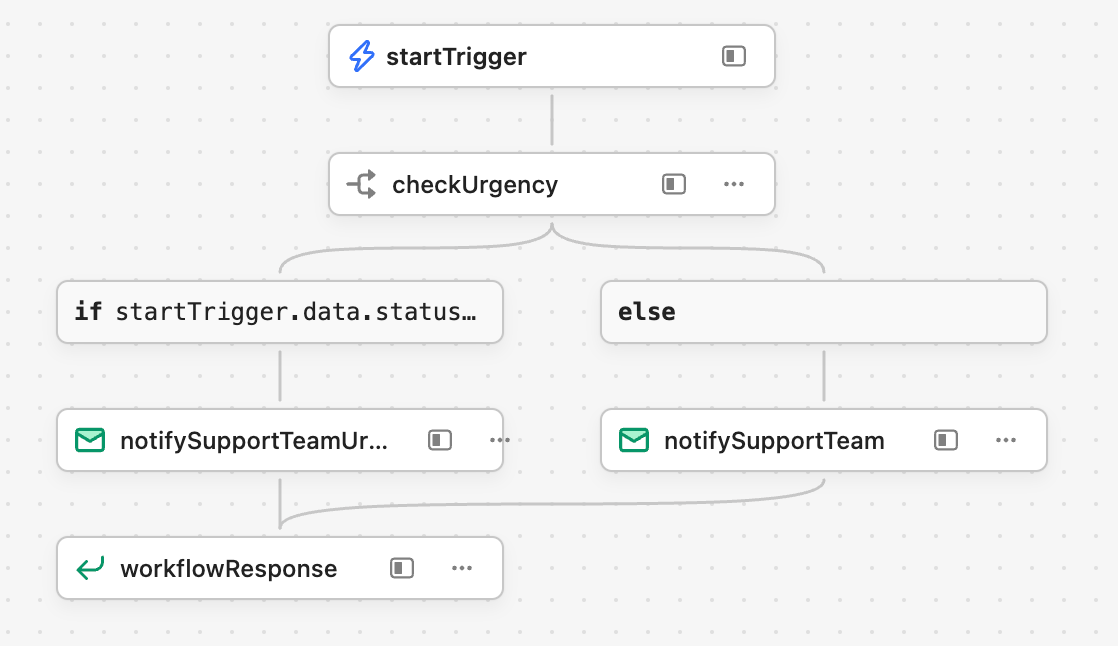
In the primary workflow, we focused on executing the core business process. The secondary workflow is meant to act as a catch-all when errors arise across the primary workflow and other workflows. The following table and subsequent image identifies the steps and order of execution (top to bottom):
| Name of Step | Description |
|---|---|
| startTrigger | This step initiates the workflow using a Webhook and two parameters. |
| checkUrgency | This step checks the status value of the calling workflow and routes accordingly. |
| notifySupportTeamUrgent | This step sends email to an urgent/oncall mailing list for immediate investigation. |
| notifySupportTeam | This step sends email to a general support mailing list for further investigation. |
| workflowResponse | This step replies to the calling workflow that the workflow completed successfully. |
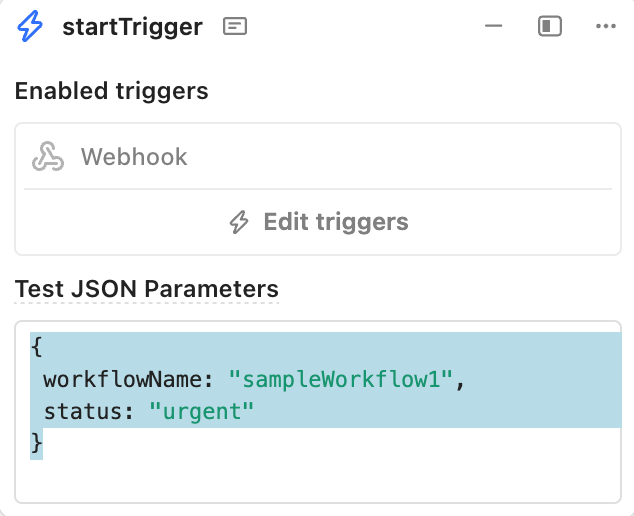
Start Trigger Webhook with Parameter
The Start Trigger Webhook will support two parameters, the first being the workflow name that is calling it, to help operations personnel. The second is the status of the calling workflow.
- Within the startTrigger block, specify the following JSON for testing purposes:
{
 workflowName: "sampleWorkflow1",
 status: "urgent"
}
- Local testing can be performed by adjusting these two parameters as they will display as values for the startTrigger block.
- Select Triggers and enable
Webhook.
Branch Block (check response)
In order to handle the urgency of the calling workflow, a Branch Block is employed. This will check the status value and if set to urgent, send an email to the an urgent mailing list identifying the workflow, where oncall support where they can swarm and resolve. If not urgent, it will be sent to a different mailing list for general examination.
- Select + and drag and drop a Branch Block to the right of the startTrigger Block. Connect the circle from the startTrigger Block to the Branch Block and rename the block,
checkUrgency. - Edit the Branch Block with the following evaluation:
startTrigger.data.status === 'urgent'

Resource Block (Email Notifications)
Notifications in this example employs email, to simplify implementation of this lab. Many customers often employ alternative messaging channels such as Slack, can integrate that in lieu of email.
- Select + and drag and drop two Resource Blocks to the right of the Branch Block. Connect the circle from the Branch Block to the first Resource Block and rename the block,
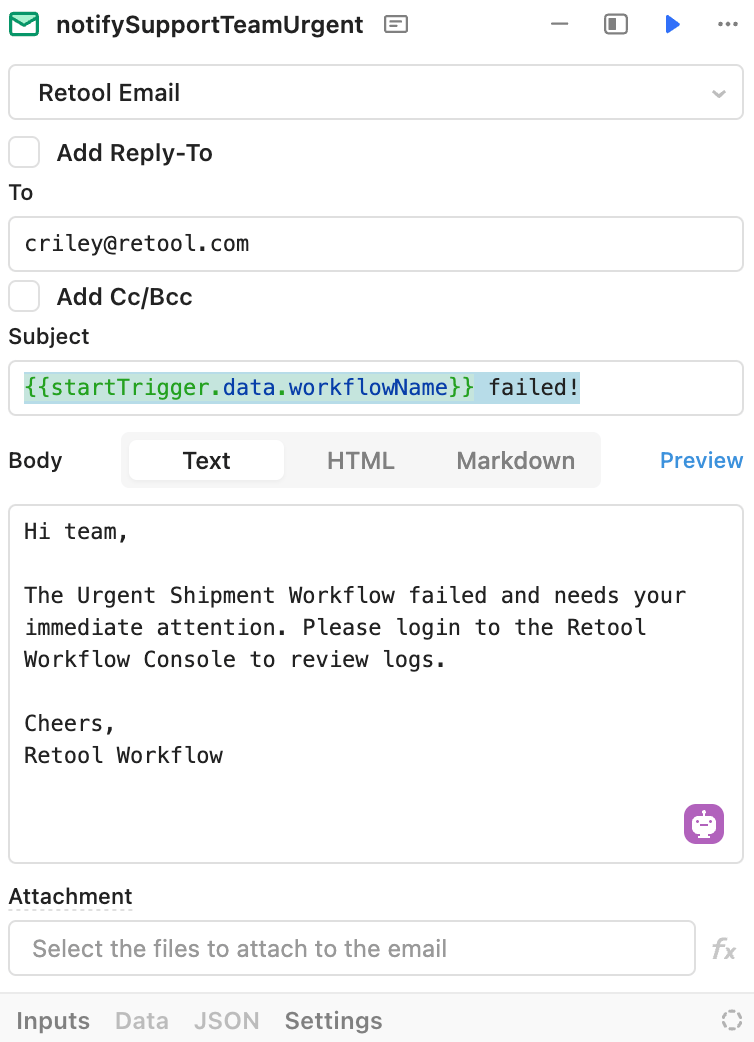
notifySupportTeamUrgent. Connect the circle from the Branch Block to the second Resource Block and rename the block,notifySupportTeam. - Edit the first Resource Block with:
- To:
your email - Subject:
{{startTrigger.data.workflowName}} failed! - Body:
- To:
Hi team,

The Urgent Shipment Workflow failed and needs your immediate attention. Please login to the Retool Workflow Console to review logs.

Cheers,
Retool Workflow
- Compare your inputs with the completed form in the following image.
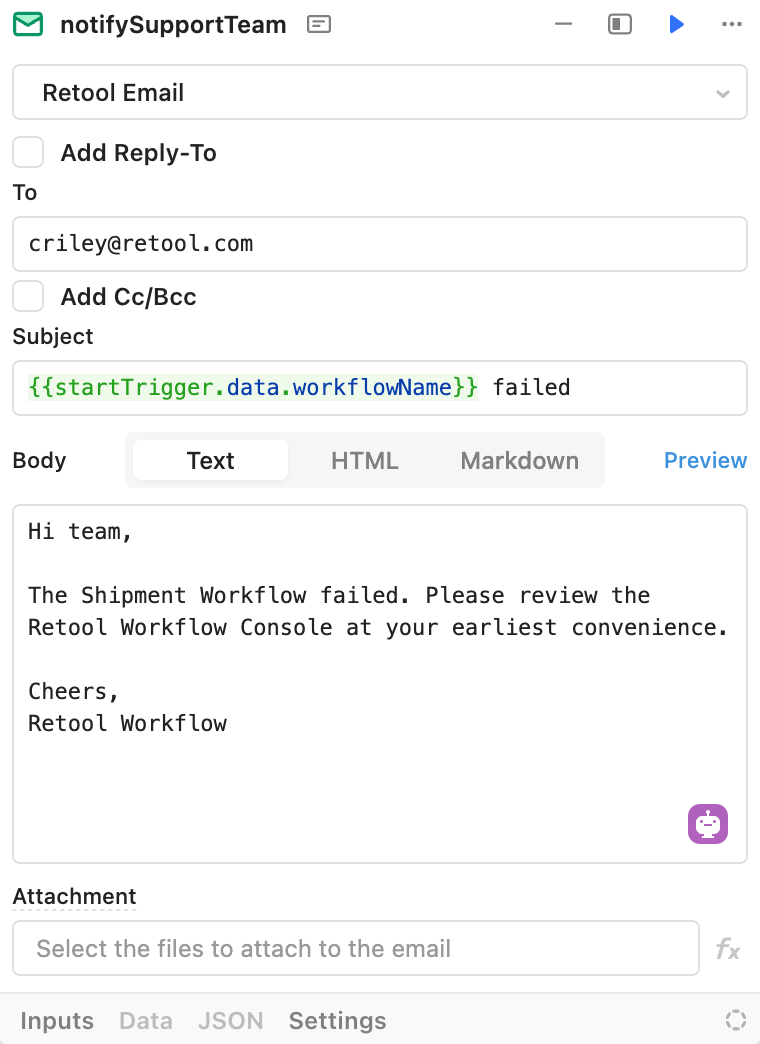
- Edit the second Resource Block with:
- To:
your email - Subject:
{{startTrigger.data.workflowName}} failed! - Body:
- To:
Hi team,

The Shipment Workflow failed. Please review the Retool Workflow Console at your earliest convenience.

Cheers,
Retool Workflow
- Compare your inputs with the completed form in the following image.
Webhook Response Block
To complete the webhook communication to this secondary workflow, a HTTP Response is sent at the end of this process.

Completed Examples
You can import the following examples and compare with what you have built.