Inventory Management Multipage App
This laboratory focuses on developing a simple inventory management application using a database (e.g., Retool Database / PostgreSQL), Storage, Retool Multipage App, Charts v2, and Retool Workflows.
Steps
The following steps demonstrate building an inventory application setting up a database with inventory data and then building a Retool Multipage app with supporting workflow.
Create a Retool account and login
Create a Retool account and login to your account as shown below.
Upload Images and Create Tables
This required portion of the lab is available as a separate artifact in Retool Storage and Database. Complete this first before continuing with the rest of the instructions.
Create Multipage App
Retool v3.148.0 introduces the multipage app as the default for all apps improving performance, simplifying navigation and overall development experience.
Inventory and Add Inventory Page
First we will create the app.
- Select Retool Home > Apps > Create app
- Select the app name and then update it to,
inventory-mgmt.
Next we create the inventory and addInventory pages by selecting:
- A default page exists. Rename this by right-clicking, , and select Rename changing the name to
inventory. - Select Pages > +
- Select the page, right-click, and select Rename changing the name to
addInventory.
Add Header with Navigation
The inventory-mgmt app will use a global header that navigates users to/from the inventory an addInventory pages.
- Select Outline > Global > + > Header. This creates a Header with navigation that displays in the canvas.
- Select the Logo and update the Content > Image course > Storage to
inventory_lab/acme.co.png. - Select
Page1in the header to modify its label and content. - Select Content > Mode > Manual. This will allow us to manually specify the header options.
- Select ... for the
SettingsMenu Item and Delete. This will eliminate the Settings item. - Select Home Menu item, this will open up a dialog. Now we will connect the Page to the Menu item.
- Under Edit menu item > Page specify
inventory. Change the Label toINVENTORY. - Select Customers Menu item, this will open up a dialog. Now we will connect the Page to the Menu item.
- Under Edit menu item > Page specify
addInventory. Change the Label toADD INVENTORY.
The following demonstrates the steps in action:
Inventory Page Components
Now we can lay out the components to define the inventory page functionality.
- Confirm the page is set to
inventory.

- Select Component tree > Main > +
- Type in
Tabbed Container. Select Tabbed Container icon. It will be placed on the canvas. - Stretch the container to take the full 12-column width.
- Edit the tabs, delete Item 3 and change the names of the other tabs to Local and Vendor. To change the names select the Views > Item 1 and in the Edit view dialog change the Key and Label to
localandLocalrespectively. Repeat this process forItem 2tovendorandVendor.
The following demonstrates the steps in action:
getInventory query
With the table placed, we can now connect it to a data source. In previous database section, we created an inventory table.
- Select the
table1component and selectConnect datagreen tab next to table1 tag. - Specify a Resource pointing to your database such as
Retool DatabaseorPostgreSQL. - Change the query name from
query1togetInventory. - Enter the following SQL statement to perform the query:
SELECT * FROM inventory;
- Select Preview and Run/Save.
- Close the query editor and expand the Right panel / Inspector.
- The Content > Data source should be set to getInventory.
- In the Columns select the Regenerate Columns icon.
- This should update the Primary key to
IDand the table should display data. - Change the
table1tag toinventoryTable.
The following demonstrates the steps in action:
getInventoryPaginated query
When working with large datasets, it is important to consider the use of pagination within Retool Table components. Pagination is the process of displaying a small subset of data, for example 5, 10, or 20 rows of data, at a time. This keeps the query results small and improves app performance.
We will demonstrate this through a parginated query and Server-side pagination in the Retool Table component.
- First we need a query to tell Retool how many entries are in the database. Select Code > + and create a query called getTableSize. It uses the following SQL Query.
SELECT COUNT(*) FROM inventory;
- Next we need to enable server-side pagination. Select the
inventoryTablein the Right panel, under Content > Add-ons > + selectPagination. - This will open the pagination dialog where we fill in the Page size to
5, enable Server-side pagination, Pagination type set toLimit offset based, and a Total row count.
{{getTableSize.data.count[0]}}
- Next we need to define a new query for the inventoryTable that is aligned with the Server-side pagination values.
- Select Code > + and create a query called
getInventoryPaginatedand has the following SQL command.
SELECT * FROM inventory ORDER BY ID LIMIT {{inventoryTable.pagination.pageSize}} OFFSET {{inventoryTable.pagination.offset}};
The following demonstrates the steps in action:
Add Inventory Page Components
The add inventory page provides a user the ability to add a new inventory item to the inventory table.
- Select the page,
addInventory. - Select **Component tree > + ** and search for
Container. Adjust the size / location of the container in the middle of the page. - Update the container title to
Add inventory. Use the ESC key if Retool attempt to populate with a{{ script }}. - Within the container select Add components and search for
Form. - Select
Form. Stretch the form component to be the same size as the container. - Edit the form title to say
Inventory item. - Select Generate from database. This will display the Form Generator. Specify the table
inventorythat will update the display to show the inventory columns. - Then deselect
longitude,latitude,id. - Change the
locationInput type fromText AreatoSelect.
The following demonstrates the steps in action:
getLocations query
First we need to create a query to help populate the location select.
- Select Code > + > Resource query.
- Specify your database (e.g., Retool Database or PostgreSQL) and enter the following SQL command.
SELECT DISTINCT location FROM inventory;
- Change the query name to
getLocations. - We now need to update the locationSelect component to use this query to populate the selections.
- Select the locationSelect component. Update the properties as shown in the following image where the query is identified and the value is set to
{{item.location}}:

The following demonstrates the steps in action:
form1SubmitToInventory query
Next, the Form Generator tool creates a form and an associated query to upload the form into the your database. We will modify this query to perform an INSERT into the inventory table.
- Select Code > form1SubmitToInventory
- In the query editor change to SQL Changeset which will be set to Object and will display:
{{ form1.data }}
- Select Key value pairs and enter sku, description, quantity, replenish, location, image_url with the following values
skuInput.value,descriptionInput.value,quantityInput.value,replenishInput.value,locationSelect.value, andimage_urlInput.value.
The following demonstrates the steps in action:
Part Detail Drawer
Within tables, the use of a Drawer Frame can be advantageous to expose details of a table row. Double-click a table row can cause the drawer to slide open and provide additional detail for the inventory part (e.g., image, partname, geo location).
Create Drawer Frame
- Select Component tree > (inventory page) > +
- Enter
drawerand select the Drawer Frame. This doesn't display by default so you will need to select in Component tree for it to display to the right on the canvas. - Once displayed on the canvas, you can update the
drawerTitle1component to have its content set to:
{{inventoryTable.selectedRow.sku}}
- Next we can add an image to the drawer frame using the Component tree > drawerFrame1 > +, enter Image in search, and select.
- Drag the image to take full advantage of the width of the panel.
- Specify the Content > URL as:
{{inventoryTable.selectedRow.image_url}}
- Next we repeat the process by adding a Key value component. Stretch to the full width of the panel. Edit the Content > Data to be set to:
{
  "Description": {{ inventoryTable.selectedRow.description }} ,
  "Warehouse Location": {{ inventoryTable.selectedRow.location }}
}
- Once the Image and Key value are placed, we will add a Mapbox component. Repeat the previous process of adding a component to drawerFrame1 and stretch to the full width of the drawer.
- Update Content > Latitude
{{ inventoryTable.selectedRow.latitude }}
- Update Content > Longitude
{{ inventoryTable.selectedRow.longitude }}
- Update Content > Points
    [{
      "id": {{ inventoryTable.selectedRow.id }} ,
      "longitude": {{inventoryTable.selectedRow.longitude}},
      "latitude": {{inventoryTable.selectedRow.latitude}}
    }]
- Finally you can modify the Appearance > Zoom from
8to4.
The following demonstrates the steps in action:
Add event handler in Table to open Drawer Frame
Once the drawer frame is defined, we want to be able to have it open when you double-click a row in the table. This will then expose the details of the part we created in the previous step.
- Select the
inventoryTablecomponent. - Select Interaction > Event handlers, complete the event handler using the following image to identify the settings:
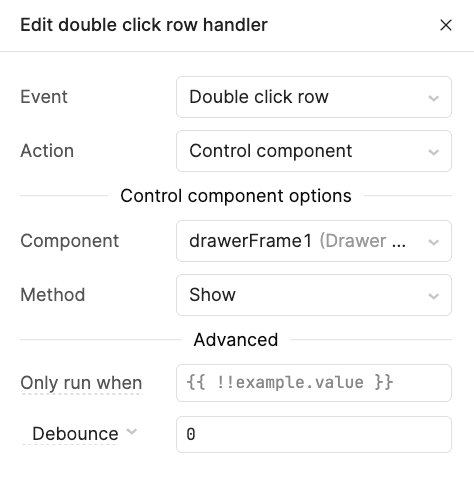
Once specified, you can select a row by double-click it and the drawer will appear. You can use the X or click on the row with a single-click to close the drawer.
The following demonstrates the steps in action:
Retool Charts
Retool's new Chart component(s) provides a wide range of ways of visualizing data. The Retool charts will use a bar graph that pulls data from inventory and vendor_inventory for current inventory.
- Select the Component tree > inventory page.
- Select the
Vendortab in the tabbed container.
Local Inventory Chart
This will display a left chart and right chart. The left chart will be local inventory powered by the getInventory query we built previously.
- Select barChart1 and change the component name to
localInventoryChart. - Delete the series
salesandspend. - Select Series > + and specify a Name of
Local Inventory Data. - Specify a Datasource of:
{{getInventory.data}}
- Select Add-ons > Tooltip > to update and specify a Format of
X,Y,Series name. This will provide a tooltip when you hover over bars to provide the SKU and other detail. - Select Appearance > Fill color > Tokens > Primary (Blue). This should update the bars to blue.
- Select the
localInventoryChartso we can access the and X and Y Axis Controls and specifyPart nameandQuantity. - Select X-Axis > Content > Title and enter
Part name. - Enable under Appearance,
Show axis line,Show gridlines, andShow zero line. - Select Y-Axis > Content > Title and enter
Quantity. Enable the same features under Appearance.
The following demonstrates the steps in action:
getInventoryVendor query
For vendor inventory we will use a SQL JOIN to display the SKU from the inventory table and the vendor quantity and name.
SELECT
    i.sku,
    iv.available_quantity,
    iv.vendor_name
FROM
    inventory i
INNER JOIN
    vendor_inventory iv
ON
    i.id = iv.sku;
The following demonstrates the steps in action:
Vendor Inventory Chart
Similar to the previous chart, we will update the chart name to vendorInventoryChart, delete the existing series, and create a new series that is powered by the getVendorInventory query.
- Perform the same actions as in the previous example by creating a new series called
Vendor Inventory Data, and the Content > Data source is set to:
{{getVendorInventory.data}}
- We use similar settings to the previous example but include Group by
vendor_name. Select FX to see this selection. The chart will display colored lines that is not legible. - Select the ... > vendorInventoryChart in the chart name to get back to the parent screen.
- Select Bar mode as
Stack.
The following demonstrates the steps in action:
Styling the Retool App
Once the application is functional, it is important from a design perspective to increase it's efficiency and usability. The following lab improves this app further using Retool Appearance capabilities: Styling a Retool App.
Initiate Reorder Workflow
We can extend the Inventory Management app by integrating a inventory reorder workflow to help automate vendor identification and ordering. The following lab demonstrates how to do this: Inventory Reorder Workflow.