Retool App IDE
The Retool App IDE provides the development interface for creating Web Apps. The following lab performs a walkthrough of common functionality a developer will use.
App IDE walkthrough
The following image labels the core features of the IDE.
The App IDE is the interface you use to build Retool apps. It is made up of these primary areas:
- Canvas (Green): Arrange components to build your app's interface.
- Navbar (Purple): Configure, preview, share and manage your app.
- Left panel(Dark blue): Explore components, queries, transformers, and constants.
- Right panel (Orange): Create and edit components.
- Status bar (Light blue): Select the app environment, releases, runtime, and debug apps.
Simple example
The following video shows a completed app that will be built using a Retool App and Database.
Import data
In this step we will setup a sample table that you can use in the example.
Create schema
The schema we will create is defined in the following table.
| Column name | Description | Value Type |
|---|---|---|
| id | auto-generated primary key | Int |
| vendor | Public Cloud Vendor | Enum (AWS, Azure, GCP) |
| instance_id | VM instance identifier | Text |
| created_at | DateTime the instance was created | Date + Time |
| cpu_count | Number of vCPU | Number |
| ram_count | Amount of RAM | Number |
| cost_center | Owner of the instance | Enum (engineering, operations, finance, support) |
- Select Retool Home > Database
Import CSV
Next we want to populate this table with data. Download this CSV to import into the new table.
- Select Import CSV > Into a new table
- A import window appears showing the column names and types.
- Select Create table.
We want to alter the vendor and cost_center columns to be of type Enum.
- Select the down caret for the
vendorcolumn and selecting Settings. - Select Field type and change from
TexttoEnumand select Save. - Repeat this process for the
cost_centercolumn.
The following Arcade video will guide through importing the CSV and changing the columns.
Create a Web App
- Select Home (Retool icon) to return to the home page. Select App > Create Web App. Provide an app name and save.
- The App IDE screen will now display an empty app.
Create Home and Profile Page
Focus Area: Left panel
The Left panel provides access to the construction features in Retool. Let's rename the app and create two pages, a home page and a profile page.
- Select the app name and change to
infratest. - Select Pages.
- A default called
page1will exist. Select it, right-click and select Rename and change the name tohome. - Create another page called
profile.
Add Navigation Header
Focus Area: Left panel
The Left panel / Component tree provides a visual way to examine a mult-page app including Global scope, Page scope and more. Let's create a navigation bar that is global accessible.
- Under
Globalselect + > Header. - This will by default create a Global header and navigation component.
Connect Navigation to Pages
Focus Area: Right panel
To modify the header / navigation, we need to edit its properties. This done in the right panel for any component.
- Select the Navigation component.
- View the navigation component properties in the Right panel.
- Under Content select Manual.
- Delete the
Settingsentry by selecting ... > Delete. - Select the
Homeentry and set the page tohome. - Select the
Customersentry, rename it to Profile and set the page toprofile.
Test the navigation by clicking home and profile. This will update the page to the respective selection. This is visible in the Left panel / Component Tree.
Create Home Page
Focus Area: Left panel + Canvas
Next we want to add a container and table components to the canvas.
- In the component tree, under the home page, select + > Container. Place the container on the canvas below the navigation and expand to take the full page.
- In the right panel, change the container title to
Infrastructure. - Next go back to the component tree, under the home page, select + > Table. Move the table into containerInfra and expand it to take the full width.
A table component will be placed with dummy data. To change the data we need to first create a resource query.
Create and Connect Query to Table
Focus Area: Left panel
- Select Code > + > Resource query and rename it by selecting the tab. Change it to
runInfra. - Specify
Retool Databasefor the Resource, and the following query in the Query window.
SELECT * FROM multi_cloud_infrastructure;
- Select Preview to confirm this shows data.
- Select Save/Run to save the query
- Select the
tableInfracomponent and in the right panel under Content > Data source update the value togetInfra.
Update Table Display
Focus Area: Right panel
Next we update the table to filter what data is displayed. Other data we will expose via a Drawer in the following step.
- Select the table component.
- Under Content > Columns select the ... to access the Hide column menu selection.
- Hide the
ID,cpu_count,ram_count,instance_id,network. - Move the columns to the following order
Cost center,Vendor,Instance Id,Purpose,Create at
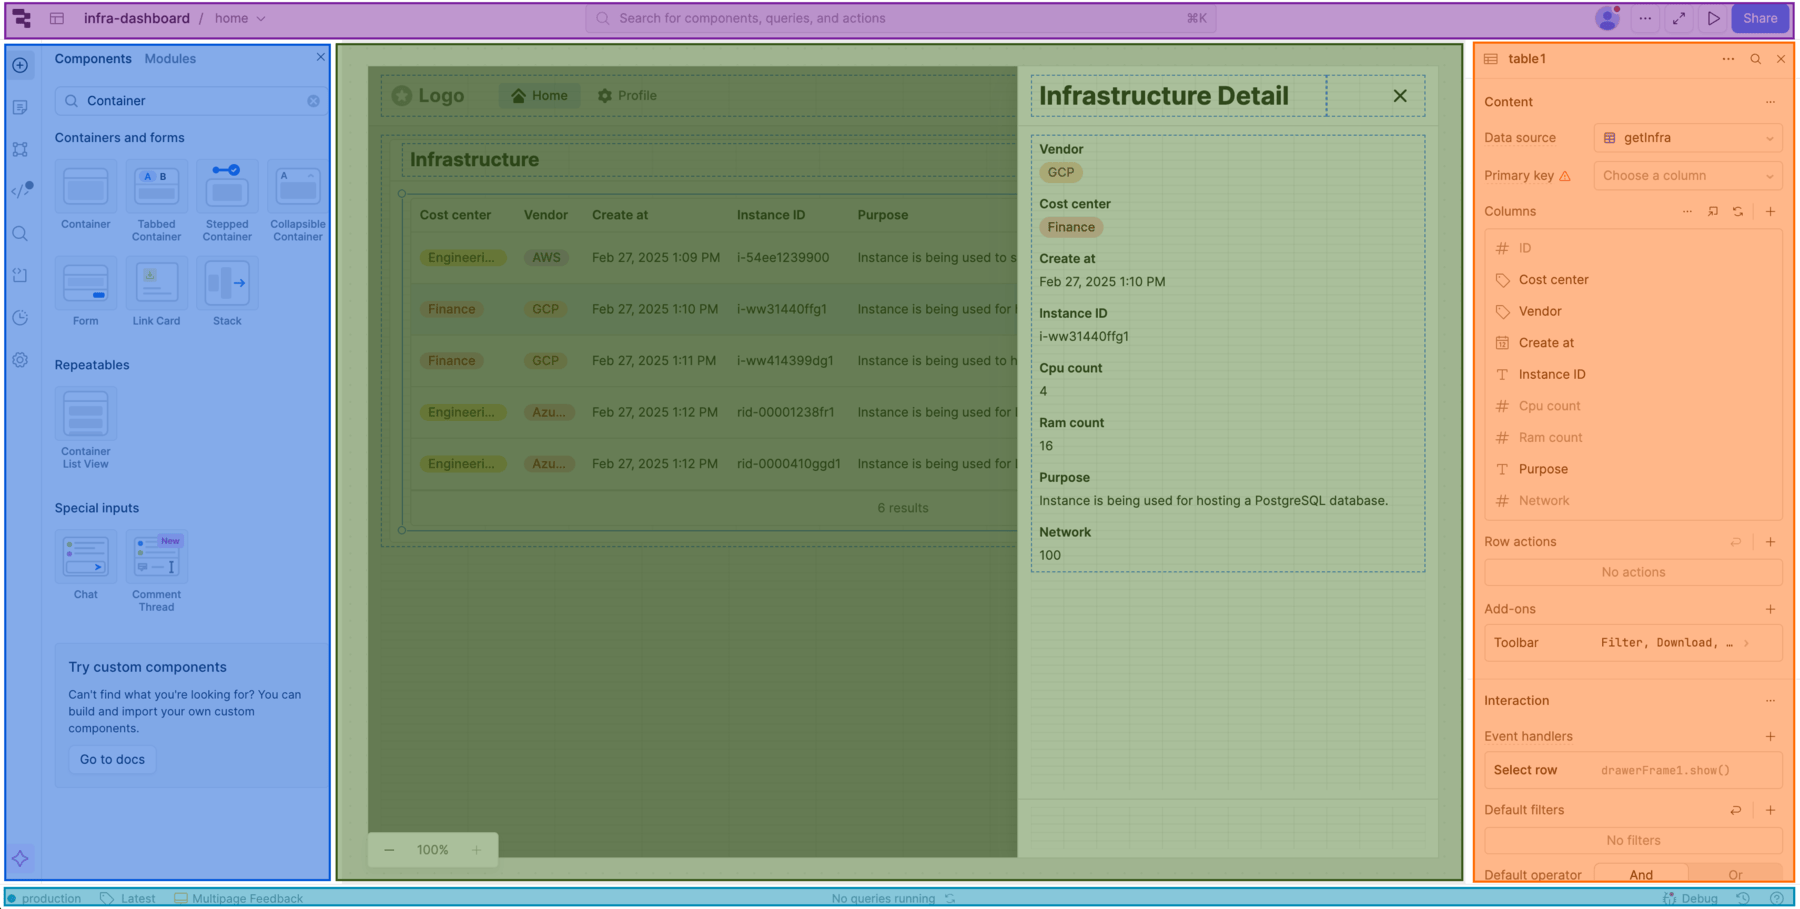
Create Drawer with Infrastructure Detail
Focus Area: Left panel + Right panel
Now we want to allow a user to double-click a row and have a drawer appear with additional details.
- Select Component tree , make sure the
homepage is selected. - Select + and in the Search, specify
Drawer. - Select the drawer Add component and specify Key Value component.
- Update the key value content of the drawer component to use the selected row in the table. Override the current content and specify the following:
{{tableInfra.selectedRow}}
Connect the Drawer and Table via an Event Handler
Focus Area: Right panel
Now we need to use an event handler to listen for double click selection of a row. This will open up the drawer and allow us to populate it with table data.
- Select tableInfra component.
- Under
Interactionselect Event handler - Update the event handler to use
Event=Double click row,Action=Control component,Component=drawerFrame1,Method=Show. - Test this by double clicking on rows in the table, the drawerFrame1 should slide out.
Update Profile Page
Focus Area: Left panel + Canvas
Next we want to update the Profile page to have a Container and Key Value component. This will be used to display the fullname, email and current date.
- In the Component tree, select the profile page
- Select / search for Container component.
- Place the Container component on the canvas.
- Modify the header to
User profile. - Select / search for Key Value component.
- Place the Key Value component in the Container on the canvas.
Update Key Value Component
Focus Area: Right panel
Note: This example uses the current_user global object that provides information about the user logged in including their name, groups, email and more.
- Select the Key Value component on the canvas
- In the Content section, change the value to the following:
{
  'Fullname' : {{ current_user.fullName }},
  'Email': {{ current_user.email }},
  'Last_Update' : {{ moment().format('MMMM Do YYYY, h:mm:ss a') }}
}
Note: Closer examination of the 'Last_Update' property shows the use of the momentJS JavaScript library. Retool has several pre-loaded JS libraries that simplify date handling and more.