SQL Application
The following SQL App provides a sample that demonstrates the use of SQL queries and how those queries are connected to components and event handlers with Retool.
Steps
The following steps focus on accessing Retool and using Retool Database to provide a base understanding of the Retool Platform.
- The example will populate three tables into the Retool Database using provided CSV files and provide an overview of each table and associated queries that will be demonstrated.
- The fundamentals-sql app will be imported as a Retool App.
- Each section of the app will be closely examined to understand different SQL Queries and how Retool components / event handlers interact.
Create a Retool account and login
Create a Retool account and login to your account as shown below.
Create supporting tables in Retool DB
Download sample data
For this laboratory, there are several CSV files necessary to be able to power the fundamentals-sql app. There are three CSV files that you need to download and we will later import into Retool Database.
Setup sample_departments
- Select Database from Retool Home.
- Select the + on the far right to create a new table.
- The table editor appears as shown in the following image.

- Specify a Name of
sample_departments. - Select Add field and enter
departmentwith a value ofText. It will appear as the following.
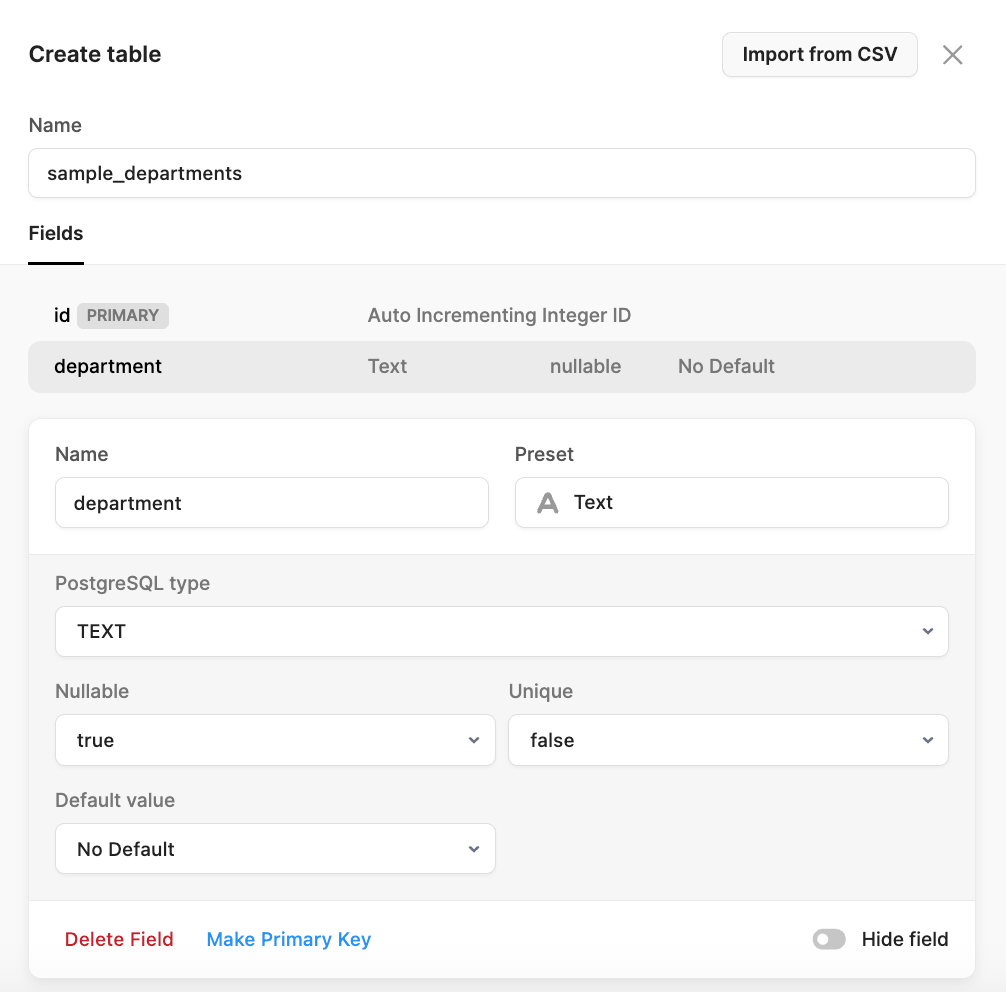
- Select Create and the display will show the table.

- Next import the
sample_departments.csvinto the table. Select Import CSV > Into current table. Select thesample_departments.csvfile. This will display the following showing what is being imported. Select Import CSV.

- Once imported the table will display as shown below.

Setup sample_majors table
Next we create the sample_majors table, that depends on the sample_departments table with a foreign key relationship.
- Select Database from Retool Home.
- Select the + on the far right to create a new table.
- Specify a Name of
sample_majors. - Select Add field and enter
majorwith a value ofText. Next select Add field and enterdepartment. Specify a Preset ofForeign key, Table ofsample_departmentsand a Field ofid (int4). This creates the connection between the department column and the id field in the sample_departments table.
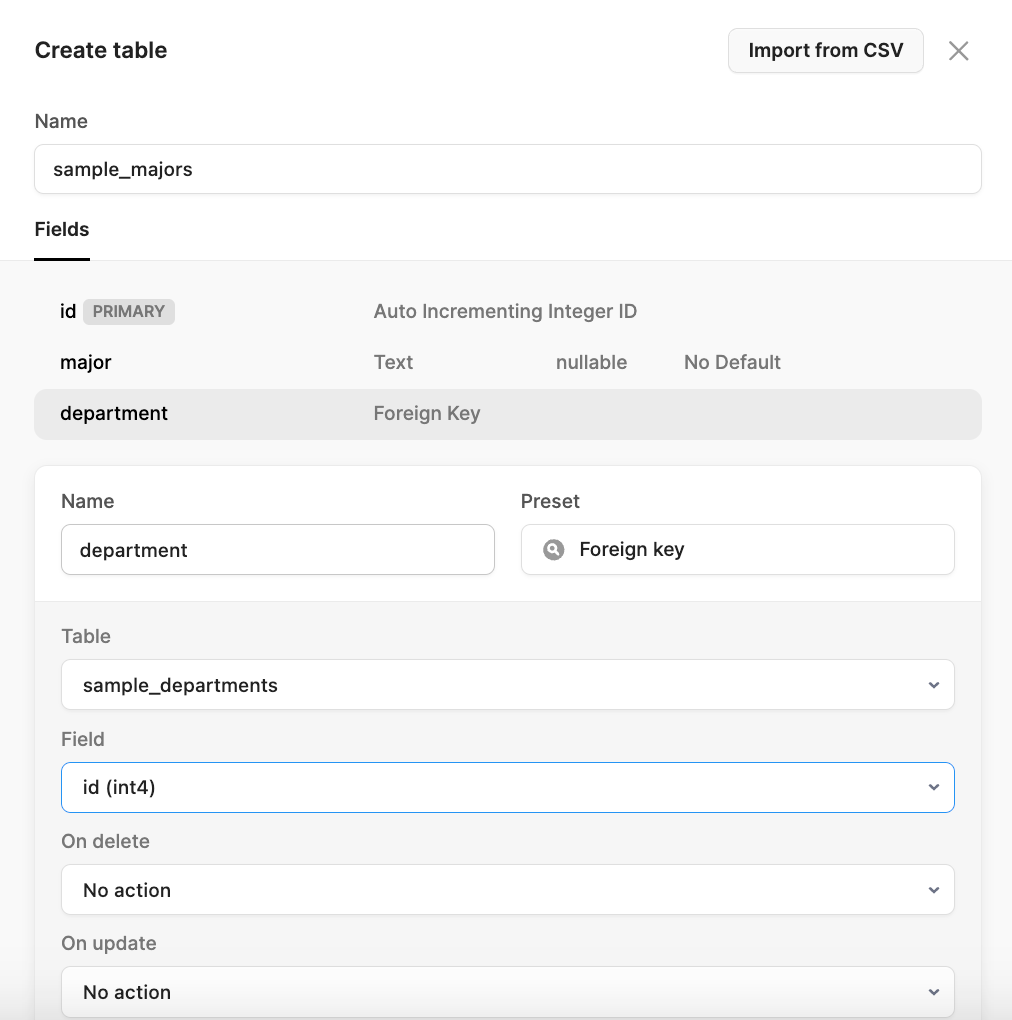
- Select Create table. It will appear as below.

- Next import the
sample_majors.csvinto the table. Select Import CSV > Into current table. Select thesample_majors.csvfile. This will display the following showing what is being imported. Select Import CSV.

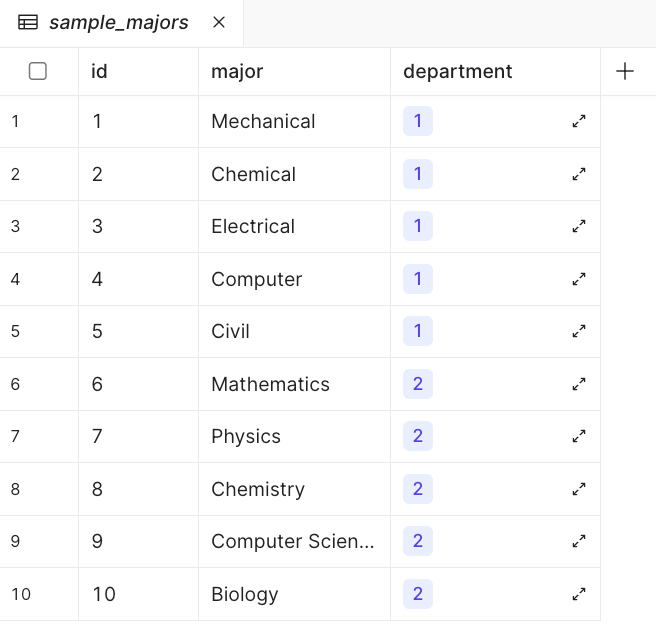
- Once imported the table will display as shown below.
Setup sample_students table
Next we create the sample_students table, that depends on the sample_departments and sample_majors table with foreign key relationships.
- Select Database from Retool Home.
- Select the + on the far right to create a new table.
- Specify a Name of
sample_students. - Select Add field and enter the following fields
first_name,last_name,student_idwith a value ofText. Next select Add field and entermajor. Specify a Preset ofForeign key, Table ofsample_majorsand a Field ofid (int4). This creates the connection between the major column and the id field in the sample_majors table. - Select Add field and enter
department. Specify a Preset ofForeign key, Table ofsample_departmentsand a Field ofid (int4). This creates the connection between the department column and the id field in the sample_departments table. The following image shows the completed table definition.
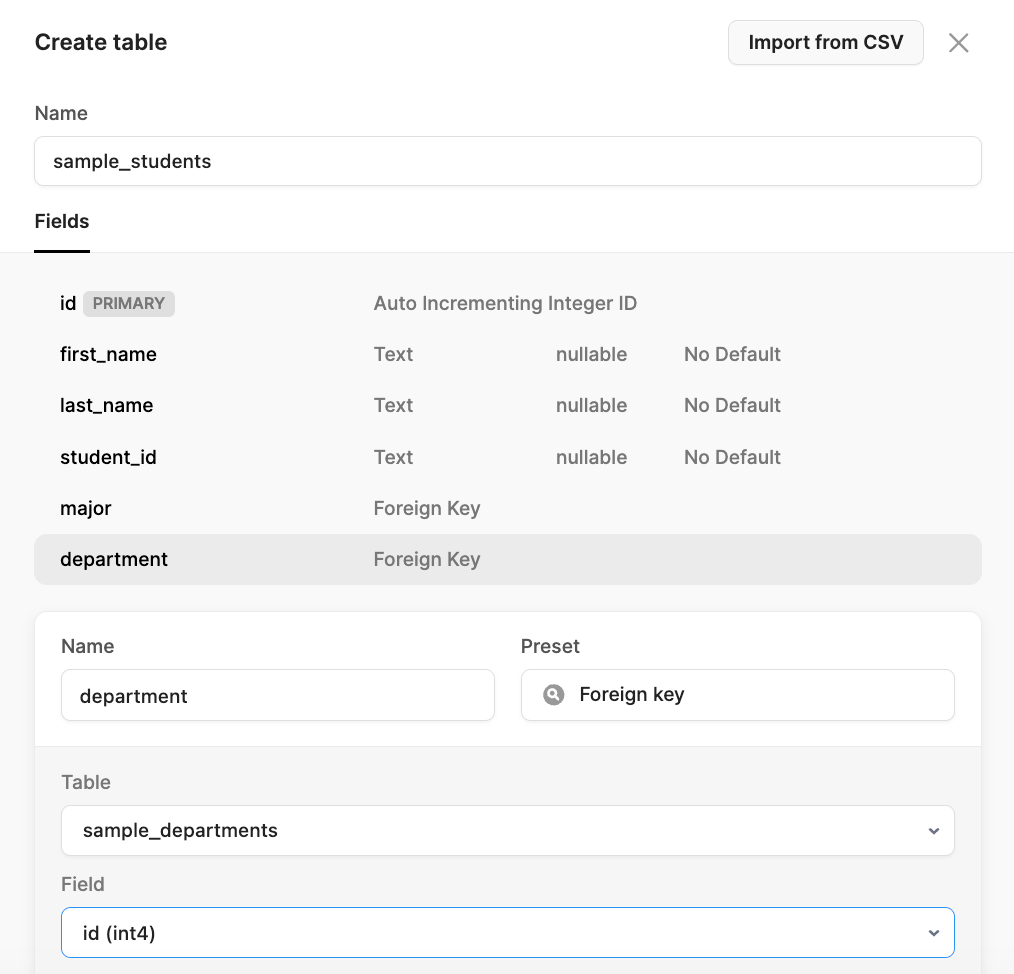
- Select Create table. It will appear as below.

- Next import the
sample_students.csvinto the table. Select Import CSV > Into current table. Select thesample_students.csvfile. This will display the following showing what is being imported. Select Import CSV.

- Once imported the table will display as shown below.
Database Tables Overview
Once the import of the CSVs has been completed, let’s quickly understand each table’s purpose and how they are related.
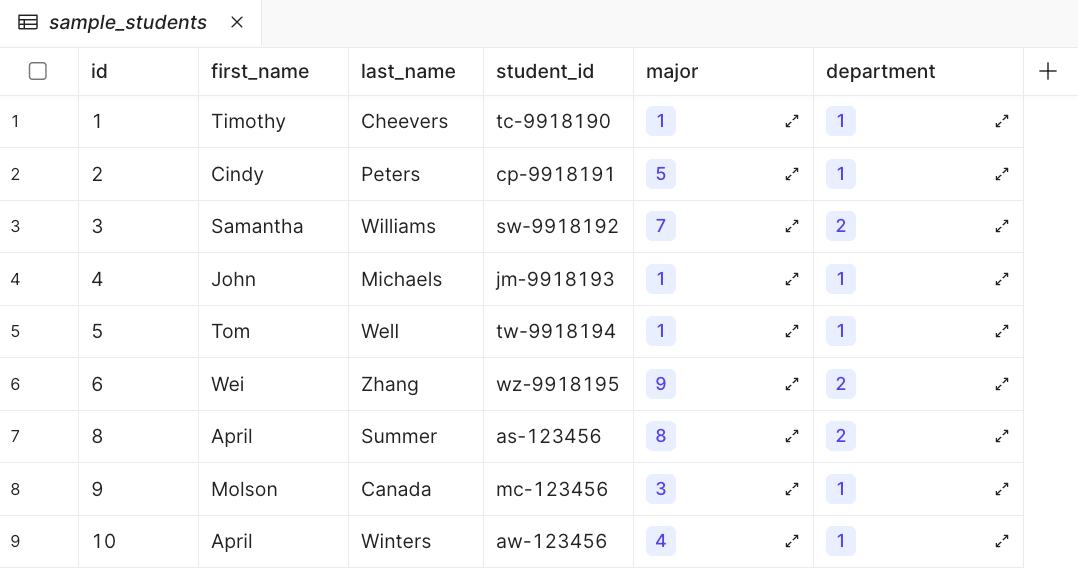
sample_students table
This table stores students that are enrolled in an Engineering or Science department. The following table provides an overview of the fields.
The department and major columns store foreign keys / identifiers to the sample_department and sample_majors tables.
| Column name | Description | Type |
|---|---|---|
| id | Primary key for entries | Integer |
| first_name | Student first name | Text |
| last_name | Student last name | Text |
| student_id | Student identifier | Text |
| major | Student major field of study | Foreign key (sample_majors) |
| department | Department where major is taught | Foreign key (sample_departments) |
sample_majors table
This table stores majors within an Engineering or Science department. The following table provides an overview of the fields.
The department column stores foreign key / identifier to the sample_department table.
| Column name | Description | Type |
|---|---|---|
| id | Primary key for entries | Integer |
| major | Major field of study | Text |
| department | Department where major is taught | Foreign key (sample_departments) |
sample_departments table
This table stores departments within a university. The following table provides an overview of the fields.
| Column name | Description | Type |
|---|---|---|
| id | Primary key for entries | Integer |
| department | Department within the university | Text |
Import fundamentals-sql app into Retool
Next we will import the Retool fundamentals-sql app into Retool. This application is meant to provide a working example with components, code and event handlers that demonstrate real-world actions that are commonly used in building Retool Apps.
- Click the Fundamentals SQL App link to download the ZIP.
- Once the template has downloaded go to Retool Home Screen, select Apps > Create > Classic App.
- The Classic App editor will display, rename the app
fundamentals-sql. - In the upper-right, select ... > Replace app with JSON/ZIP.
- Select the downloaded file
fundamentals-sql.zip.
Sometime the application may not display select component values properly (e.g. major). You may need to access the queries listed in the next section and run them to initialize the query and thus the select component values.
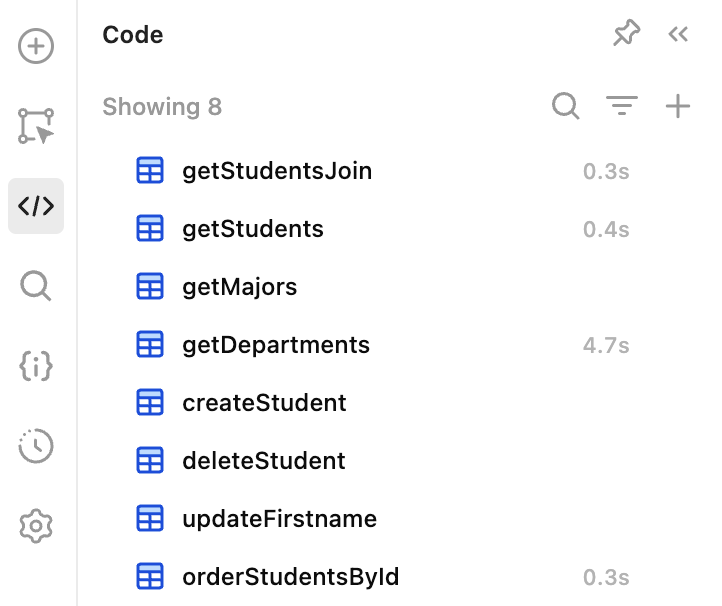
Code Overview
The fundamentals-sql app has several SQL Statements that are leveraged in the following sections. To access these queries, go to Code. The following table provides an overview of each query that will be examined in the following sections.
| Query Name | Description |
|---|---|
| getStudents | This query uses SQL SELECT to query data in a single table, in this example the sample_students table. |
| getStudentsJoin | This query uses SQL JOIN to query data across the tables sample_students, sample_departments, sample_majors to create a single view of the data. |
| getMajors | This query uses SQL SELECT to query data in a single table, in this example the sample_majors table. |
| getDepartments | This query uses SQL SELECT to query data in a single table, in this example the sample_departments table. |
| createStudent | This query uses SQL INSERT to add a new student to the sample_students table. |
| deleteStudent | This query uses SQL DELETE to delete a student from the sample_students table. |
| updateFirstname | This query uses SQL UPDATE to update the first_name column in the sample_students table. |
| orderStudentsById | This query uses SQL ORDER BY to update the ordering of SQL SELECT using the ID column in the sample_students table. |
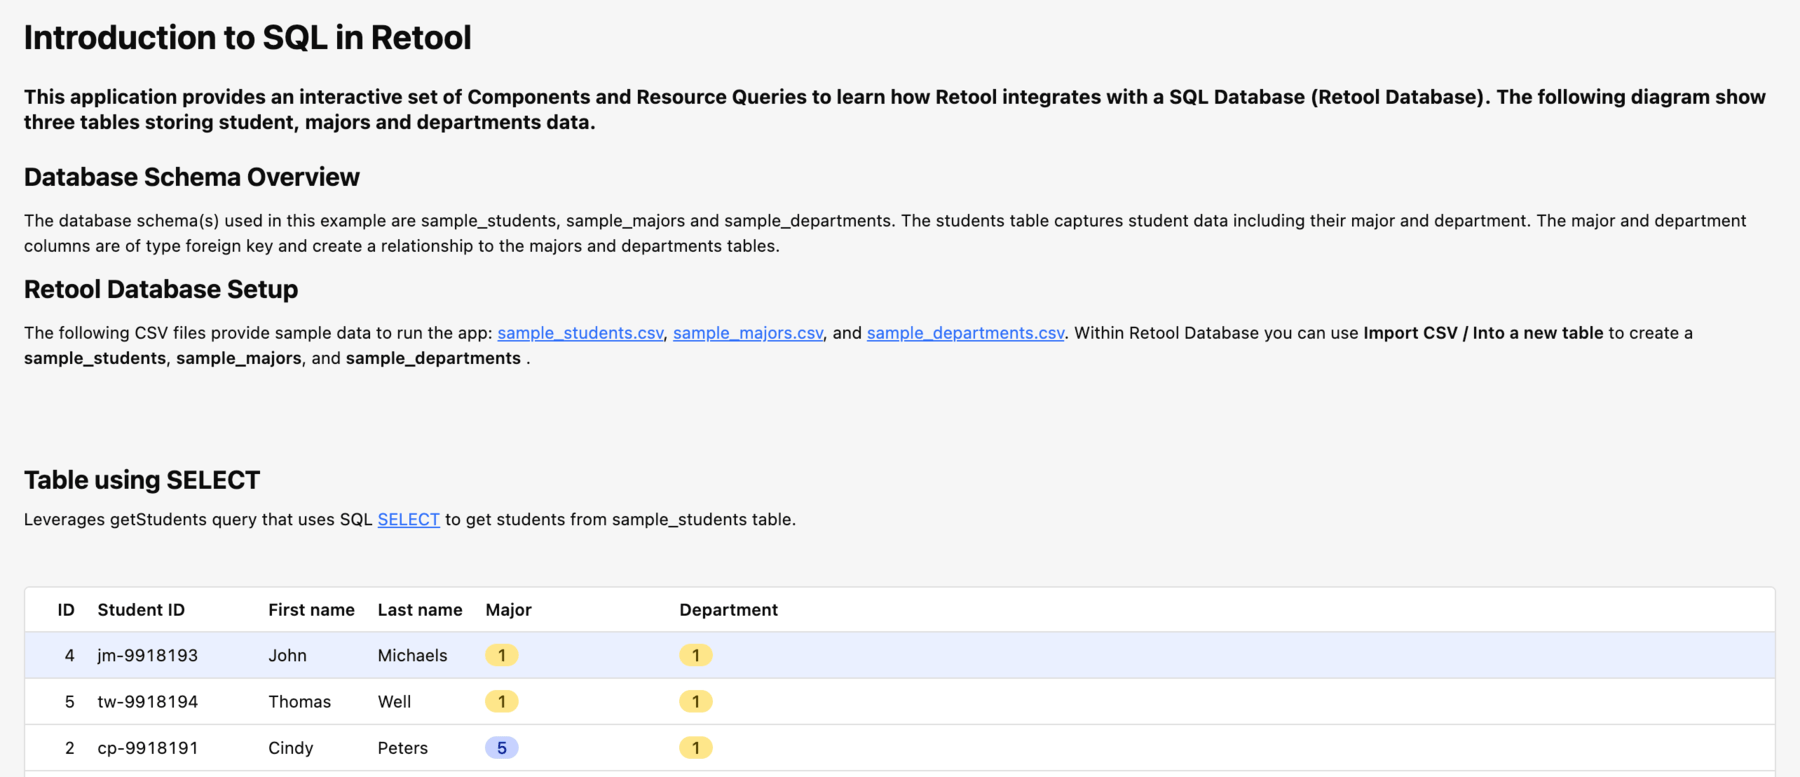
Examine SELECT
In this section we will examine a SQL SELECT statement and how it powers a Retool Table by selecting data from a single table. Select Edit App to be able to see how this application is created.
- Select the table in the Table Using Select section. This will display a
tableUsingSelectlabel.
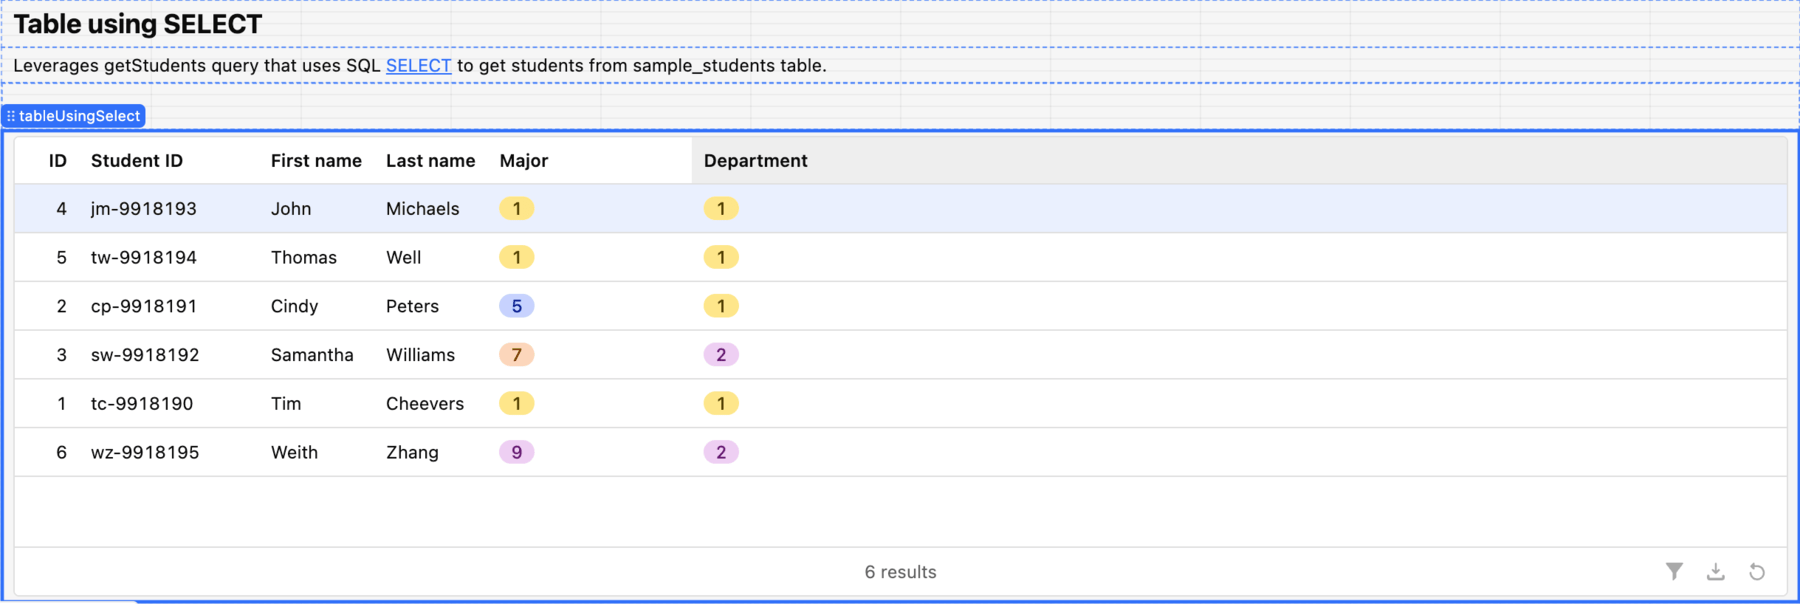
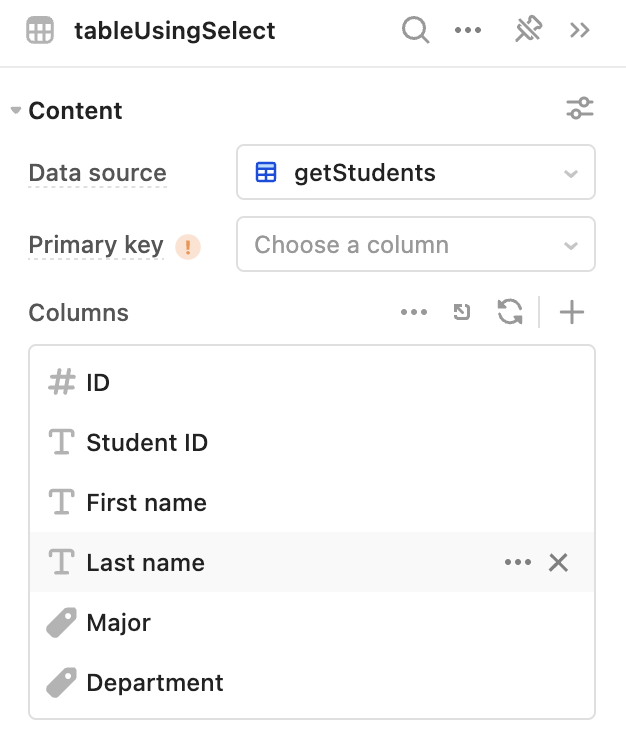
- Look at the Right Panel and inspect the table. For Content > Data source the app uses the
getStudentsquery. It also displays the columns in the table and how Retool will render the data in the table component (e.g. Integer, Text, Tag).
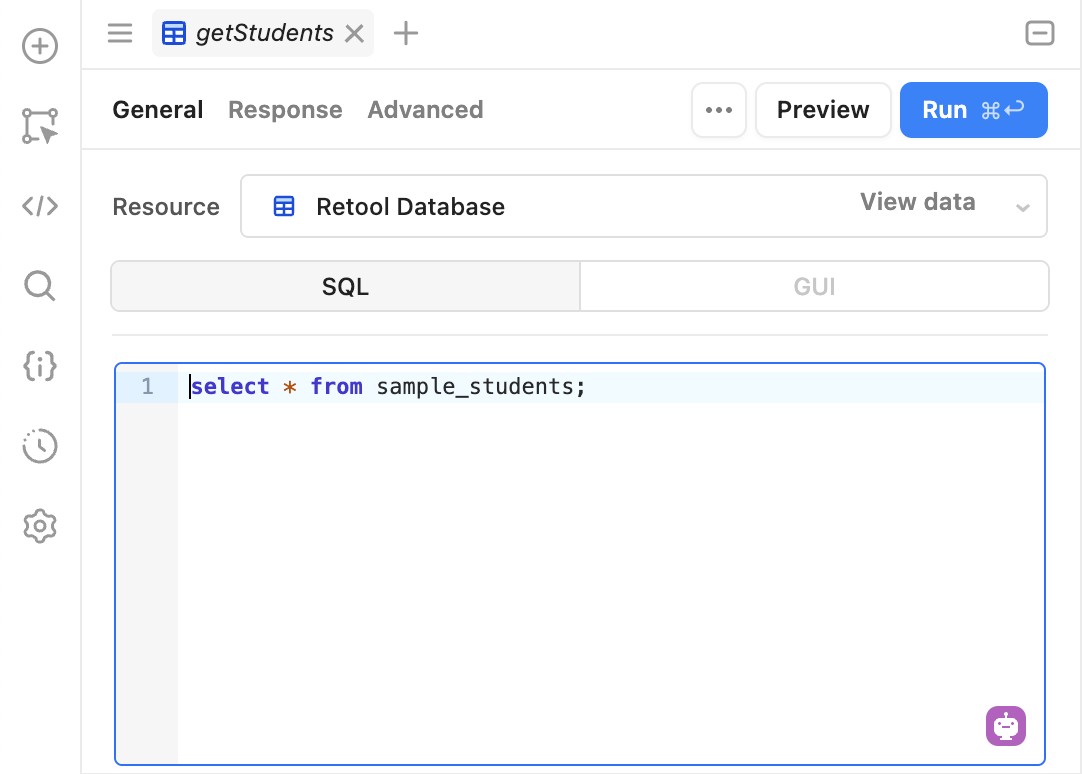
- The query, getStudents, can be examined by selecting the Code > getStudents query. This will display the SQL SELECT.
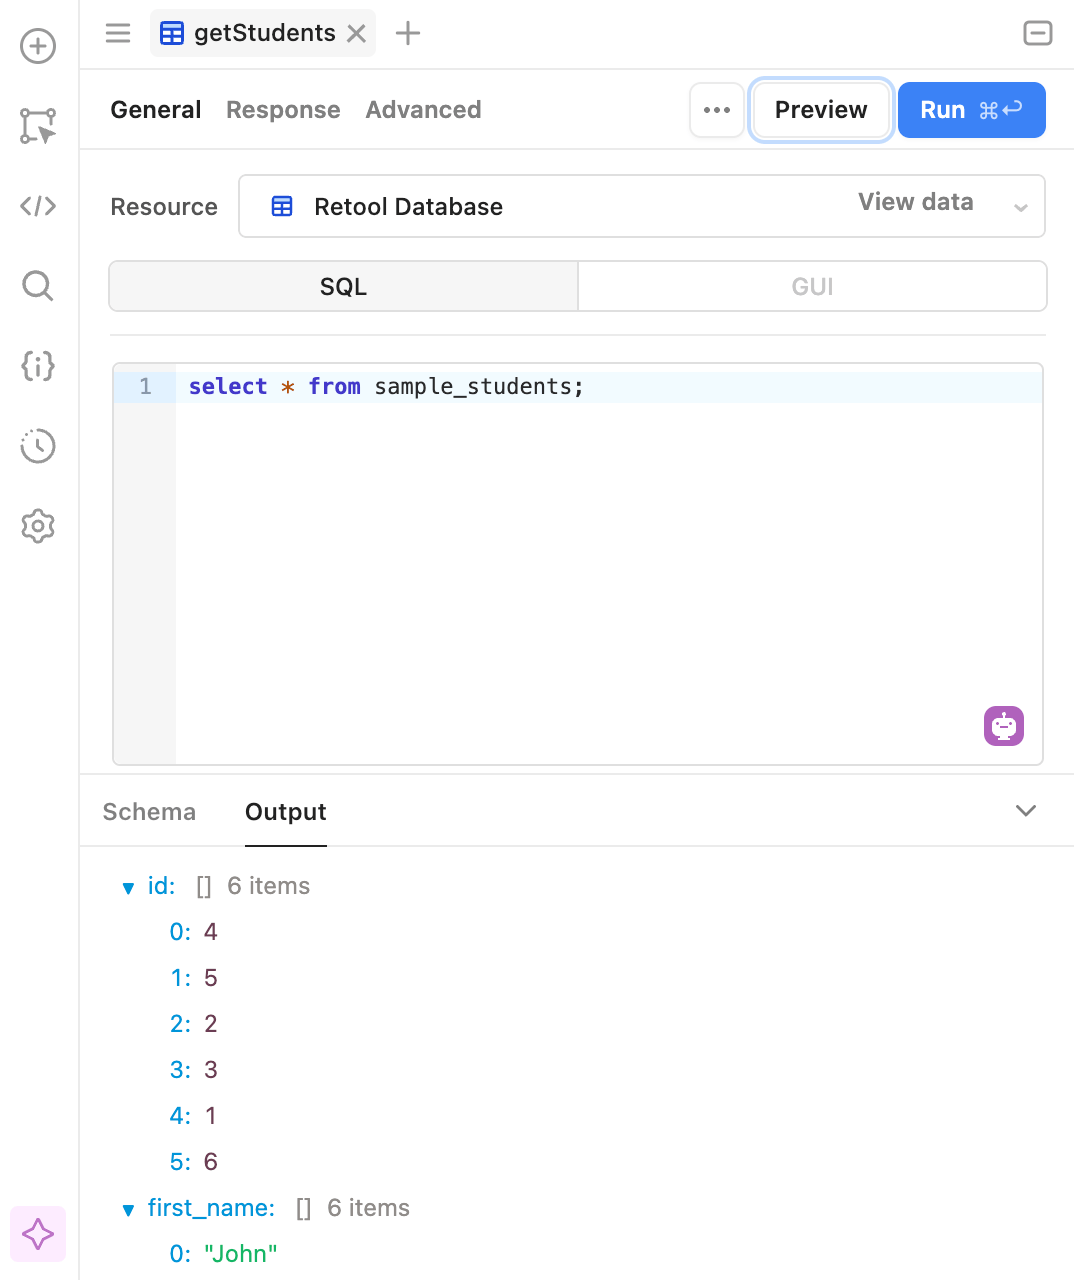
- Using the Preview button you can run this query and examine the results below without updating the component.
Examine JOIN
In this section we will examine a SQL JOIN statement and how it makes the major and department columns more legible by selecting across multiple tables. The common scenario is that a Retool App will display data that is table friendly from multiple tables. In the first table, tableUsingSelect, the major and departments are numerical values, or more specifically foreign key identifiers.
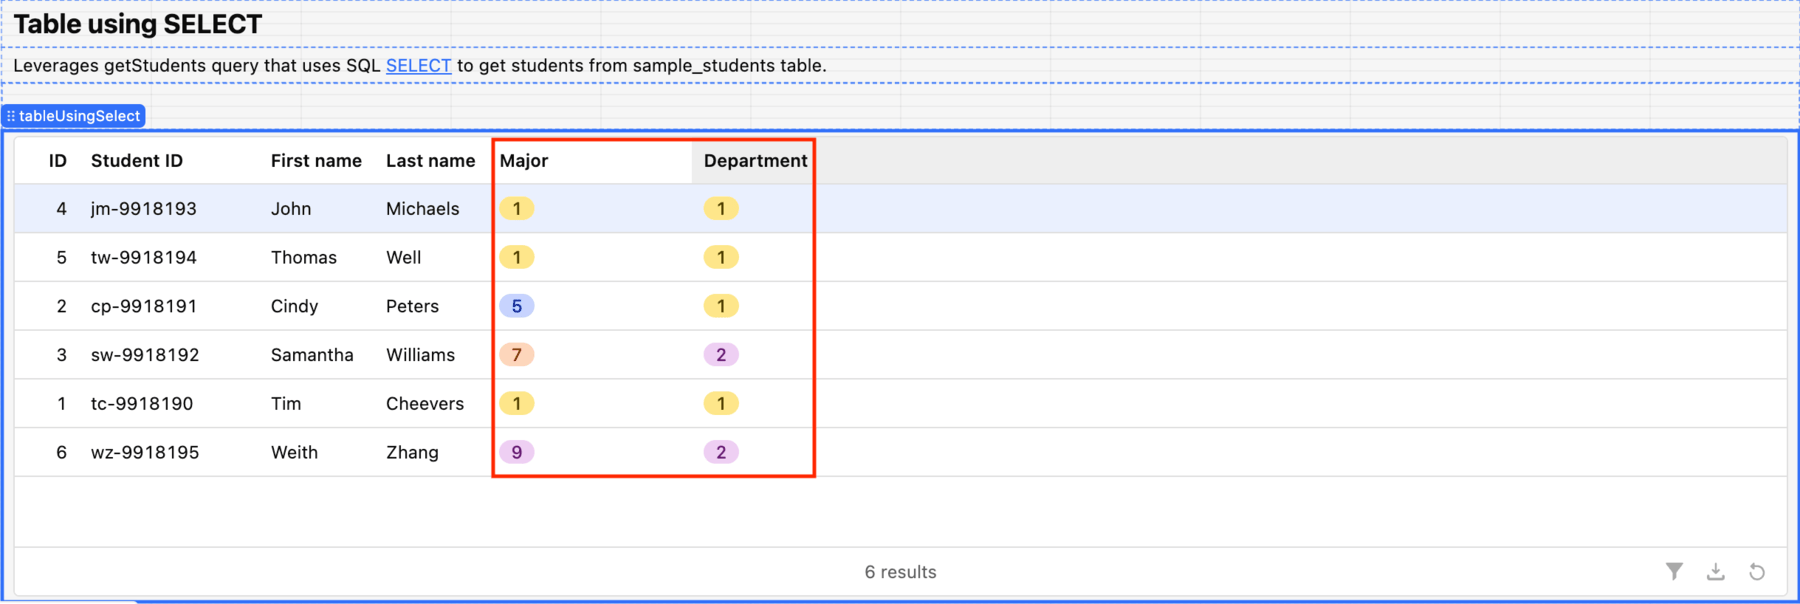
In order to display the major and department, we need to leverage a SQL JOIN.
- Scroll to the next section, Table using JOIN.
- Select the table and the
tableUsingJoinlabel should appear.
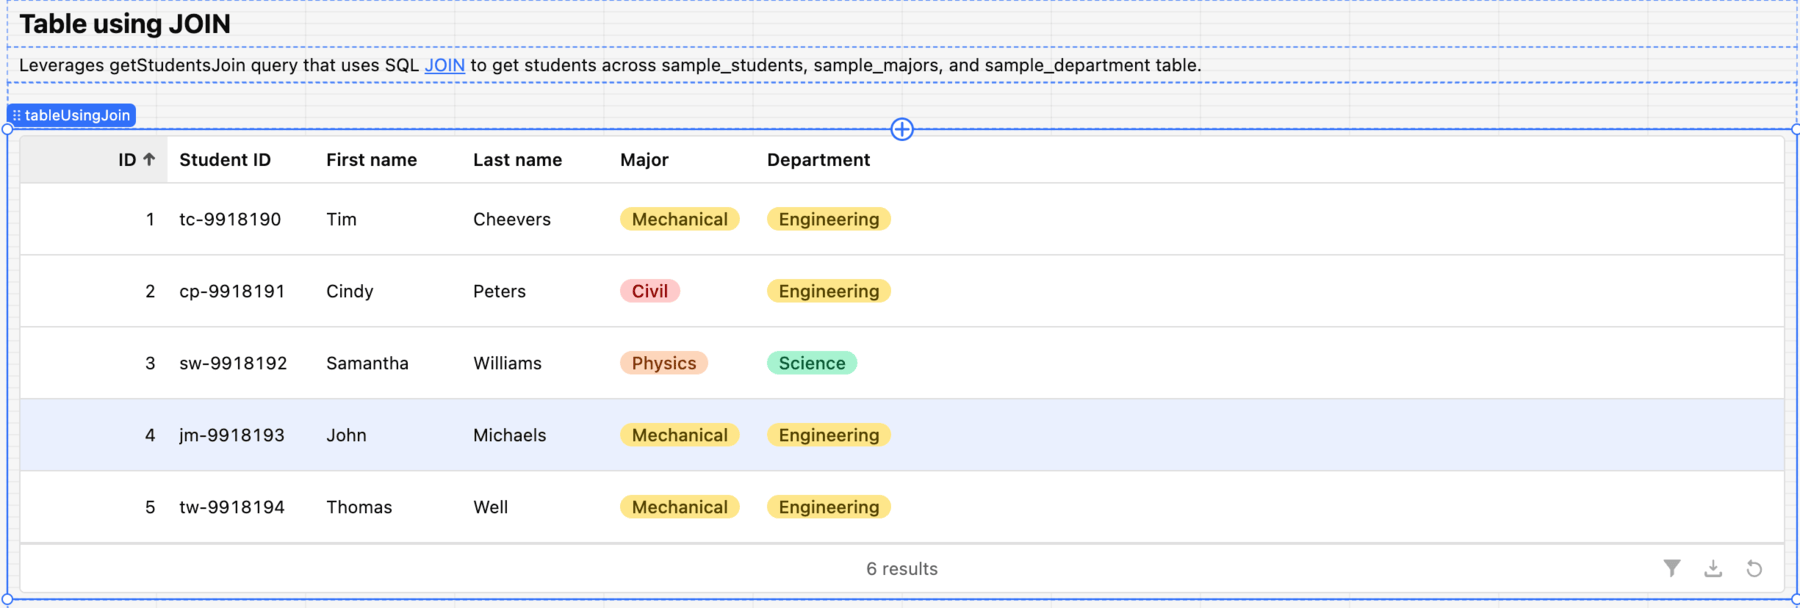
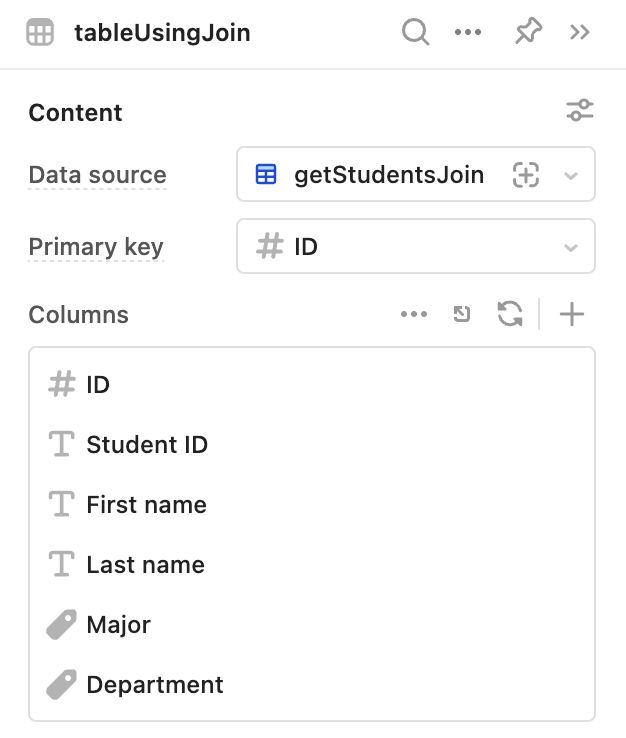
- Look at the Right Panel and inspect the table. For Content > Data source the app uses the
getStudentsJoinquery.
- The query,
getStudentsJoin, can be examined by selecting the Code > getStudentsJoin query. This will display the SQL JOIN.
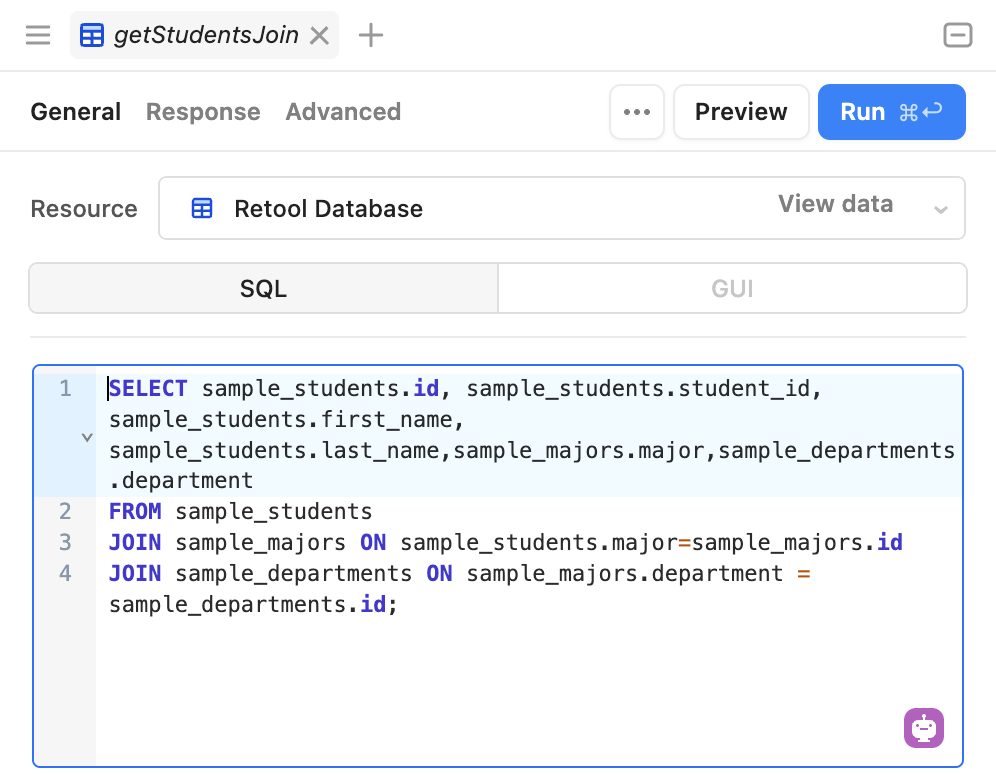
This query starts by identifying what will be displayed on a column by column basis and then identifies after the FROM and JOIN which tables populate those values. The sample_students, sample_majors and sample_department prefix the column names to help establish what table we are accessing the data from and the JOIN ON statement identifies that the majors and departments identifiers will be used to select the correct entries in those tables.
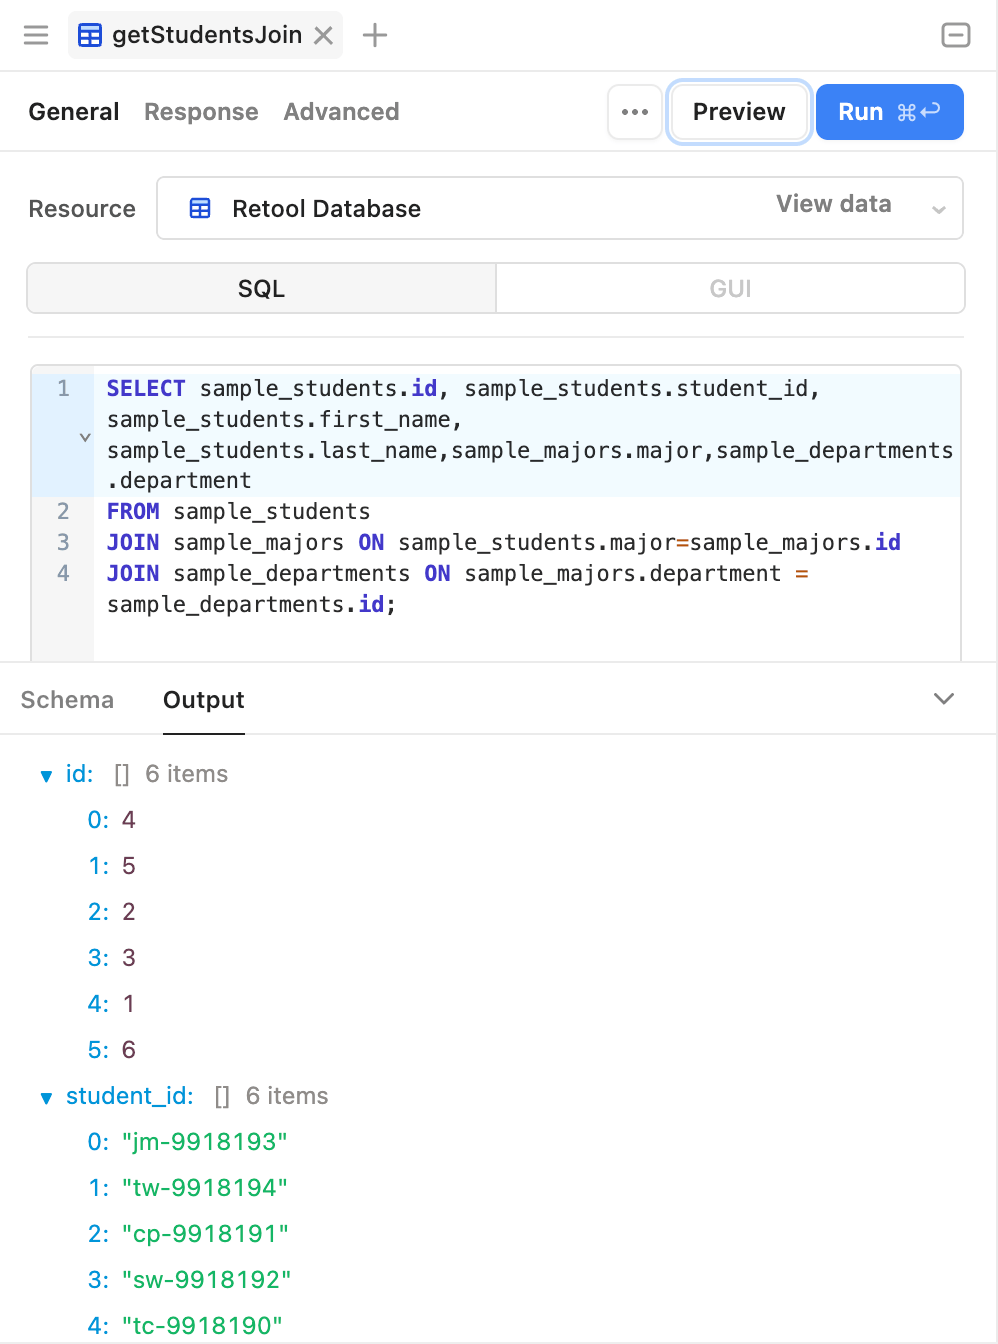
- Using the Preview button you can run this query and examine the results below without updating the component.
Examine INSERT
In this section we will examine a SQL INSERT statement and how a Retool Form component can be used to insert new students into the Retool Database / sample_users table.
- Scroll to the next section, Form using INSERT.
- Select the form and the
formUserInsertlabel should appear.
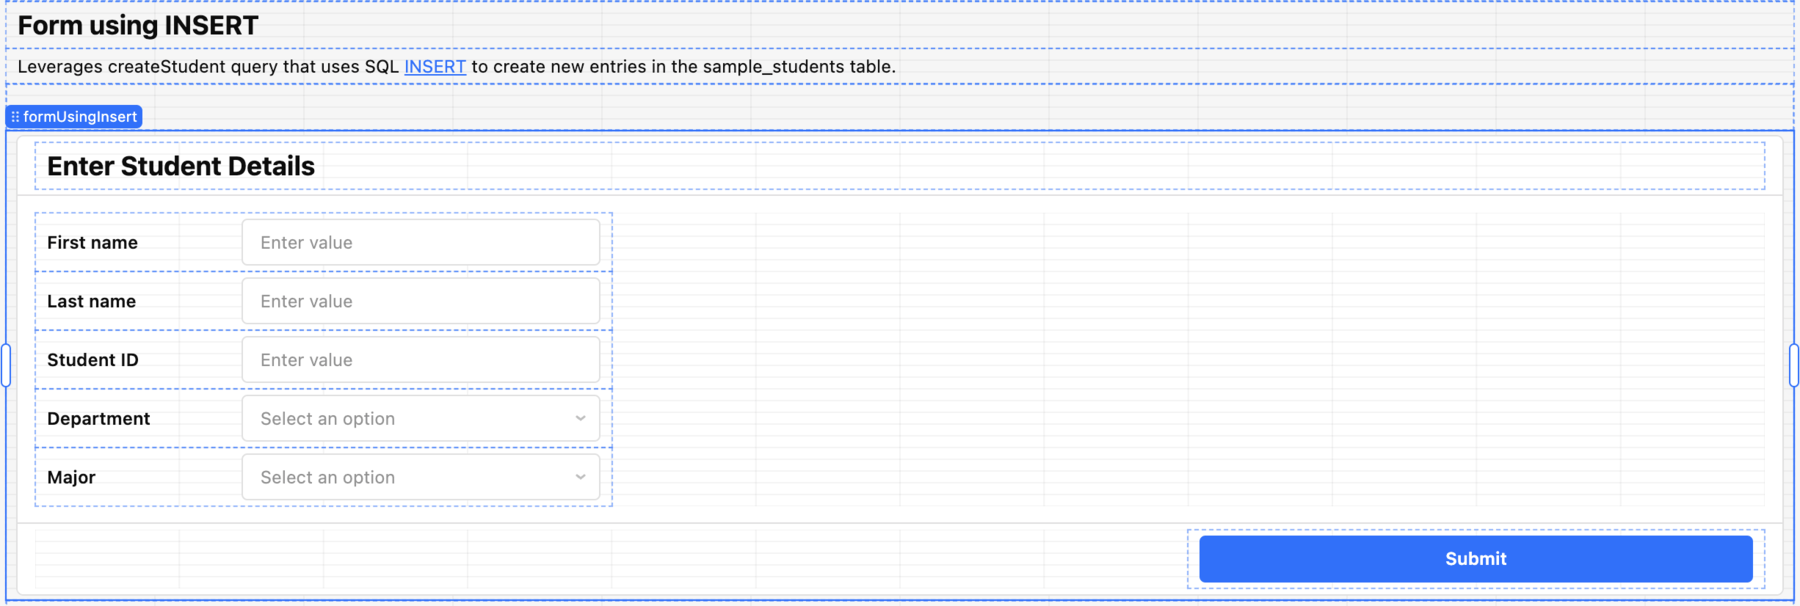
- For
formUsingInsert, we will use an event handler to take whatever is populated and use it to perform a SQL INSERT when the Submit button is clicked. In the Right panel, select Event handlers and click createStudent.trigger(). This will expose the event handler dialog below.
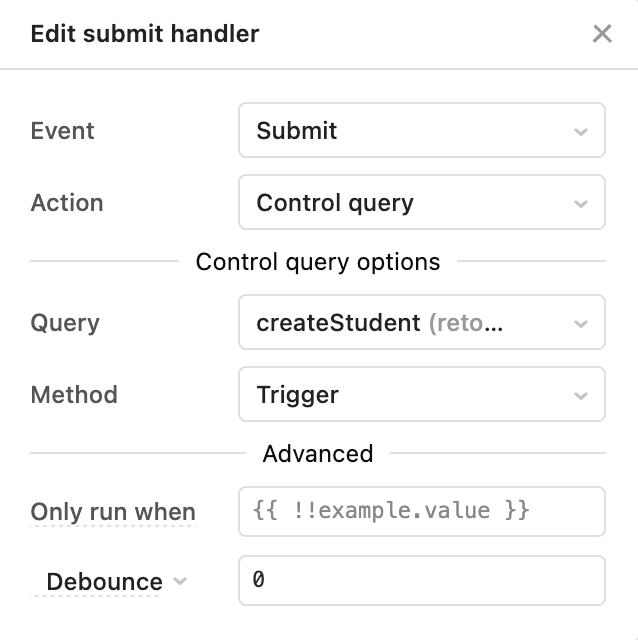
-
In the submit handler shown above, we see the following settings, that defines what happens when the Submit button is selected, in this case run the createStudent query:
- Event =
Submit - Action =
Control Query - Query =
createStudent - Method =
Trigger
- Event =
-
Let’s examine the createStudent query to see how data is extracted from the Form. Select Code > createStudent .
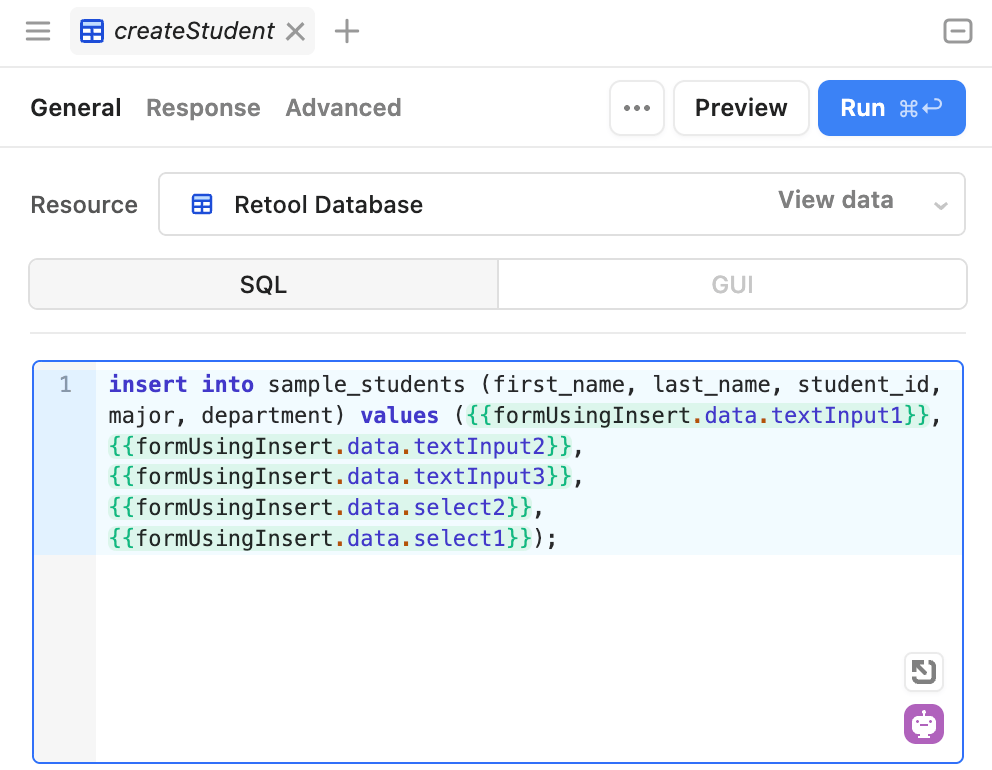
- A SQL INSERT statement is used to put entries into the
sample_studentstable. The values offirst_name,last_name,student_id,major, anddepartmentare inserted. The values are extracted from the form by using the{{ }}syntax. The values use the form label.data.component name. In this case this isformUsingInsert.data.textInput1to extract the value forfirst_namefor example as shown below:
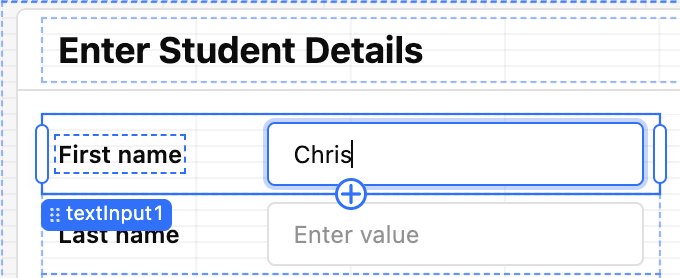
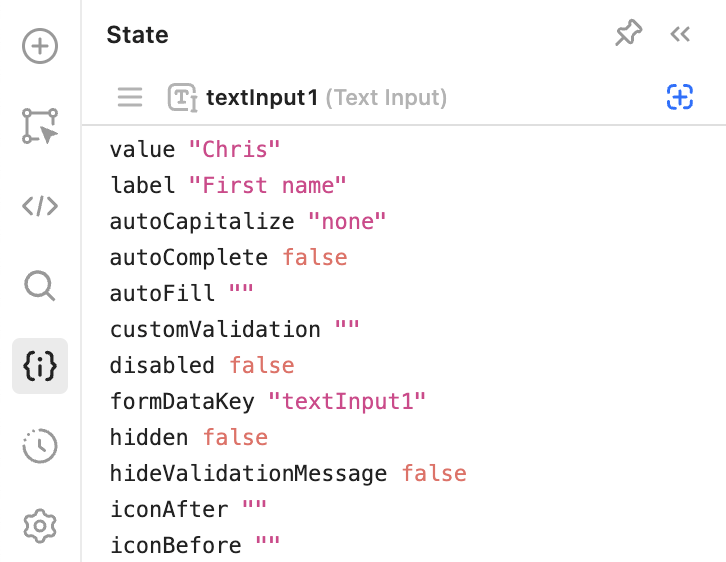
- What if you are unsure that the value is set to? Check out the State tab in the Left panel where you can examine queries, components, and globals. If we use the State tab, we can see that the value of the
textInput1component is,Chris.
- The remaining fields are extracted in the same way including the values for textInput2, textInput3, select1, and select2.
When completing the form, the Department and Major select components are pre-populated with values. These values come from the department and major tables and require defining queries to extract the current values.
- Select the Department
select1component. This refers to the getDepartments Data source. The Value is set to the{{item.id}}and Label set to{{item.department}}. This will set values to the primary key ids for department (e.g., 1, 2) but display the associated department name (e.g., Engineering, Science) for easier selection.

- Select
select1and see the values.

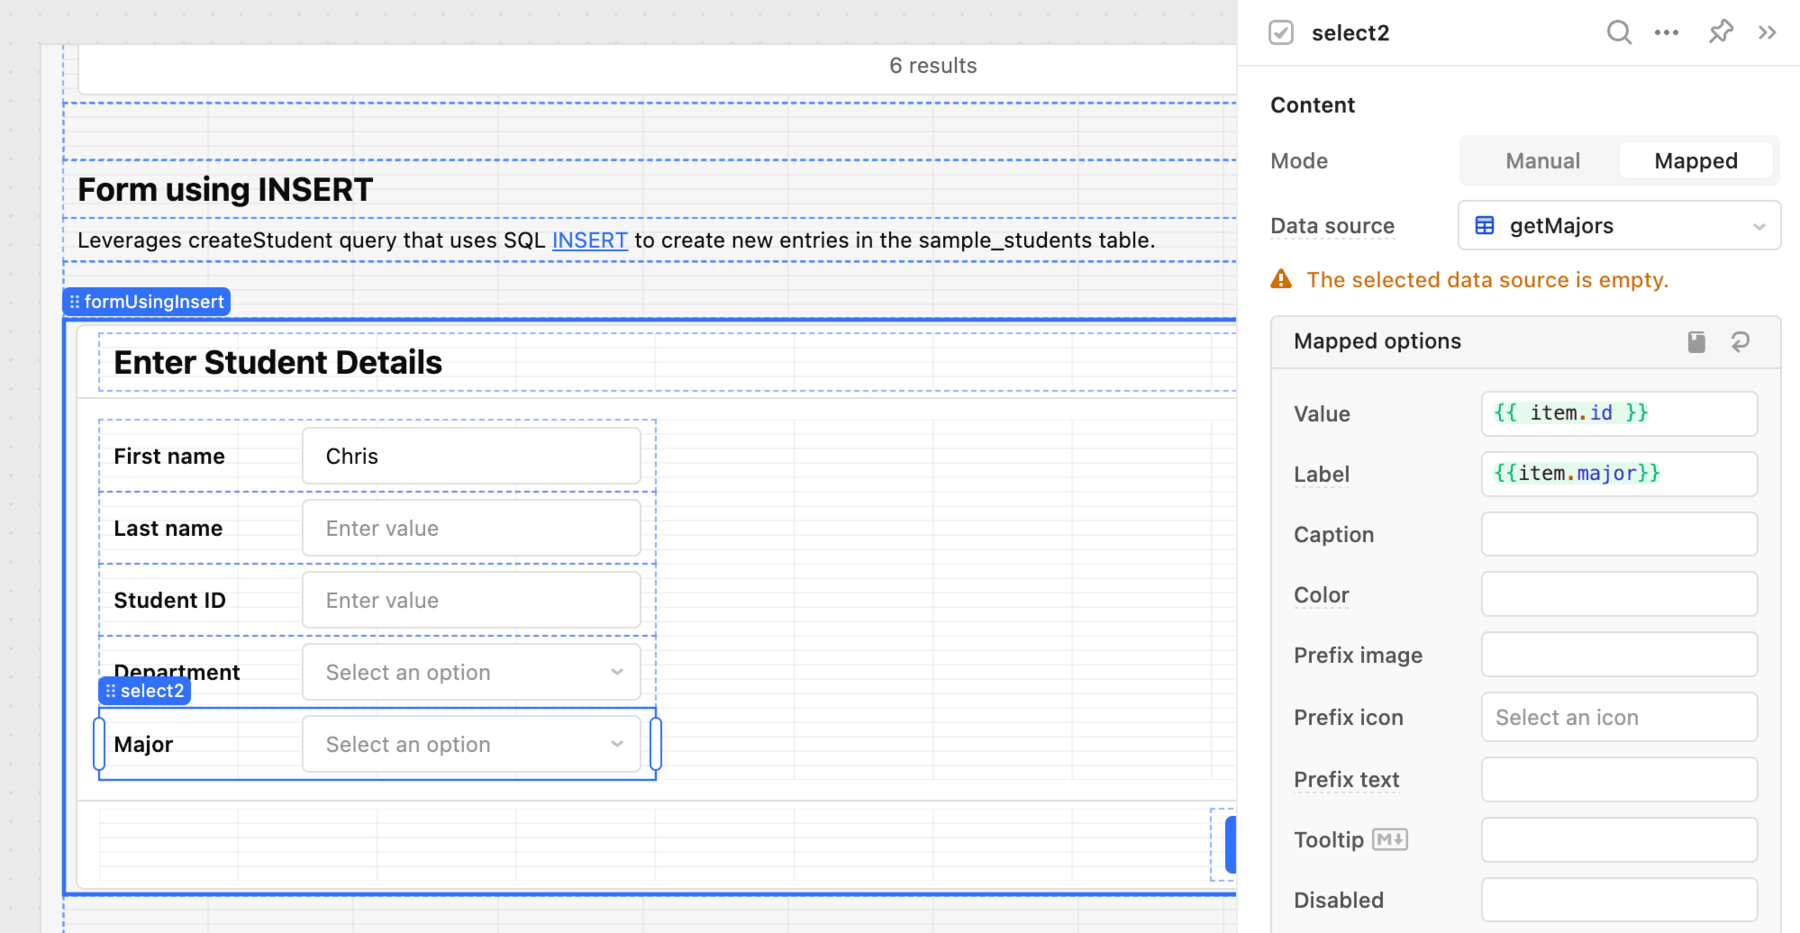
- Select the Major
select2component. This refers to the getMajors Data source. The Value is set to the{{item.id}}and Label set to{{item.major}}. This will set values to the primary key ids for major (e.g., 1, 2, 3 etc.) but display the associated major (e.g., Mechanical, Chemical, Electrical etc.) for easier selection.
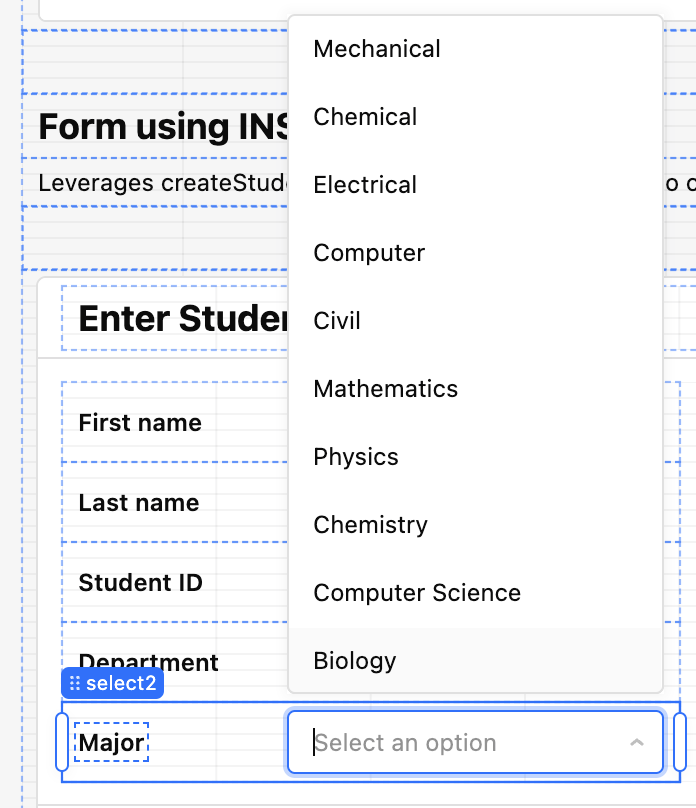
- Select
select2component and examine the values.
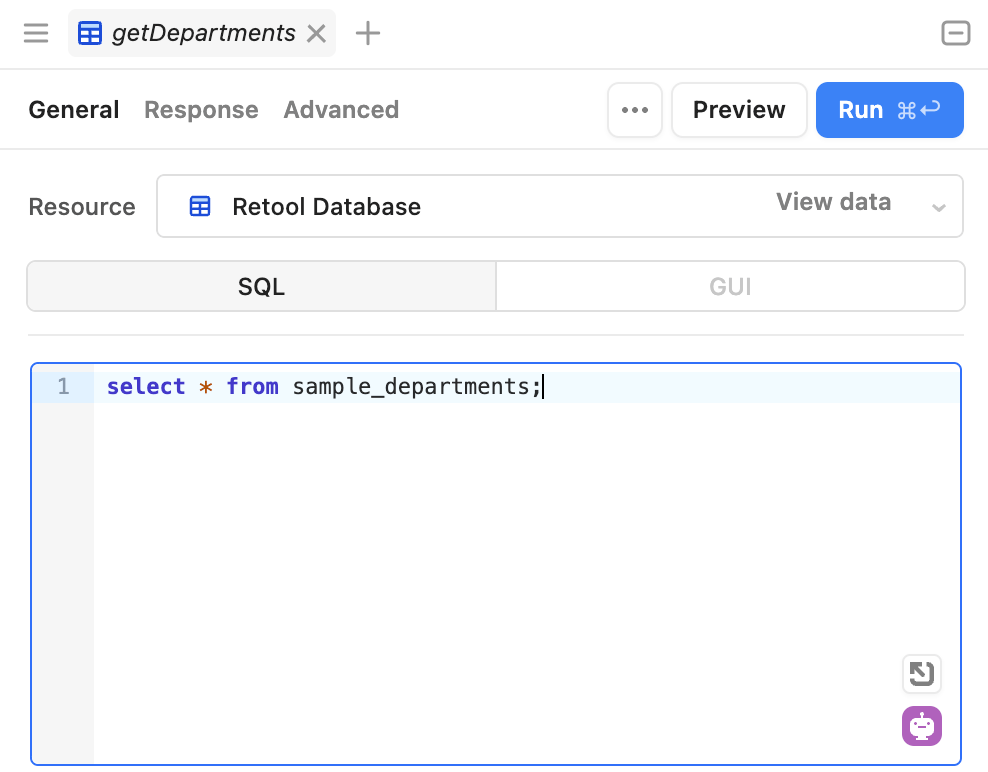
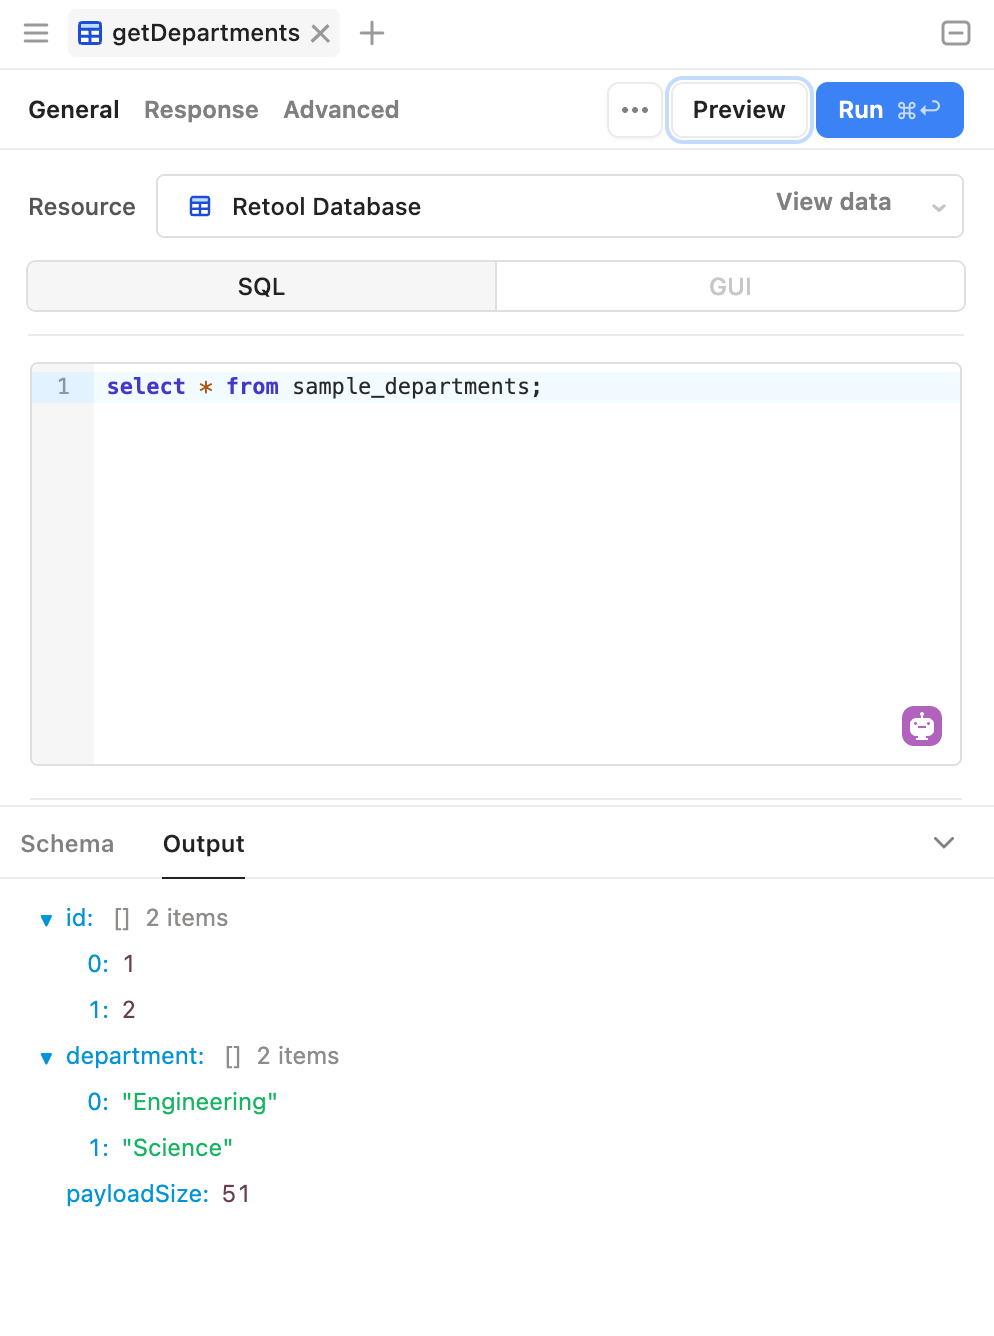
- Let's examine the queries that are powering each of the select components. Go to Code > getDepartments. The following query is displayed:
- Using the Preview button you can run this query and examine the results below without updating the component.
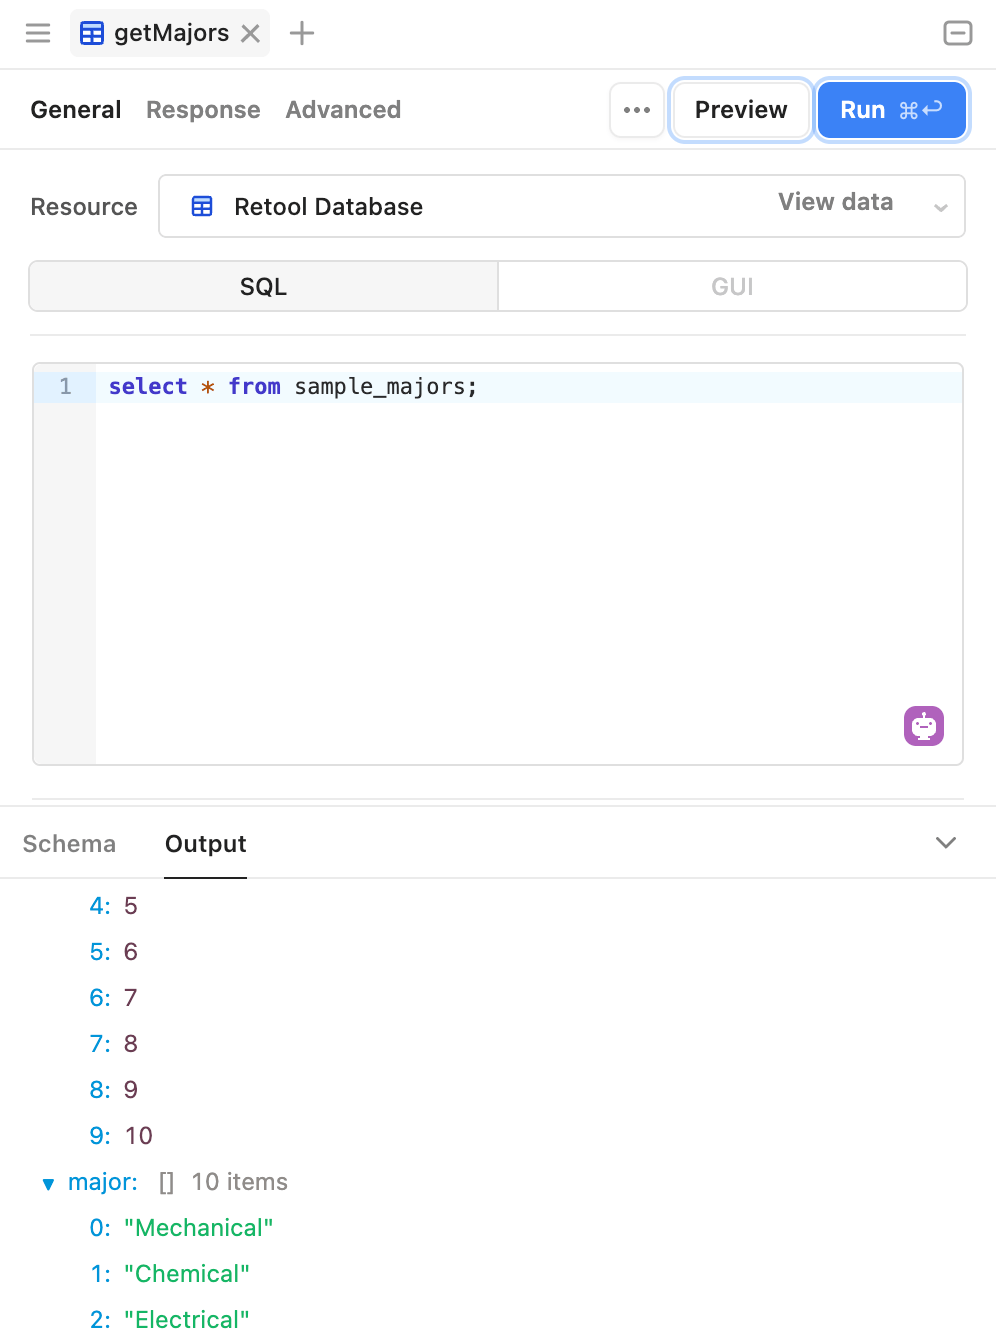
- Let's examine the queries that are powering each of the select components. Go to Code > getMajors. The following query is displayed
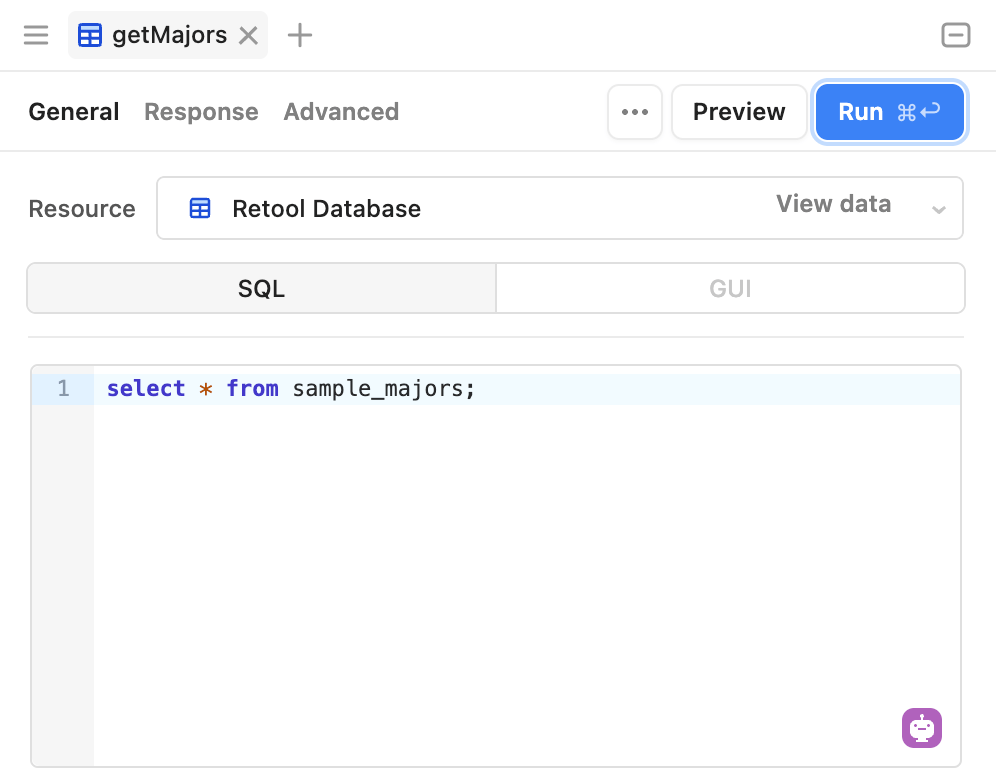
- Using the Preview button you can run this query and examine the results below without updating the component.
Examine UPDATE
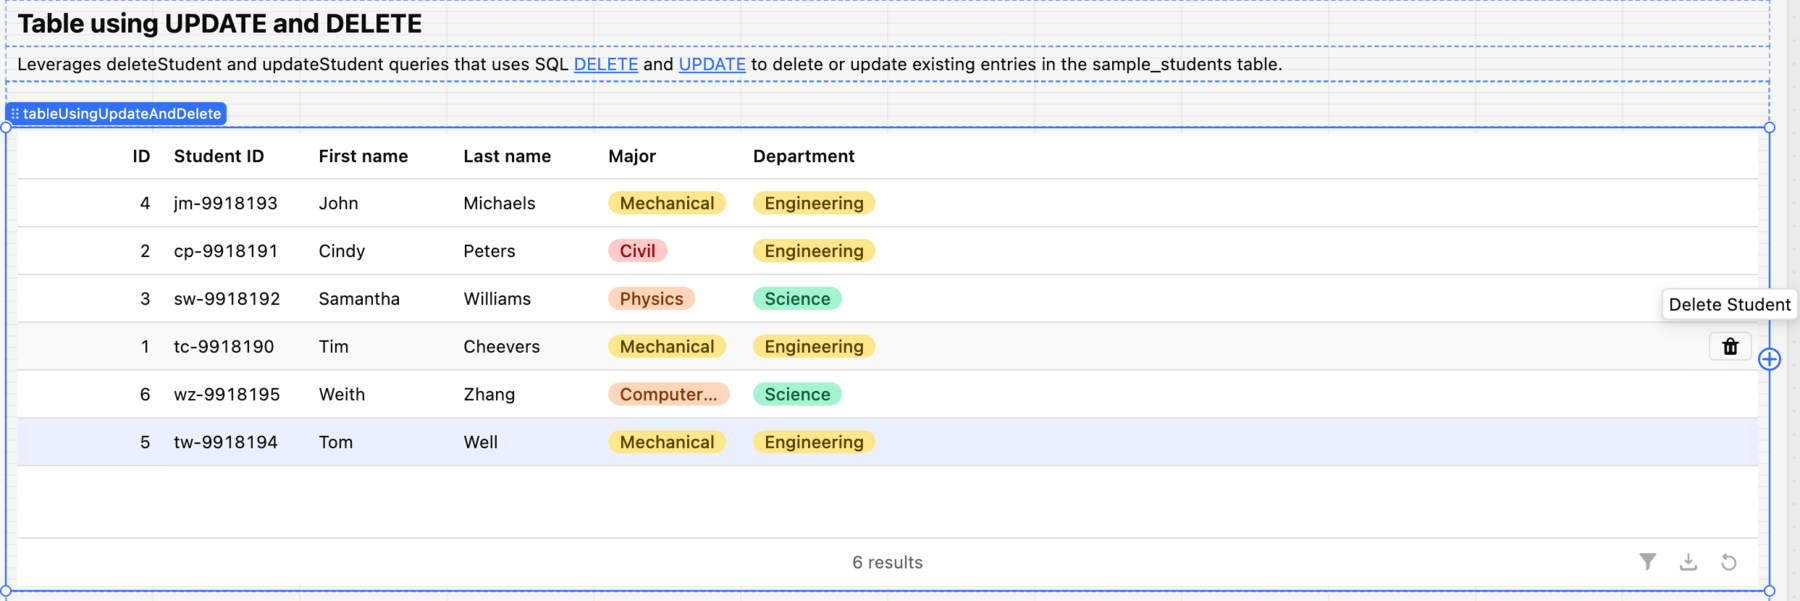
In this section we will examine a SQL UPDATE statement. Using an editable column and event handlers we can make changes in the table or delete an entry from the table.
- Scroll to the next section, Table using UPDATE and DELETE.
- Select the table and the
tableUsingUpdateAndDeletelabel should appear.
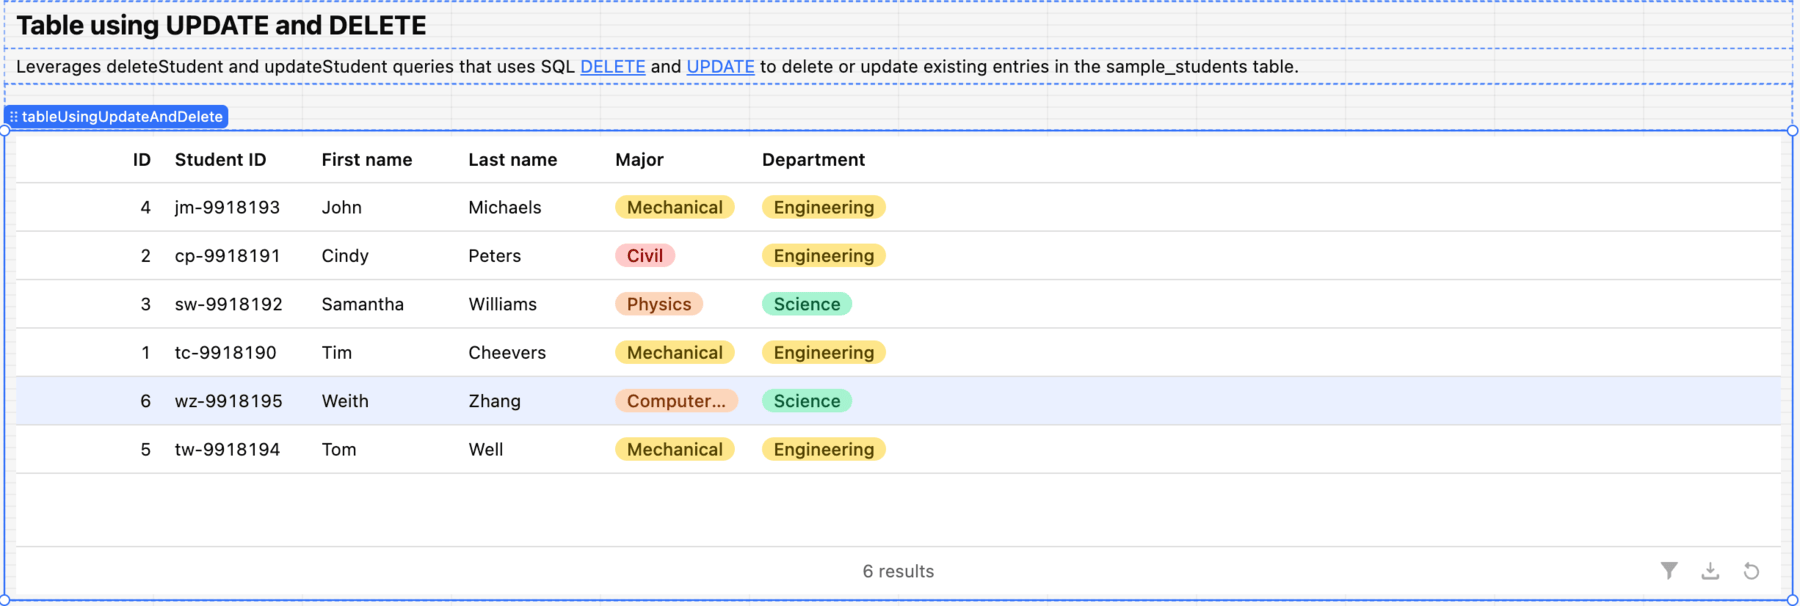
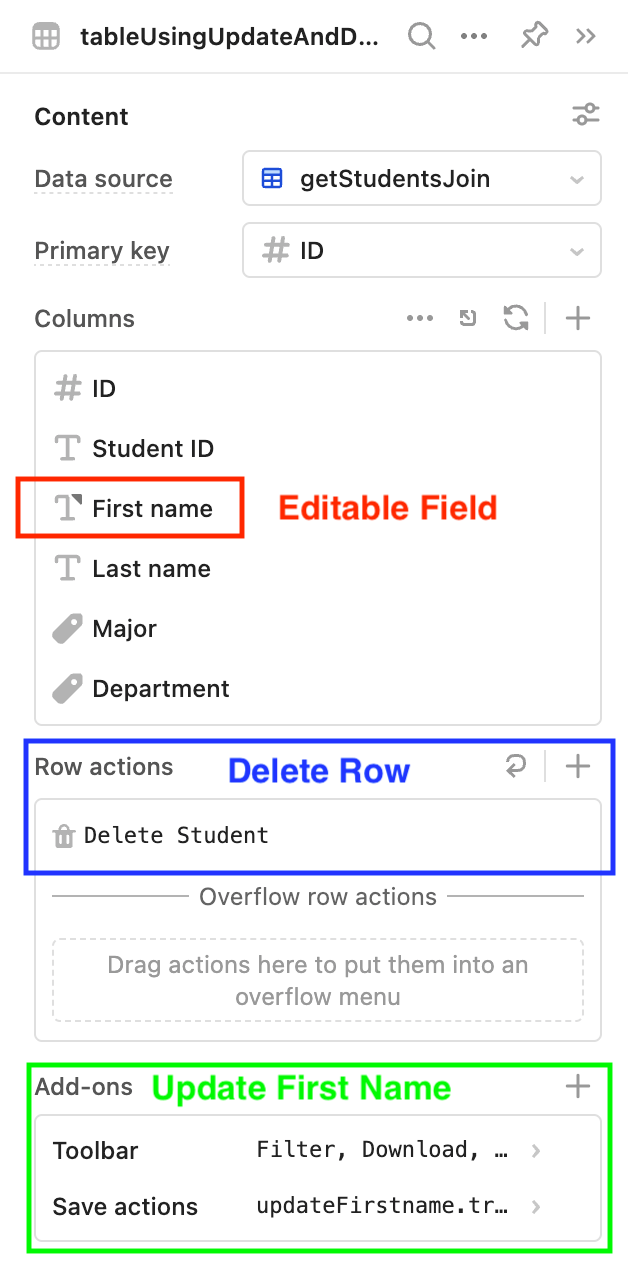
- Look at the Right Panel and inspect the table. For Content > Data source the app uses the
getStudentsJoinquery. - Next examine the First name column.
Make editableis enabled on that column allowing a user to update the value of a selected cell and save the result. Next we have a Row action that identifies aDelete Studentaction that will be covered in the next section. Finally there is an Add-on that has a Save actions,updateFirstName.trigger(), that will trigger when the cell is updated andSaveis selected.
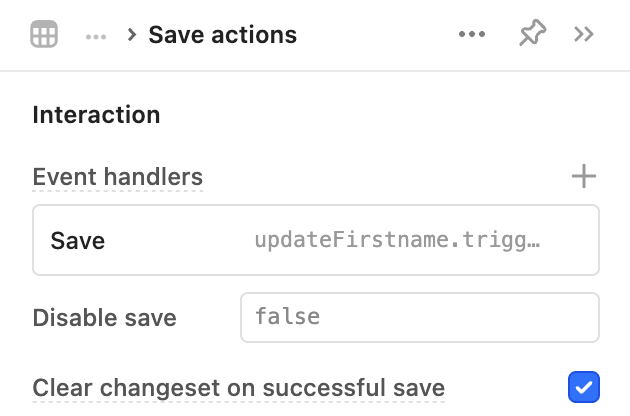
- Let’s first examine the Save actions.
- Select it and you can see an Event handler is specified,
updateFirstname.trigger(). Disable saveis set to false.Clear changeset on successful saveis enabled.
- Select it and you can see an Event handler is specified,
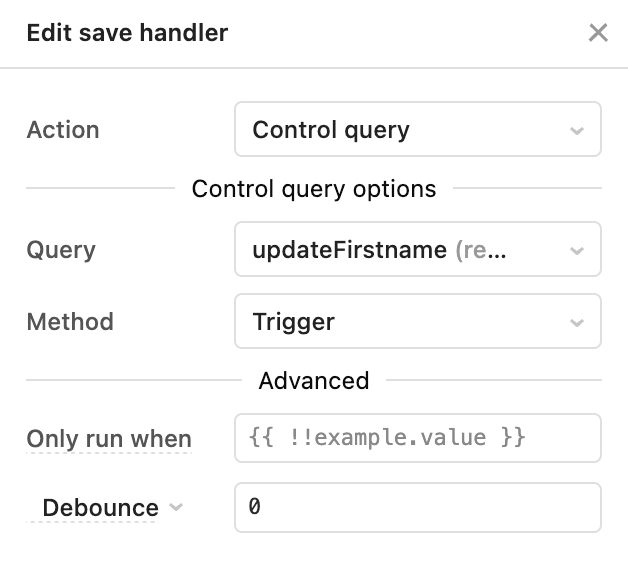
- Selecting the Event handlers, we can edit it and see the query that is identified for updating the student, updateFirstname.
- Let’s examine the updateFirstname query to see how data is extracted from the row in the table. Select Code > updateFirstname. We are using inline JavaScript to pull the value selected in the table via the changesetArray as seen below.
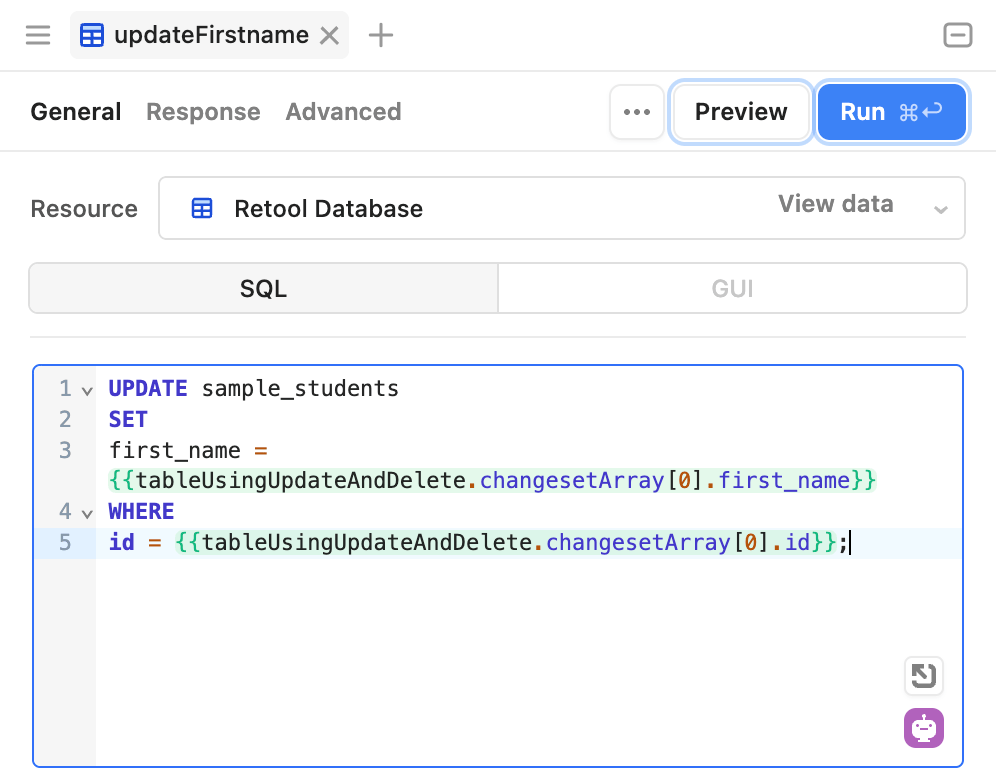
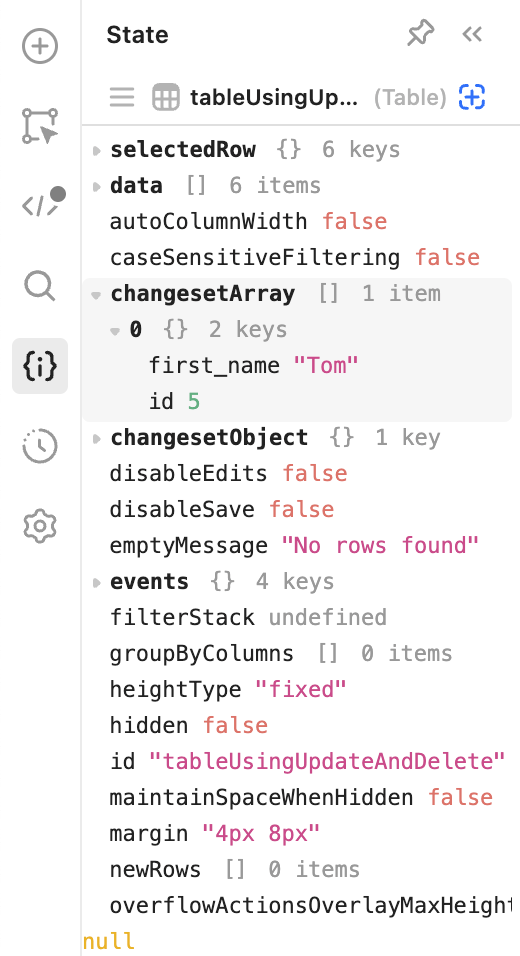
- What is a changeset? When a user selects a first name to change, that value and its id is stored in an array. We can extract this by referring to the table, changeset array, and the first_name and id attributes. This then provides a valid SQL UPDATE by changing the first_name column for an entry identified by the primary key, id. To see the changesetArray in action, select a first name in the table as shown below and modify the first name. Do not select Save yet. We want to see how changesets work.
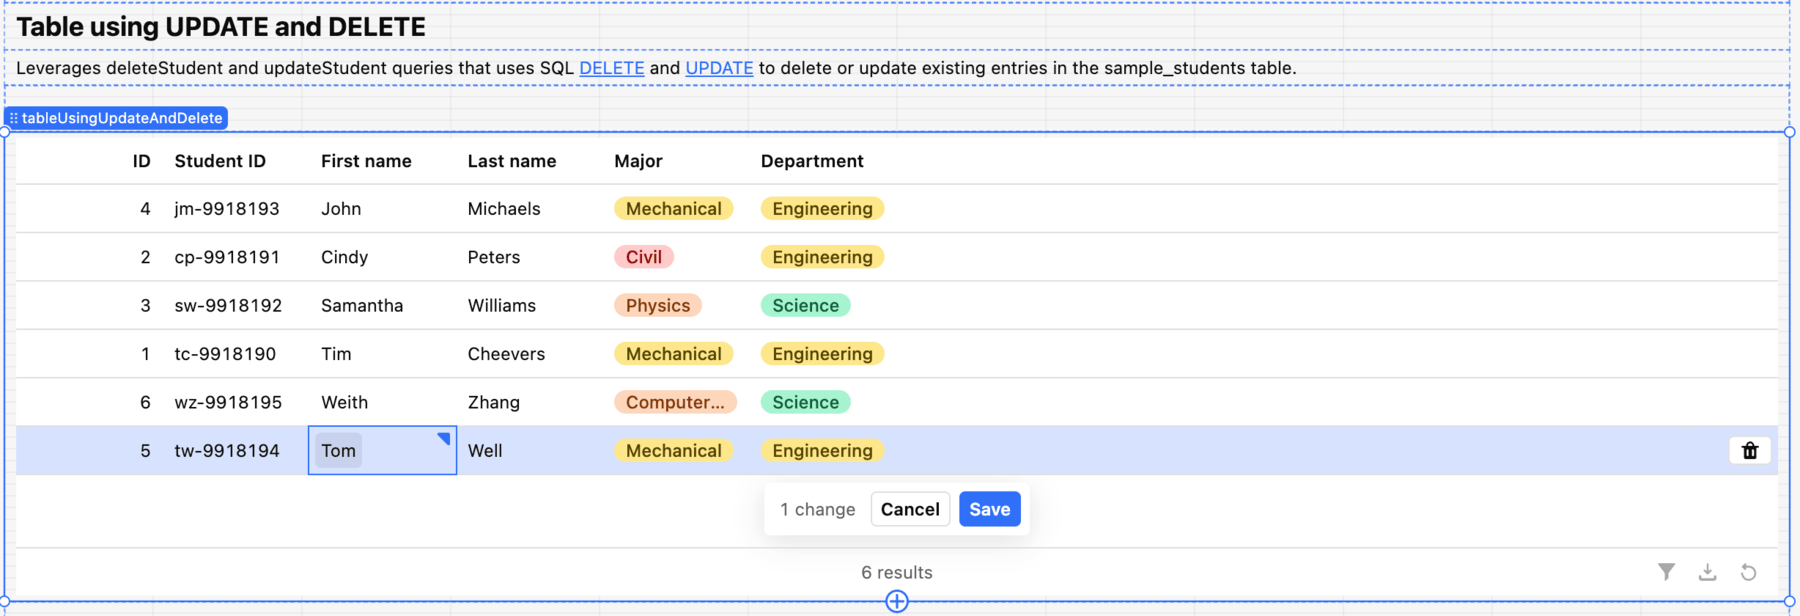
- Now go to the State tab and select tableUsingUpdateAndDelete. Examine the changesetArray and see the first_name is set to the new value, “Tom”. The id specifies which student primary key this relates to, in this case “5”.
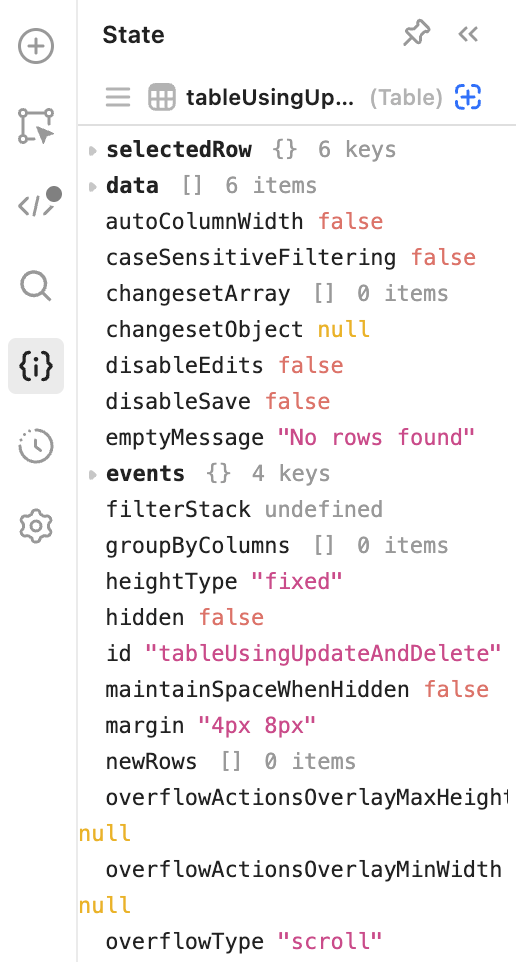
- Go back to the table and select Save to modify the entry in the database. When the entry is saved by selecting Save, the changesetArray appears as follows. No entries exist as we enabled Clear changeset on successful save.
Examine DELETE
In this section we will examine a SQL DELETE statement. Using an editable column and event handlers we can make changes in the table or delete an entry from the table.
- Scroll to the next section, Table using UPDATE and DELETE.
- Select the table and the
tableUsingUpdateAndDeletelabel should appear.
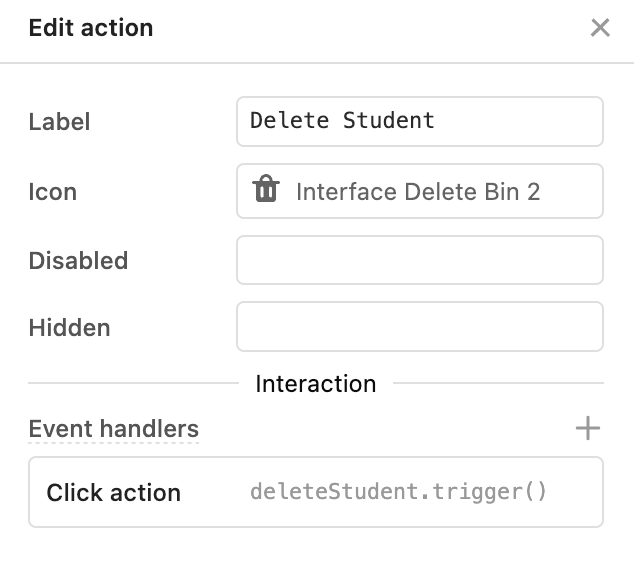
- Next let’s understand how we can delete a student entry. In the Right panel, examine the Row actions > Delete Student. Select the Delete Student Row action.

- This will expose the Label, Icon used and Event handlers, deleteStudent.trigger().
- Let’s examine the deleteStudent query to see how the student is deleted from the table. Select Code > deleteStudent.
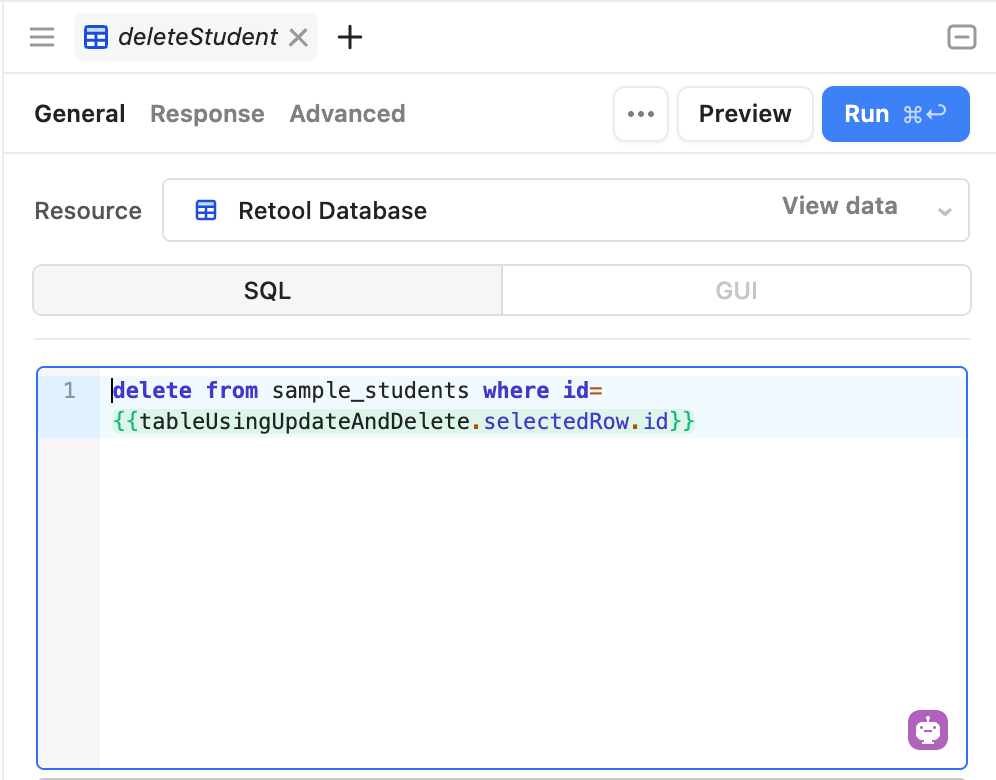
- In order to delete the student, we need to access the student’s id attribute, the primary key. How do we do this? This is done by identifying the selectedRow.id value. When the user selects a row, a trash icon appears on the right.
- Selecting the trash icon will trigger the event handler,
deleteStudent.trigger(). The query deletes the student using theid = {{ tableUsingUpdateAndDelete.selectedRow.id }}. The selectedRow attribute will examine which row the trash can was selected in and get the student identifier. - An advanced setting defined in the deleteStudent query, provides a warning dialog as shown below. Selecting OK will execute the query, deleting the student from the sample_students table.

Examine ORDER BY
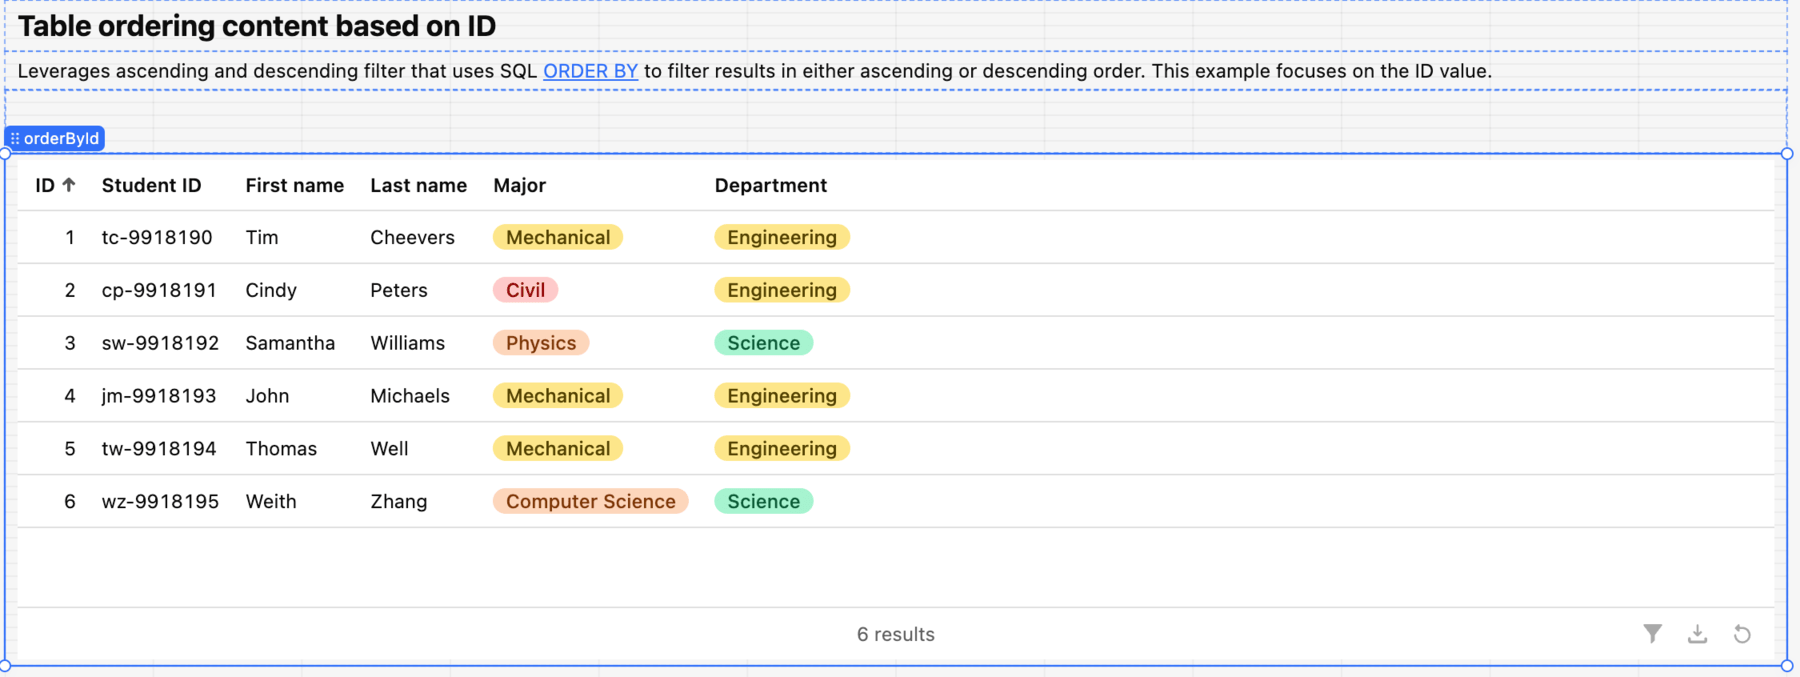
In this section we will examine the use of ORDER BY to filter a column with ascending or descending values.
- Scroll to the next section, Table ordering content based on ID.
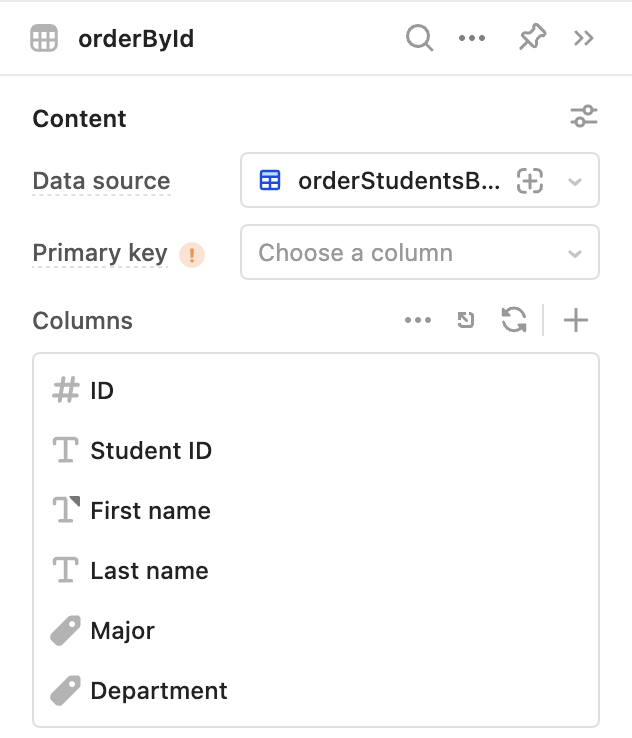
- Select the table and the orderById label should appear.
- Look at the Right Panel and inspect the table. For Content > Data source the app uses the
orderStudentsByIDquery.
- The query, orderStudentsByID, can be examined by selecting the Code > orderStudentsByID query. This will display the SQL JOIN with SQL ORDER BY.
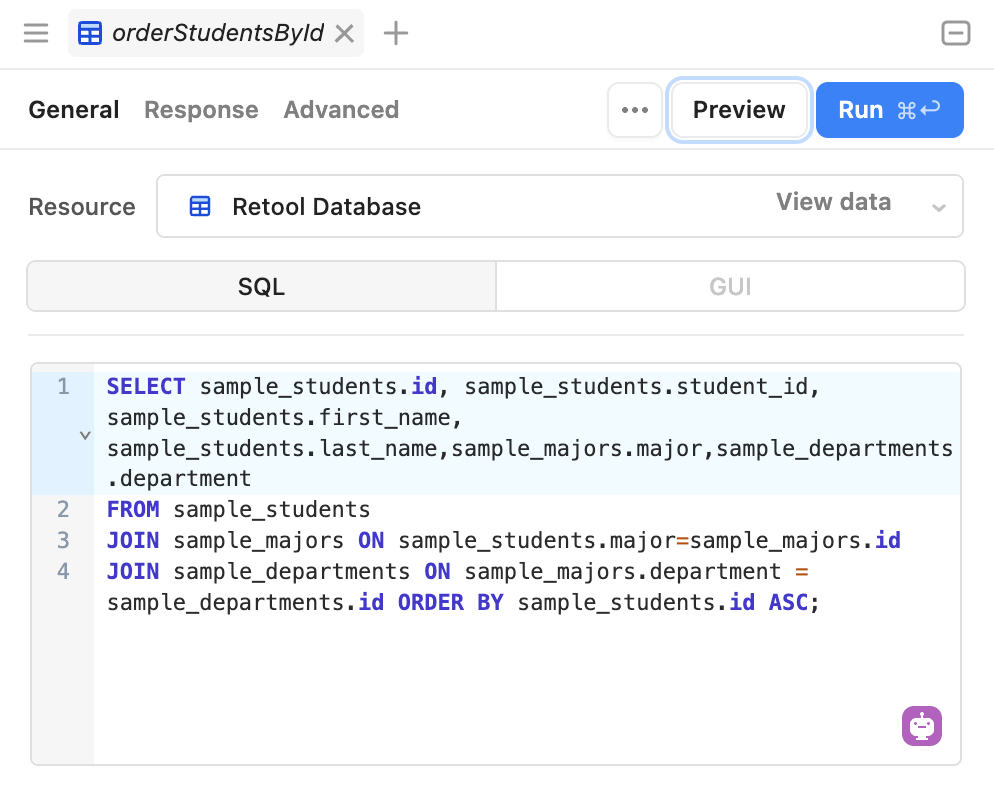
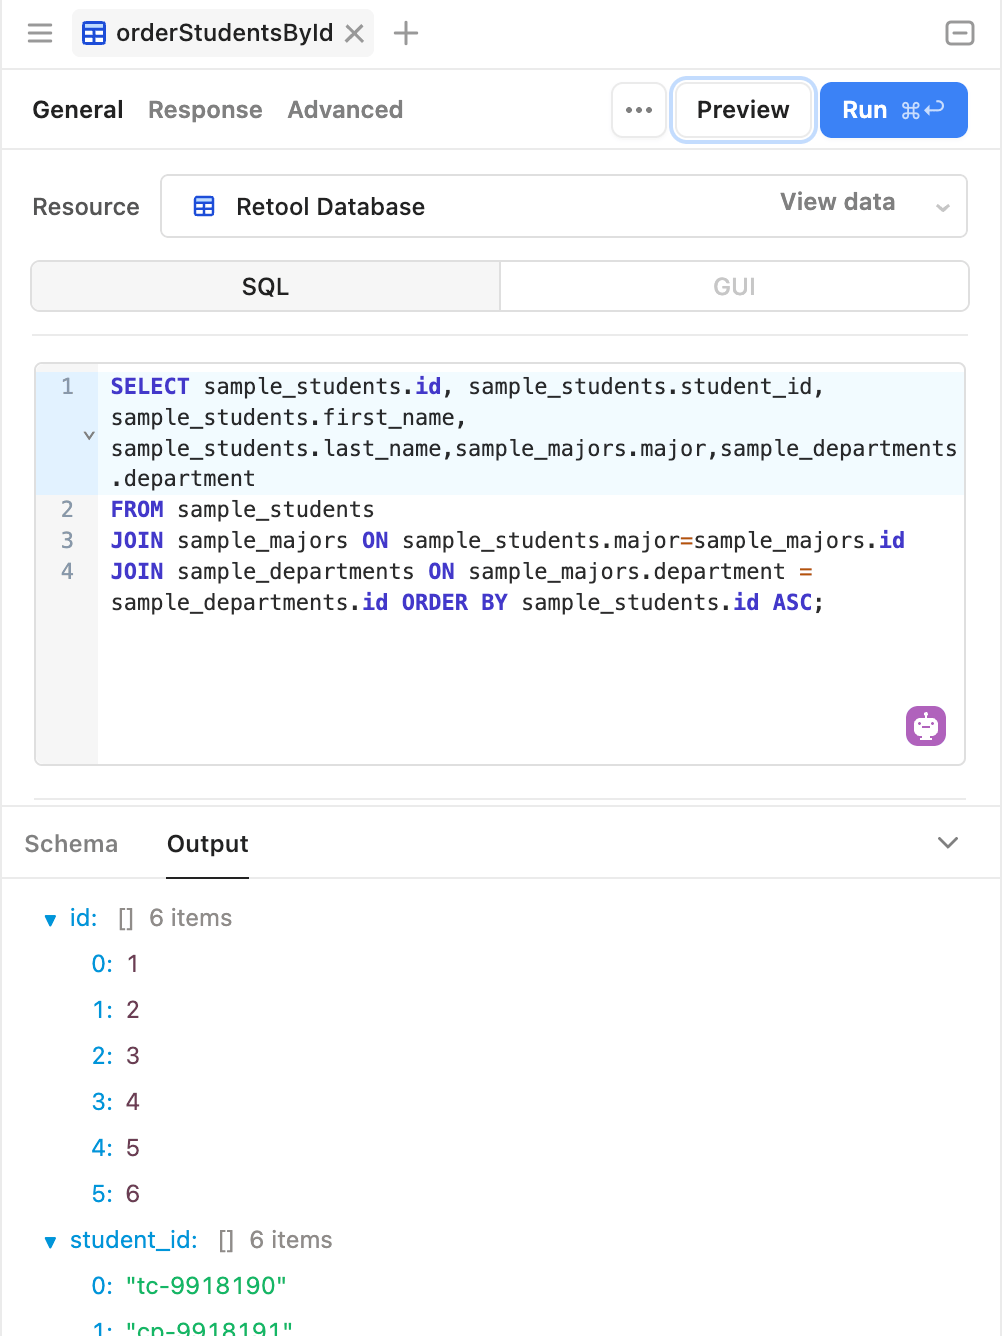
- In this query notice at the end of the query the use of ORDER BY identifying the column
sample_students.id. Ordering will be done by ascending order as defined by ASC. We could have also specified DESC for descending order. Select Preview to see the query execute and return the IDs in ascending order.
Summary
Now that you have a base understanding the SQL App, insert some students, update their first names and delete them. Examine the Retool Database to see them get added, updated and deleted.