Connect to Google Calendar
Connect Google Calendar to Retool to read, create, and manage events using the Calendar API.
Google Calendar is a cloud-based calendaring service for scheduling events and managing availability. Retool connects to Google Calendar through the Calendar API v3 using either OAuth 2.0 or a Google service account.
After you create a Google Calendar resource in Retool, you can:
- Display upcoming events from one or more calendars in tables, lists, or calendar views.
- Create, update, and cancel events from forms and other user inputs.
- Move events between calendars, change attendees, and update recurrence rules.
- Check free/busy availability across users for scheduling apps.
- List the calendars a user can access and inspect calendar metadata.
Before you begin
To connect Google Calendar to Retool, you need the following:
- Cloud
- Self-hosted
- Google account: A Google account or Google Workspace user with access to the calendars you want to query.
- Retool permissions: Edit all permissions for resources in your organization.
- Google account: A Google account or Google Workspace user with access to the calendars you want to query.
- Custom OAuth 2.0 client: A Google OAuth 2.0 client configured for your Retool instance. Self-hosted instances cannot use Retool's hosted OAuth app and must provide their own client ID and secret. Service account authentication does not require an OAuth client.
- Network access: Your Retool instance must be able to reach
accounts.google.com,oauth2.googleapis.com, andwww.googleapis.comover HTTPS. - Retool permissions: Edit all permissions for resources in your organization.
Create a Google Calendar resource
Follow these steps to create a Google Calendar resource in your Retool organization.
1. Create a new resource
In your Retool organization, navigate to Resources in the main navigation and click Create new → Resource. Search for Google Calendar and click the Google Calendar tile to begin configuration.
Use folders to organize your resources by team, environment, or data source type. This helps keep your resource list manageable as your organization grows.
2. Configure general settings
Specify a name and description for the resource that indicates which Google account or workspace it connects to. The description provides more context to users about how to use the resource.
| Example name | Example description |
|---|---|
Google Calendar | Default Google Calendar resource for the operations team. Reads team calendars and creates events from internal apps. |
Google Calendar (read only) | Read-only Google Calendar resource for displaying upcoming events on dashboards. |
When using Retool's hosted OAuth app (Cloud) or a custom OAuth app (self-hosted), you typically only need one resource. Each user authenticates individually and can only access their own calendars. Creating multiple resources is usually unnecessary unless you need to support multiple OAuth applications or mix OAuth with service account authentication.
3. Configure authentication
Configure the connection settings for your Google Calendar resource under the Credentials section of the resource configuration form.
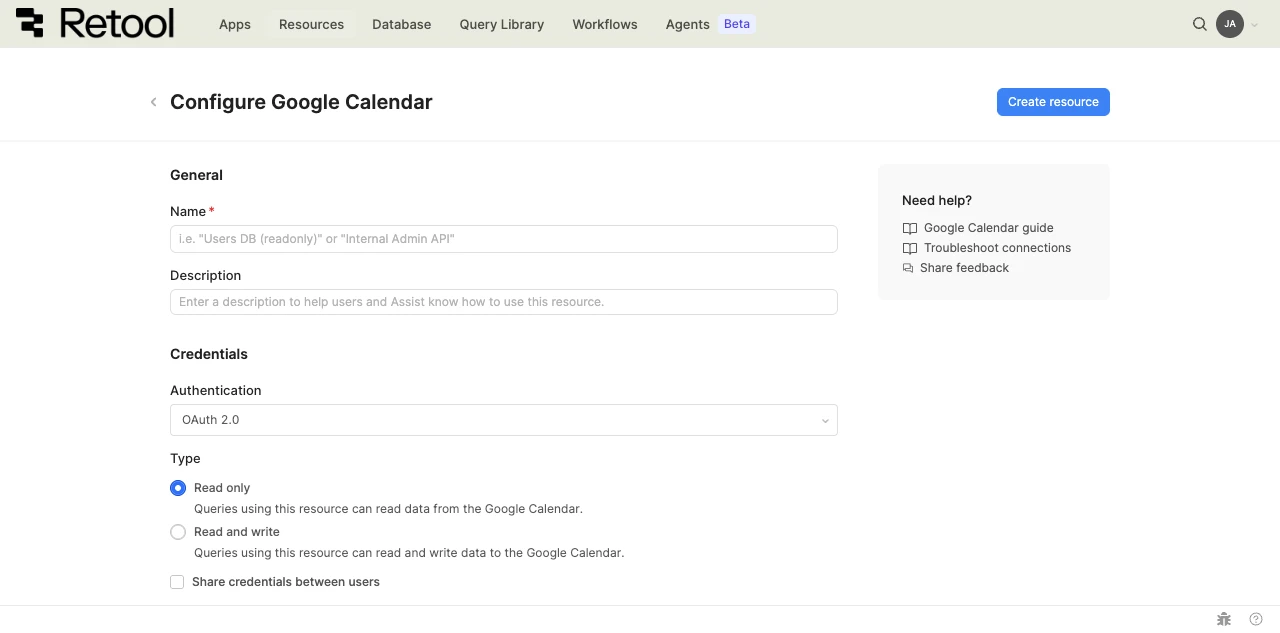
Google Calendar resource configuration form.
Authentication
Google Calendar supports two authentication methods. Choose based on whether queries should run as the signed-in user or as a non-interactive service identity.
| Authentication method | Use cases |
|---|---|
| OAuth 2.0 | Interactive apps where each user authenticates with their own Google account. Each user only sees the calendars they have access to. |
| Google Service Account | Automated workflows, scheduled queries, and shared internal apps that need to act as a non-interactive service identity. Calendars must be explicitly shared with the service account's email address. |
- Cloud
- Self-hosted
option A: OAuth 2.0 with Retool's hosted app (recommended)
Retool provides a hosted OAuth 2.0 client for Cloud organizations, so no external configuration is required.
- Select OAuth 2.0 as the Authentication method.
- Choose the Type:
- Read only—queries can read calendars, events, and free/busy data.
- Read and write—queries can create, update, and delete events and calendars.
- Optionally enable Share credentials between users to allow all users of the resource to share a single set of credentials. By default, each user authenticates individually.
- Click Connect with OAuth and authorize Retool to access your Google Calendar.
- Click Create resource to save.
option B: Google service account
Use a service account when queries should run as a non-interactive service identity rather than as the signed-in user.
- Create a service account in the Google Cloud Console and generate a JSON key.
- In Google Calendar, share the calendars the service account needs to access with the service account's email address. Set the permission level based on the access your apps need.
- In Retool, select Google Service Account as the Authentication method.
- Choose the Type: Read only or Read and write.
- Paste the JSON contents of your service account key into the Service account key field.
- Click Create resource to save.
Refer to Google's service account documentation for setup details and key rotation guidance.
option A: OAuth 2.0 with a custom app (recommended)
Self-hosted instances must provide their own Google OAuth 2.0 client. Retool's hosted OAuth app is only available for Cloud organizations.
- Create an OAuth 2.0 client in the Google Cloud Console and configure the authorized redirect URI for your Retool instance.
- In Retool, select OAuth 2.0 as the Authentication method.
- Enter the Client ID and Client secret from your OAuth 2.0 client.
- Choose the Type:
- Read only—queries can read calendars, events, and free/busy data.
- Read and write—queries can create, update, and delete events and calendars.
- Optionally enable Share credentials between users to allow all users of the resource to share a single set of credentials.
- Click Connect with OAuth and authorize Retool to access your Google Calendar.
- Click Create resource to save.
option B: Google service account
Use a service account when queries should run as a non-interactive service identity rather than as the signed-in user. Service accounts do not require a custom OAuth client.
- Create a service account in the Google Cloud Console and generate a JSON key.
- In Google Calendar, share the calendars the service account needs to access with the service account's email address.
- In Retool, select Google Service Account as the Authentication method.
- Choose the Type: Read only or Read and write.
- Paste the JSON contents of your service account key into the Service account key field.
- Click Create resource to save.
Type
The Type setting controls the OAuth scopes used for Calendar API calls.
| Type | API access |
|---|---|
| Read only | Read calendars, events, and free/busy data. Uses the calendar.readonly scope. Use for apps that display upcoming events or check availability. |
| Read and write | Full read and write access, including create, update, and delete. Uses the calendar scope. Use for apps that schedule, reschedule, or cancel events. |
To change the Type after a resource has been created, update the authentication settings and re-authorize the resource. Users are prompted to re-consent on the next query.
Outbound region
- Cloud
- Self-hosted
By default, requests originate from your organization's outbound region (for example, us-west-2). Enable Override default outbound Retool region to route requests through a different region. This is useful when Calendar API access is restricted by IP. Outbound regions do not change where Retool stores your apps or data. For details, refer to Configure Retool outbound regions.
Self-hosted instances do not have the outbound region field.
4. Save the resource
Click Create resource to save your Google Calendar resource.
Google Calendar resources cannot be tested from the resource configuration screen. Save the resource and verify the connection by running a query—for example, list calendars at https://www.googleapis.com/calendar/v3/users/me/calendarList.
Query Google Calendar data
Once you've created a Google Calendar resource, you can query it in apps, workflows, and agent tools. Google Calendar queries call the Calendar API v3—Retool exposes an Operation dropdown listing the available Calendar endpoints.
Create a query
To create a Google Calendar query in a classic app:
- In the Retool app IDE, open the Code tab, then click + in the page or global scope.
- Select Resource query.
- Choose your Google Calendar resource.
- Select an Operation from the dropdown. Operations are labeled by endpoint path and HTTP method (for example,
/calendars/{calendarId}/events GET). - Configure the required parameters and run the query.
Query configuration fields
The fields below describe the Retool-side configuration—for the full list of available endpoints and parameters, refer to the Calendar API reference.
Operation
Select a Calendar API endpoint from the dropdown. Each entry is labeled by endpoint path and HTTP method.
# List calendars the user can access
/users/me/calendarList GET

# List events on a calendar
/calendars/{calendarId}/events GET

# Create an event
/calendars/{calendarId}/events POST

# Update specific fields on an event
/calendars/{calendarId}/events/{eventId} PATCH

# Delete an event
/calendars/{calendarId}/events/{eventId} DELETE

# Query free/busy data
/freeBusy POST
Path parameters (like calendarId and eventId), URL parameters, and a request body appear once an operation is selected. Use primary as the calendarId to target the authenticated user's primary calendar.
URL parameters
Common URL parameters for event list and event operations:
| Parameter | Description | Example |
|---|---|---|
timeMin | Lower bound (inclusive) for an event's end time, as an RFC 3339 timestamp. | {{ moment().toISOString() }} |
timeMax | Upper bound (exclusive) for an event's start time, as an RFC 3339 timestamp. | {{ moment().add(7, 'days').toISOString() }} |
q | Free-text search across event fields (summary, description, location, attendees). | quarterly review |
singleEvents | Set to true to expand recurring events into individual instances. | true |
orderBy | Sort order for list results: startTime or updated. Requires singleEvents=true. | startTime |
maxResults | Maximum number of events to return per page (max 2500). | 100 |
sendUpdates | For write operations, controls attendee notifications: all, externalOnly, or none. | all |
Request body
For write operations (POST, PATCH, PUT), provide a JSON body matching the Event resource schema. Use embedded expressions to interpolate values from app state.
{
  "summary": {{ titleInput.value }},
  "description": {{ descriptionInput.value }},
  "location": {{ locationInput.value }},
  "start": {
    "dateTime": {{ startPicker.value }},
    "timeZone": "America/Los_Angeles"
  },
  "end": {
    "dateTime": {{ endPicker.value }},
    "timeZone": "America/Los_Angeles"
  },
  "attendees": {{ attendeeInput.value.split(',').map(email => ({ email: email.trim() })) }}
}
Advanced
Use the Advanced section to add request headers or URL parameters not covered by the operation's defaults. The Authorization header is set automatically from the resource's authentication.
Google Calendar query examples
These examples demonstrate the most common Google Calendar operations in Retool apps. For a complete reference of available operations and parameters, refer to the Calendar API documentation.
list upcoming events
Create a query named listEventsQuery to list events on a calendar within a time window.
Configure the query:
| Field | Value |
|---|---|
| Operation | /calendars/{calendarId}/events GET |
| calendarId (path) | primary |
| URL parameters | timeMin={{ moment().toISOString() }}timeMax={{ moment().add(14, 'days').toISOString() }}singleEvents=trueorderBy=startTimemaxResults=100 |
Add a Table component and set its Data property to {{ listEventsQuery.data.items }}.
Format the table columns:
- Start: Map to
currentRow.start.dateTime(orcurrentRow.start.datefor all-day events) with a date/time formatter. - Summary: Display the event title with a link formatter pointing to
currentRow.htmlLink. - Attendees: Map to
currentRow.attendees.map(a => a.email).join(', ')for a comma-separated list.
create an event from a form
Add a Form component with inputs for the event title, description, start, end, and attendees.
Create a query named createEventQuery to insert a new event.
Configure the query:
| Field | Value |
|---|---|
| Operation | /calendars/{calendarId}/events POST |
| calendarId (path) | primary |
| URL parameters | sendUpdates=all |
Set the Request body to:
{
  "summary": {{ form1.data.title }},
  "description": {{ form1.data.description }},
  "location": {{ form1.data.location }},
  "start": {
    "dateTime": {{ form1.data.start }},
    "timeZone": {{ moment.tz.guess() }}
  },
  "end": {
    "dateTime": {{ form1.data.end }},
    "timeZone": {{ moment.tz.guess() }}
  },
  "attendees": {{ form1.data.attendees.split(',').map(email => ({ email: email.trim() })) }}
}
Add an event handler to the form's Submit event that runs createEventQuery and shows a success notification with the new event link from {{ createEventQuery.data.htmlLink }}.
reschedule an event
Create a query named updateEventQuery to change an event's start and end times.
Configure the query:
| Field | Value |
|---|---|
| Operation | /calendars/{calendarId}/events/{eventId} PATCH |
| calendarId (path) | {{ table1.selectedRow.data.organizer.email }} |
| eventId (path) | {{ table1.selectedRow.data.id }} |
| URL parameters | sendUpdates=all |
Set the Request body to:
{
  "start": {
    "dateTime": {{ newStartPicker.value }},
    "timeZone": {{ moment.tz.guess() }}
  },
  "end": {
    "dateTime": {{ newEndPicker.value }},
    "timeZone": {{ moment.tz.guess() }}
  }
}
The PATCH method modifies only the fields you provide, leaving the rest of the event unchanged. Use PUT against /calendars/{calendarId}/events/{eventId} to replace the entire event resource.
cancel an event
Create a query named cancelEventQuery to delete an event from the calendar.
Configure the query:
| Field | Value |
|---|---|
| Operation | /calendars/{calendarId}/events/{eventId} DELETE |
| calendarId (path) | {{ table1.selectedRow.data.organizer.email }} |
| eventId (path) | {{ table1.selectedRow.data.id }} |
| URL parameters | sendUpdates=all |
Add a Button with a Click event handler that opens a confirmation modal and, on confirm, runs cancelEventQuery and reruns listEventsQuery to refresh the table.
check availability across users
Use the POST /freeBusy operation to check when a set of users are available for a meeting.
Create a query named freebusyQuery:
| Field | Value |
|---|---|
| Operation | /freeBusy POST |
Set the Request body to:
{
  "timeMin": {{ rangeStartPicker.value }},
  "timeMax": {{ rangeEndPicker.value }},
  "items": {{ attendeeInput.value.split(',').map(email => ({ id: email.trim() })) }}
}
The response includes a calendars object keyed by email address, with a busy array of {start, end} time ranges. Walk the response to identify gaps and surface them as suggested meeting times.
list available calendars
Create a query named listCalendarsQuery to populate a calendar picker with the calendars the user can access.
Configure the query:
| Field | Value |
|---|---|
| Operation | /users/me/calendarList GET |
Bind a Select component's options to {{ listCalendarsQuery.data.items }}, with the Label key set to summary and the Value key set to id. Use the selected calendar ID in downstream event queries.
Best practices
Follow these best practices to optimize performance, maintain security, and ensure data integrity when working with REST APIs.
Performance
- Cache responses: For data that doesn't change frequently, enable query caching to reduce API calls and improve response times.
- Use pagination: Implement pagination for endpoints that return large datasets to reduce payload size and improve performance.
- Batch requests: When available, use batch API endpoints to combine multiple operations into a single request.
- Minimize payload size: Request only the fields you need using query parameters or API-specific field selection features.
- Set appropriate timeouts: Configure query timeouts based on expected API response times to prevent hung requests.
Security
- Use configuration variables: Store API keys and tokens in configuration variables or secrets rather than hardcoding them.
- Use HTTPS only: Always connect to APIs over HTTPS to encrypt data in transit and protect authentication credentials.
- Rotate credentials regularly: Follow your API provider's recommendations for credential rotation and key management.
- Validate SSL certificates: Keep SSL certificate verification enabled unless absolutely necessary for development environments.
- Use resource environments: Configure multiple resource environments to maintain separate API configurations for production, staging, and development.
- Apply least privilege: Use API keys with minimal required permissions. Create separate keys for different environments.
Data integrity
- Validate user input: Sanitize and validate all user input before including it in API requests to prevent injection attacks.
- Handle errors gracefully: Configure error notifications and fallback behavior for failed API calls to improve user experience.
- Use idempotency keys: For APIs that support idempotency keys, include them in POST/PATCH requests to prevent duplicate operations.
- Verify responses: Check response status codes and validate response data structure before using it in your app.
- Implement retry logic: For transient failures, use Retool's automatic retry settings or implement custom retry logic with exponential backoff.
Google Calendar-specific considerations
- Choose the narrowest scope: Use the Read only type unless your app needs to create or edit events. Switching from a broader scope to a narrower one later forces every user to re-consent.
- Use
primaryfor the signed-in user's calendar: For apps that operate on the current user's main calendar, useprimaryas the calendar ID instead of looking up the ID first. - Expand recurring events with
singleEvents=true: Without this parameter, recurring event series return a single record. SetsingleEvents=trueto receive one record per occurrence within the requested time range. - Respect
sendUpdatesfor attendees: When creating, updating, or deleting events with attendees, set thesendUpdatesURL parameter. Useallto email all attendees (matching what they'd see if the change were made in the Calendar UI),externalOnlyto skip Workspace users, ornoneto suppress notifications entirely. - Time zones live on the event, not the request: Always include a
timeZoneinstartandendobjects fordateTimevalues. Omitting it can cause events to land in unexpected zones—especially across daylight saving transitions. - Share calendars with the service account: For service account auth, Retool can only access calendars that have been explicitly shared with the service account's email address.
Related resources
Google OAuth credentials
Set up a custom Google OAuth 2.0 client for self-hosted Retool.
Connect to Google Drive
Manage files alongside calendar events.
Connect to Google Sheets
Sync event data with spreadsheets for reporting.
Create a resource
Learn how to create and manage resources in Retool.
Google Calendar API reference
Full reference for the Calendar API v3 endpoints and parameters.
Retool community: Google Calendar
Community discussions and solutions for Google Calendar integrations.