Retool App Builder
Build a React revenue tracking app using Retool's App Builder
Retool App Builder helps builders create production-ready React applications. Retool leverages the Retool Platform — including Resources, Source Control, and SSO — to take a natural language prompt and turn it into a fully functional, deployable React application. The following lab walks through the Retool interface and builds a revenue tracking app from a CSV export.
Retool AppGen walkthrough
In this lab, you will step into the role of a RevOps builder tasked by your COO to build a revenue tracking prototype for a recently acquired company. The IT team at the acquired company is familiar with React and has provided a CSV export from their ERP system as a starting point. You will use Retool to generate the app, explore its interface, and demonstrate write-back capability.
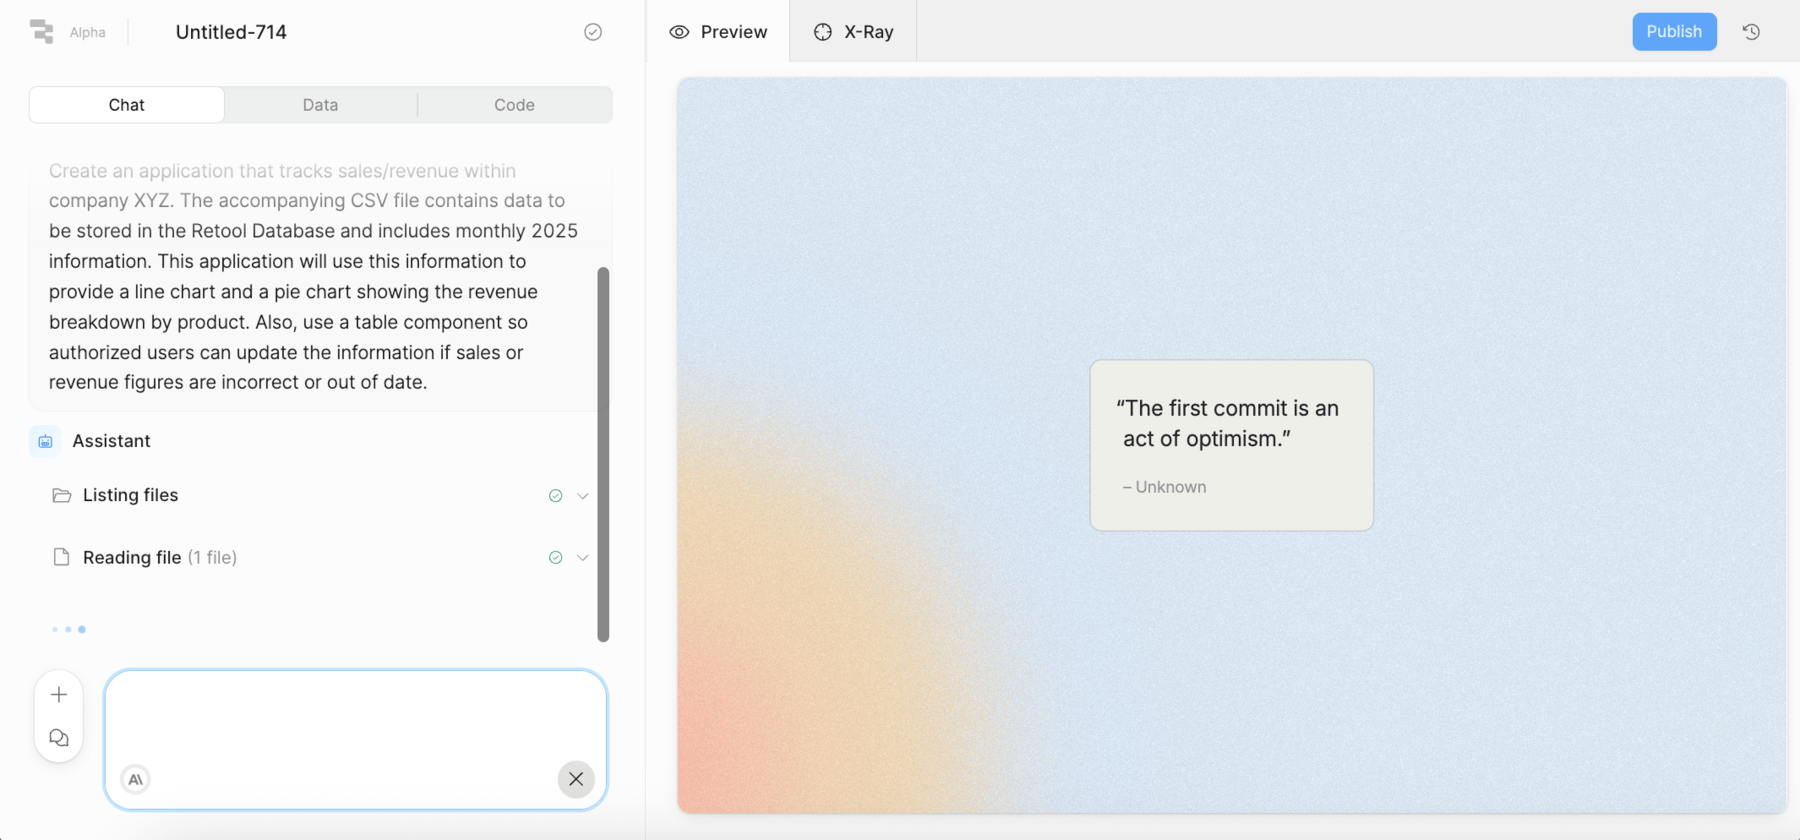
The following image shows the Retool interface with the Chat panel (magenta) and Preview panel (blue) side by side.

Simple example
The following video shows the completed revenue tracking app that you will build in this lab.
Data overview
Before creating the app, examine the sample data that Retool will reference via Retool Database.
CSV schema
The CSV export from the acquired company's ERP system contains monthly 2025 revenue data. The schema is as follows.
| Column name | Description | Value Type |
|---|---|---|
| product_id | Unique product identifier | Text (e.g., PRD-001) |
| product_name | Display name of the product | Text |
| category | Product hardware category | Text |
| month | Month number (1–12) | Number |
| month_name | Full month name | Text |
| revenue_usd | Monthly revenue in US dollars | Number |
The dataset includes 8 products across 8 hardware categories (Processors, Graphics Cards, Memory, Storage, Motherboards, Networking, Cooling Systems, Power Supplies) with one revenue record per product per month, 96 rows total.
Download the ERP revenue CSV to be used in the following section.
Create a Retool app
- Select Home (Retool icon) to return to the home page.
- Select Apps > Create > Retool.
This opens the Retool interface, which consists of two panels: the Chat panel on the left and the Preview panel on the right.
Prompt the app using the CSV
Focus Area: Chat panel / Prompt area
With the Retool interface open, we will now use the CSV file and a natural language prompt to generate the revenue tracking app.
- Select the file upload icon in the Chat panel and attach the
erp_product_revenue_2025.csvfile. - Enter the following prompt in the Ask me to build something… input area:
Create an application that tracks sales/revenue within company XYZ. The accompanying
CSV file contains data to be stored in the Retool Database and includes monthly 2025
information. This application will use this information to provide a line chart and
a pie chart showing the revenue breakdown by product. Also, use a table component so
authorized users can update the information if sales or revenue figures are incorrect
or out of date.
- Select the blue Send button to start the AppGen process.
Retool will begin building the app. You will see tool feedback messages in the Chat panel as Retool works — actions like Creating tables, Listing files, Reading files, and Wrote will appear. You can expand each action to inspect the details, including any SQL calls made against the Retool Database.
Explore the Retool interface
Focus Area: Chat panel
While Retool is generating the app, take a moment to explore the Chat panel features. The following image identifies different capabilities.
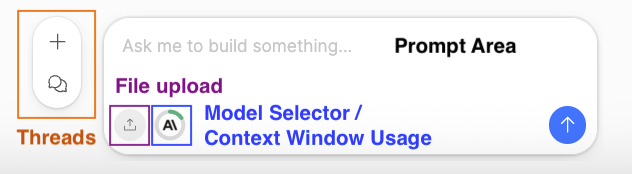
Prompt area
The Ask me to build something… input is where you enter prompts to create, edit, debug, or ask questions about your React application. You can use it at any point — before, during, or after app generation.
File upload (Magenta)
The file upload icon allows you to attach images or files (such as a CSV) to provide additional context to Retool when building or editing an app.
Model selector / context size (Blue)
The model selector allows a builder to select which provider model to employ. A context size indicator also shows how much token capacity remains in the current thread. Model providers have limits ranging from 200K to 1M tokens; the indicator helps you monitor usage.
Threads and history (Orange)
Each Retool session is captured in a thread. Threads maintain the full conversation history — prompts, edits, and model responses — that define how the app was built. The thread controls at the top of the Chat panel allow you to:
- + — Start a new thread (and a new app generation context)
- Model selector — Choose your model provider and model
- Thread history — Review and switch between prior threads
Focus Area: Preview panel
The following image shows the preview panel options that are used during development.

Publish apps (Red)
Publish apps so Retool users can access and use the application.
Copy App Link (Brown)
The Copy App link makes it easy to get the published app URL.
Version history (Green)
Access the version history dialog for app changes, what is actively published and releases.
Selection mode (Magenta)
Allows users to select individual components and then prompt focused changes to them.
Theme selector (Blue)
Allows users to specify default styling (e.g. light/dark mode).
Review the generated app
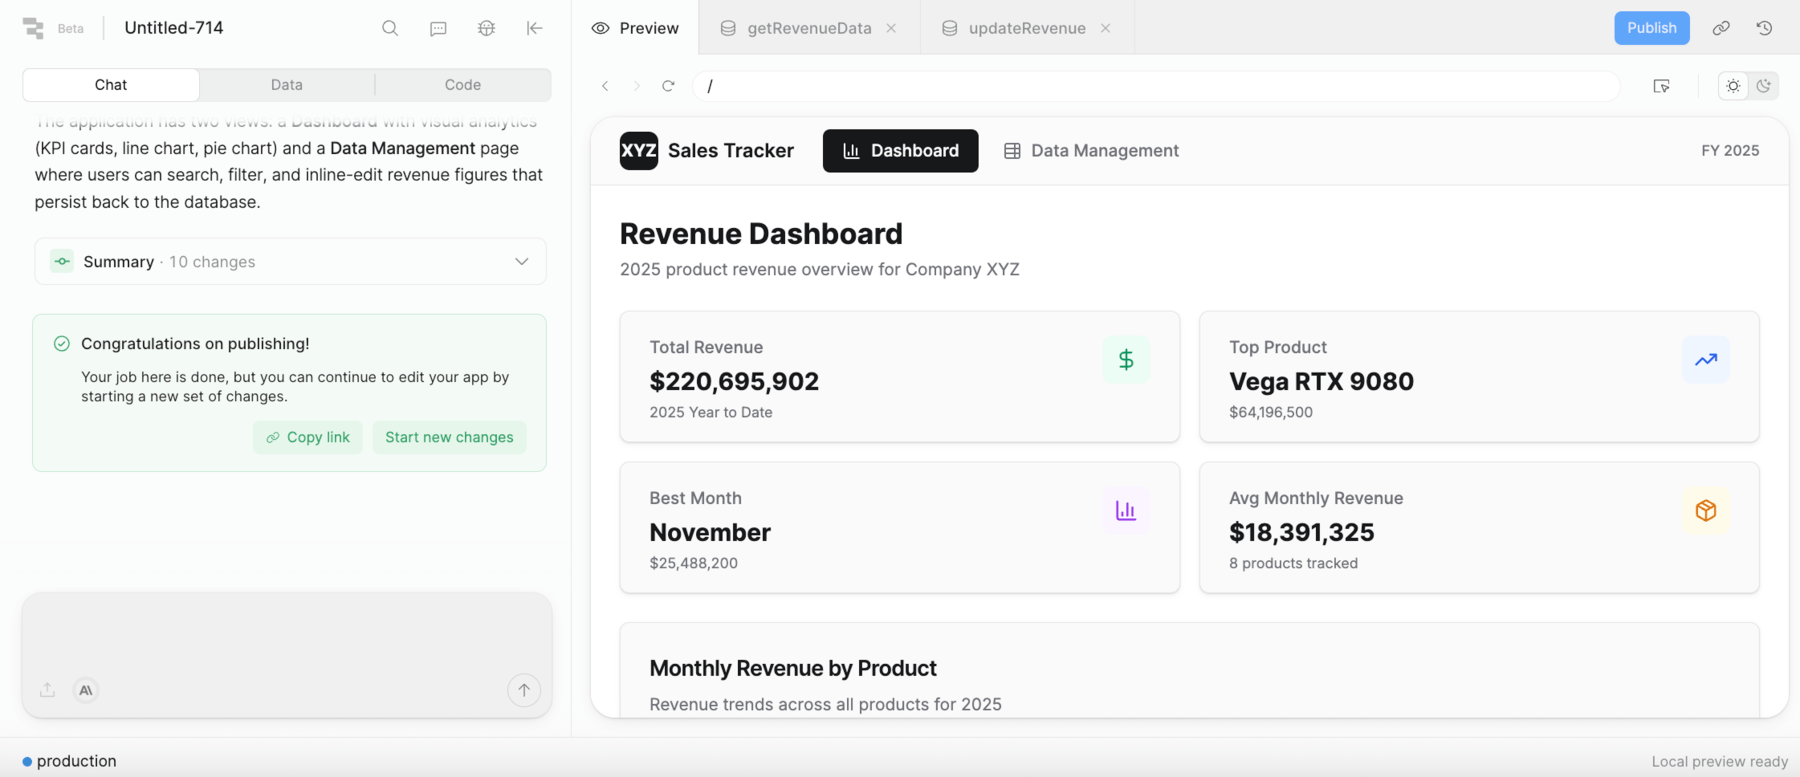
Focus Area: Preview panel
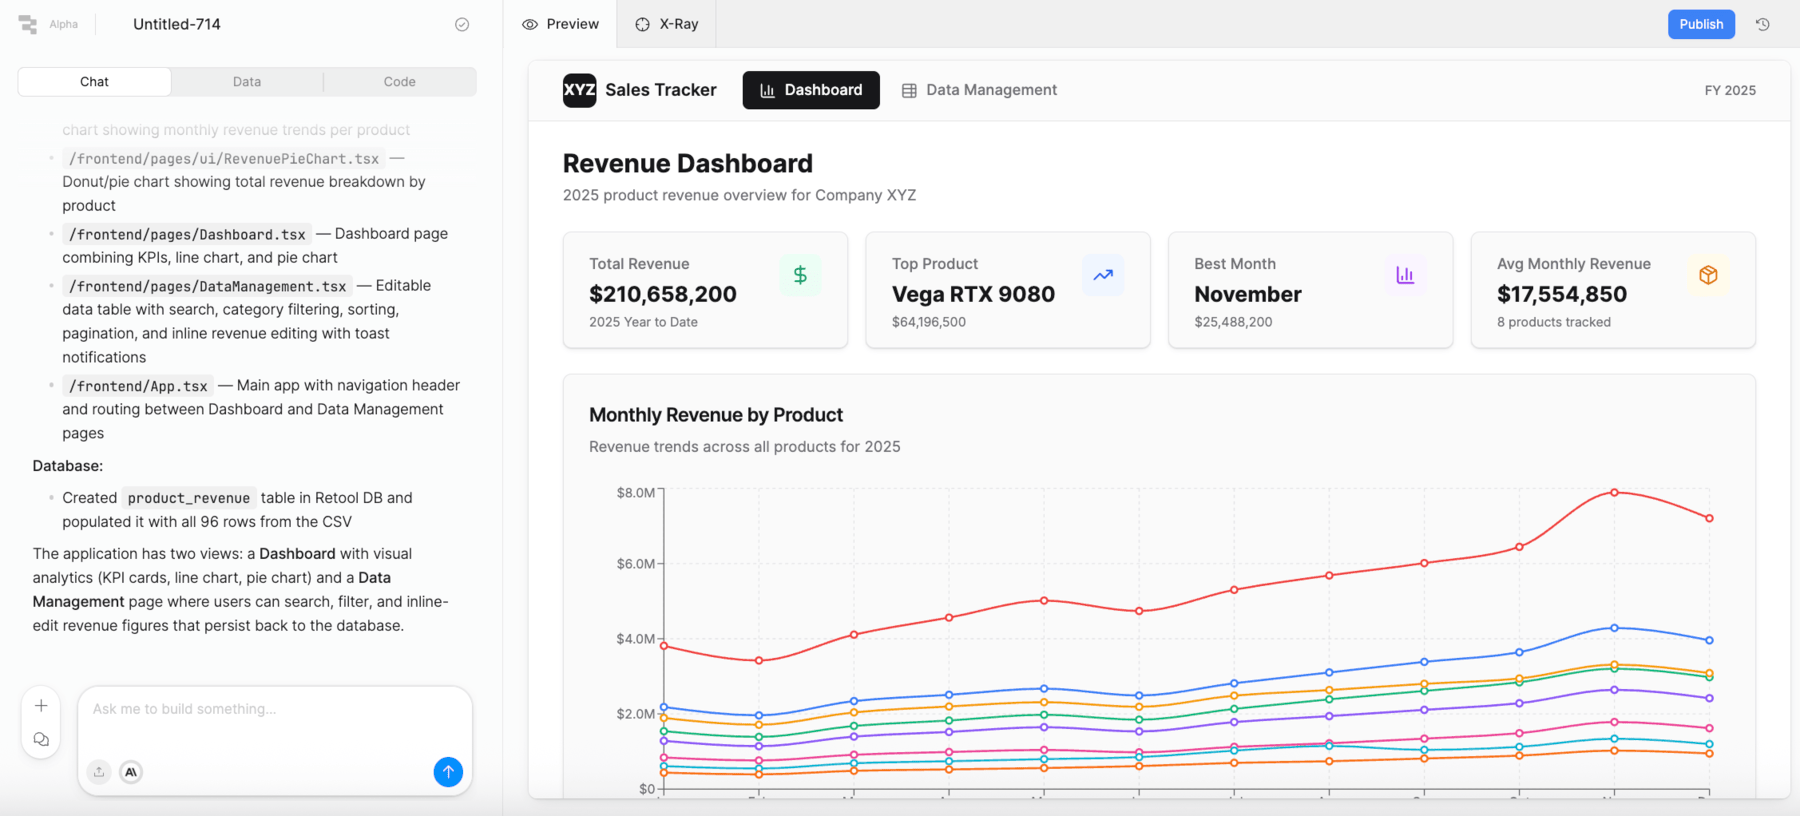
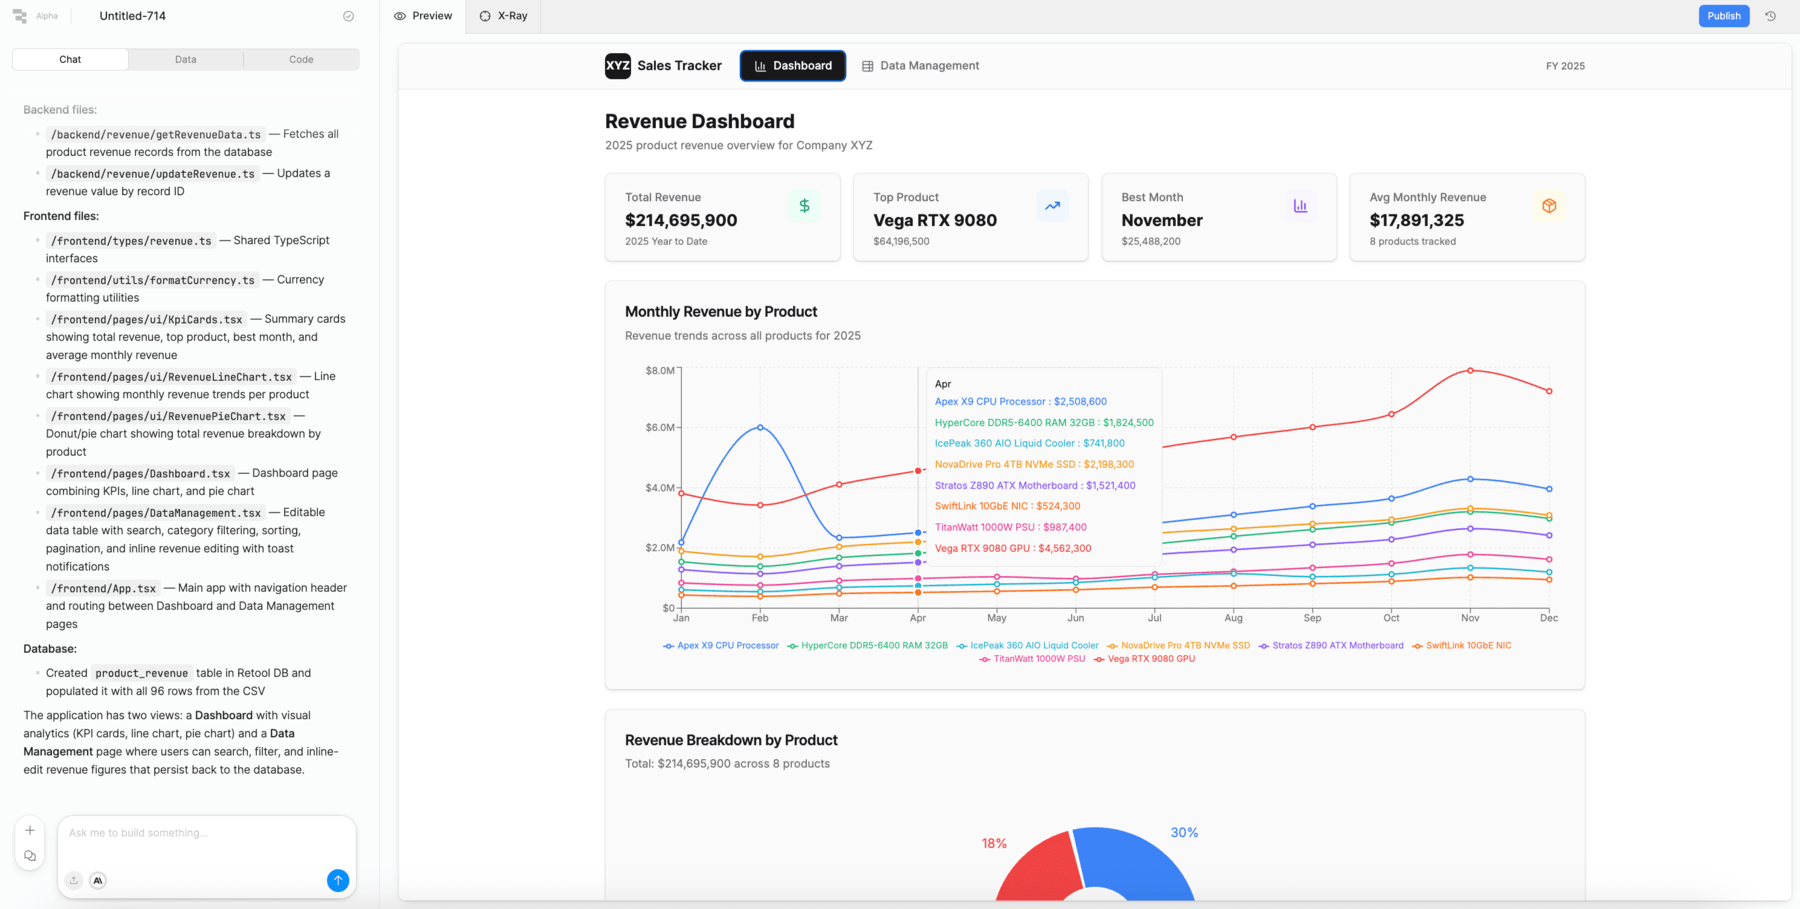
Once Retool finishes generating the app, the Preview panel on the right displays the live, interactive application. This is where you can test and validate functionality before deploying.
The generated app can vary but will either provide a single page or a tabbed container allowing you to see charts and table data separately. The following provides a generic explanation for the app:
Revenue Trends
The Revenue Trends tab displays a line chart showing monthly revenue across all products for 2025. Each product is represented as a separate line, making it easy to compare performance across the year.
Revenue Breakdown
The Revenue Breakdown tab displays a pie chart showing each product's contribution to total 2025 revenue. This provides a quick visual summary of which products drive the most revenue.

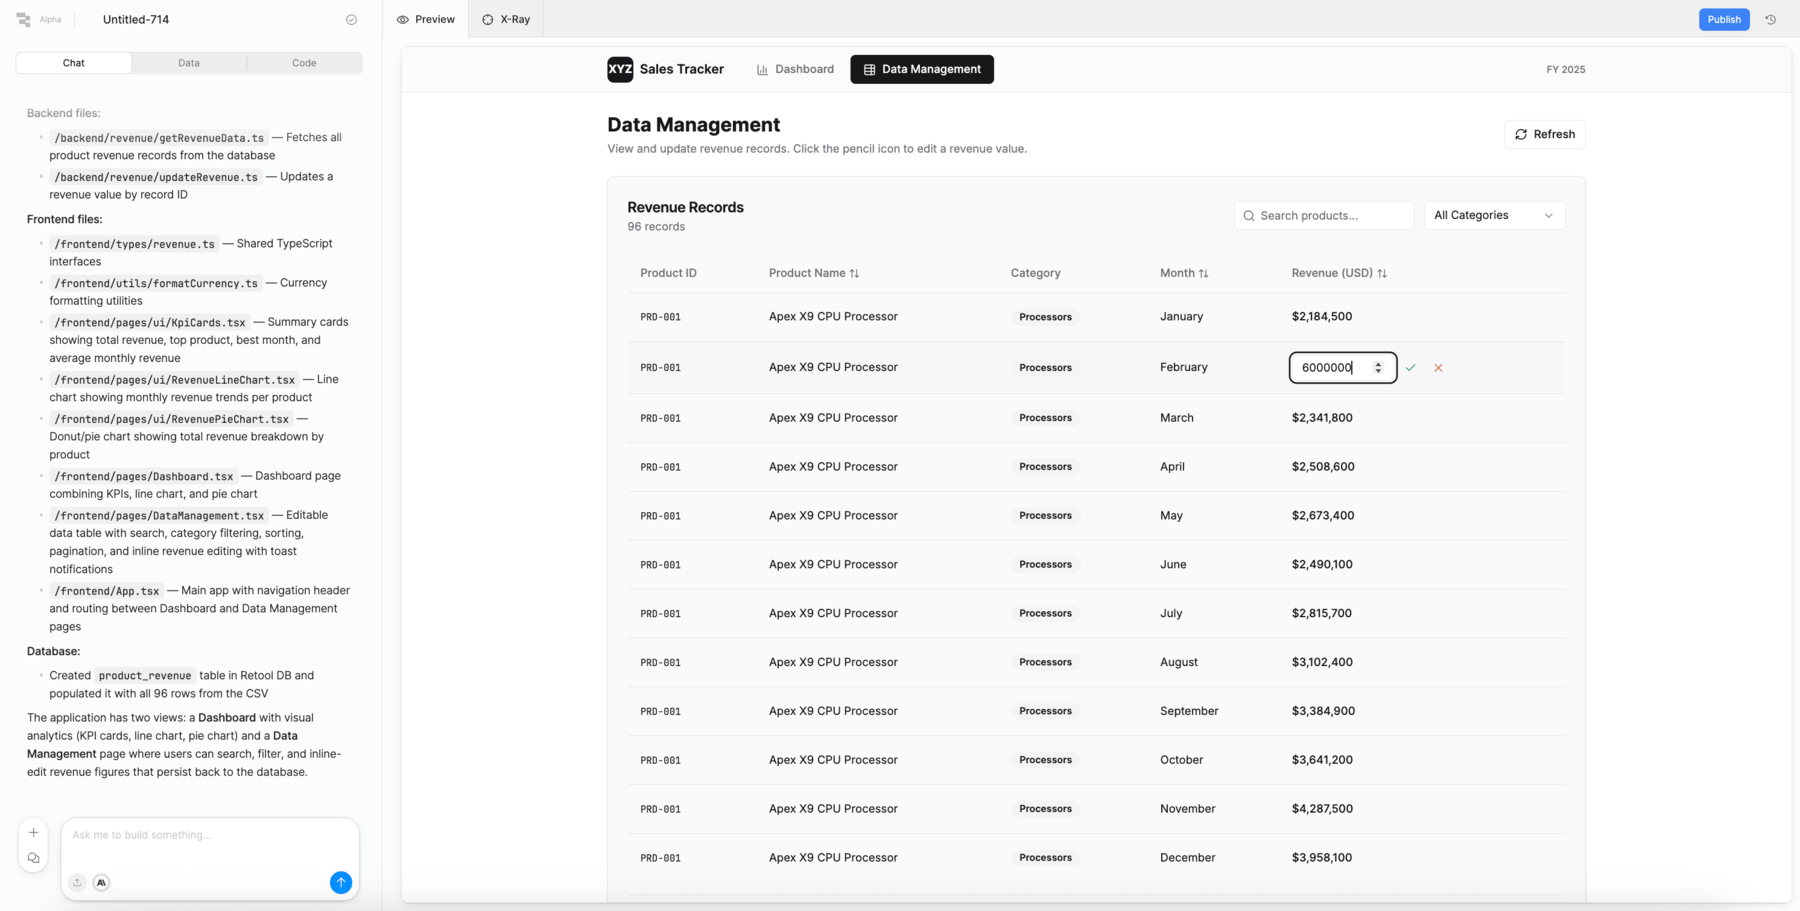
Data Table
The Data Table tab displays the underlying revenue data in an editable table, allowing authorized users to correct records if figures are inaccurate or out of date.
To demonstrate write-back capability:
- Locate the TitanWatt 1000W PSU row for February.
- Change the
revenue_usdvalue from1962300to6000000. - Select Run Function on the far left to commit the update to the Retool Database.
- Switch back to the Data Management tab and observe the updated February value for TitanWatt reflected in the line chart.
- Switch back to Dashboard to view the value change.
Review the generated source code
Focus Area: Chat panel / Code tab
- Select the Code button in the upper-left corner of the Chat panel.
The view switches from the live app preview to the underlying React codebase Retool generated. The code is organized into logical groups — components, data actions, styles, and more — giving developers full visibility and control over what was generated.
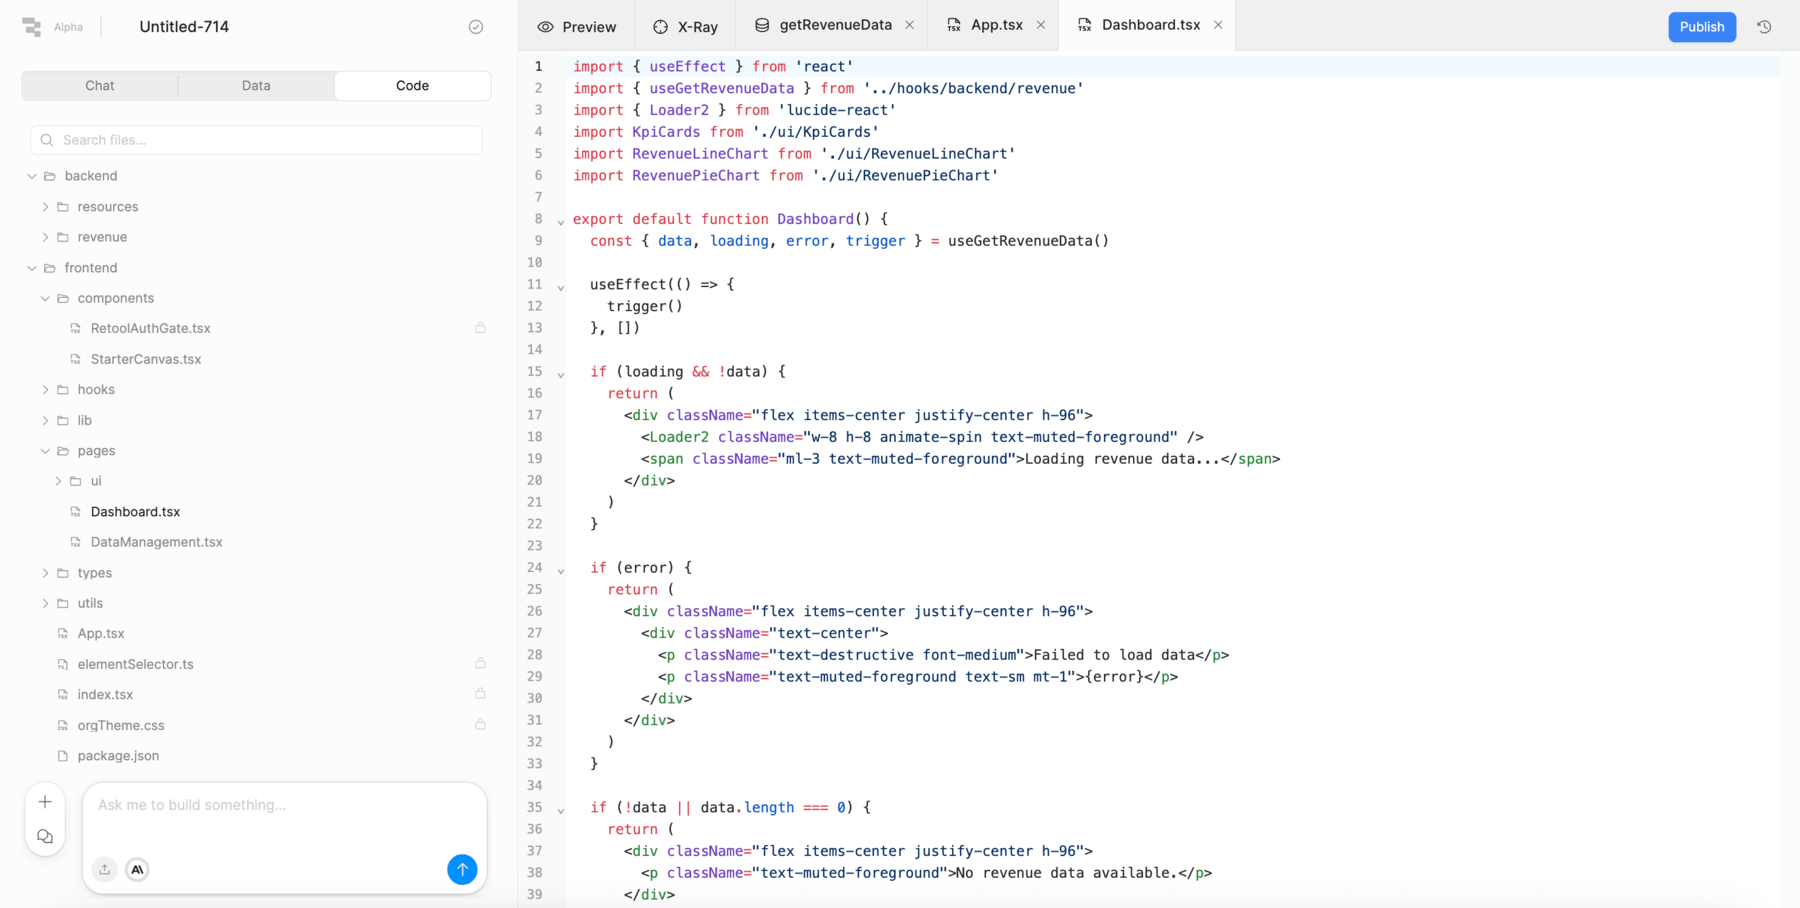
The generated code is fully editable. Developers can extend, refactor, or version-control it using Retool's Source Control integration.
Review the Data tab
Focus Area: Chat panel / Data tab
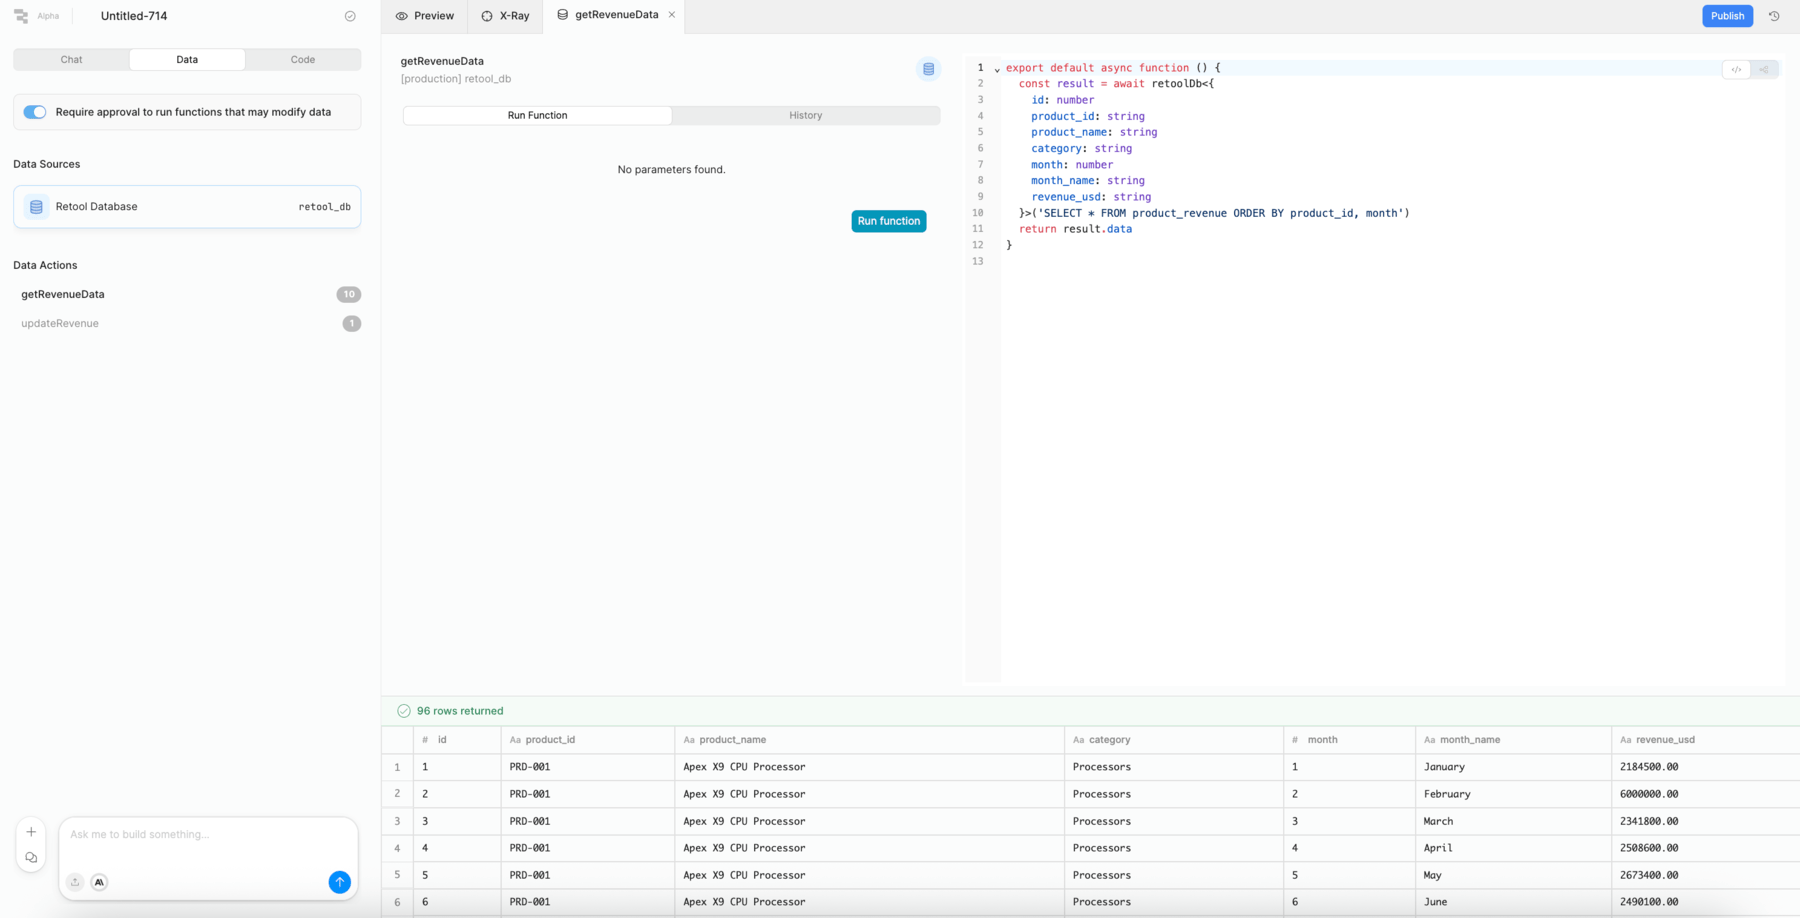
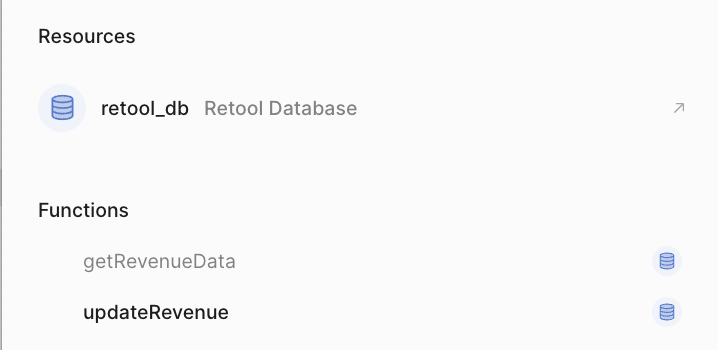
The Data tab in the Chat panel provides a structured view of the resources and functions that connect the React app to its data backend.
Data sources
Resources are the backend data services the app connects to. In this lab, the app is connected to the Retool Database (a hosted PostgreSQL instance). In a production deployment, the resource would point to the acquired company's ERP system.
Data actions
Data actions are the serverless functions Retool generated to query and write to the data source. Selecting a data action reveals its details — for example, the getRevenueData action issues a SELECT statement against the erp_product_revenue_2025 table and returns the results to the app as a named data binding.
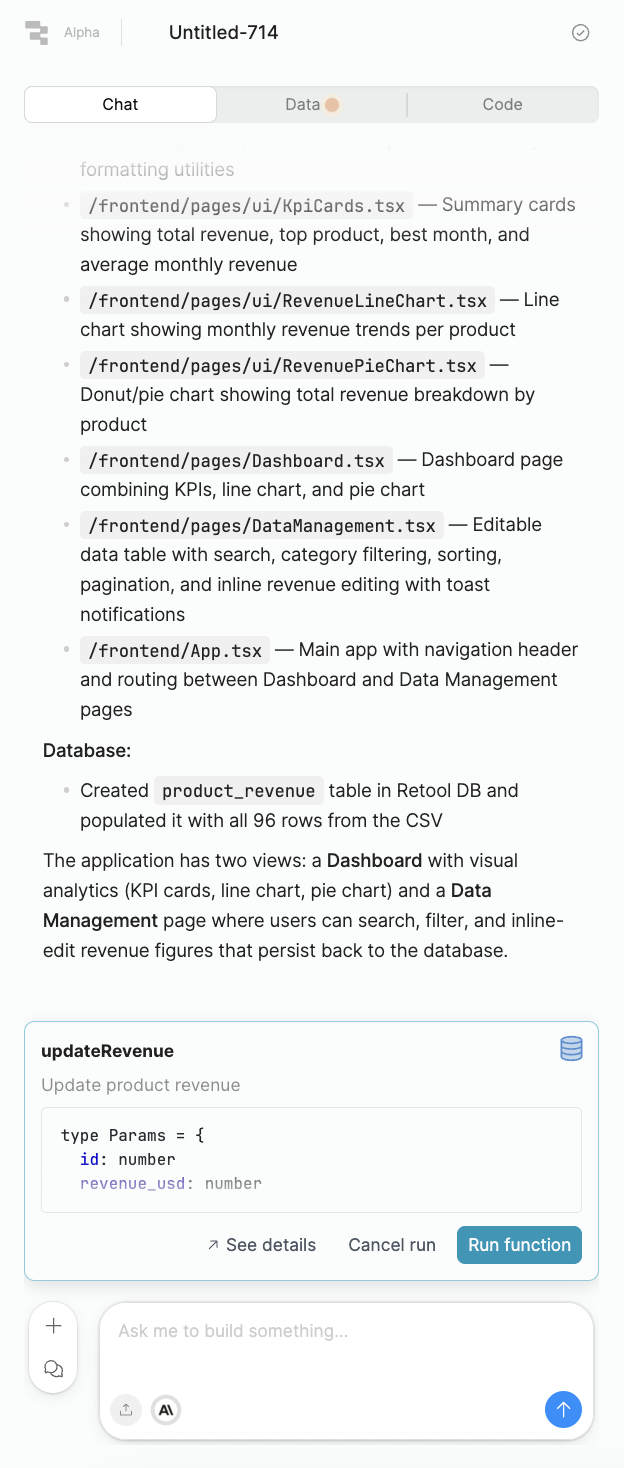
Run function
In the application, the values on the table can be modified as shown in the following image.

Once the value is changed the first time, the run function dialog appears. Selecting Run Function within a data action executes the query immediately and displays the result set for inspection. This is useful for verifying that a data action is returning the expected data before testing the full app.
History
The History tab within a data action shows prior executions of that function, including timestamps and results. This is helpful for debugging unexpected values or confirming that a write-back completed successfully.
Publish
Up until now, the application that is being developed is viewable by the builder only. If you want to make the application accessible to other Retool users, you need to publish it.
The following instructions focus on publishing non-protected apps. Additional requirements are needed to setup a Git provider and enabling protection on the app documented here.
- Select Publish
Approve Data Functions
The first check in publishing is to confirm all functions are approved. The following demonstrates when that hasn't happened.
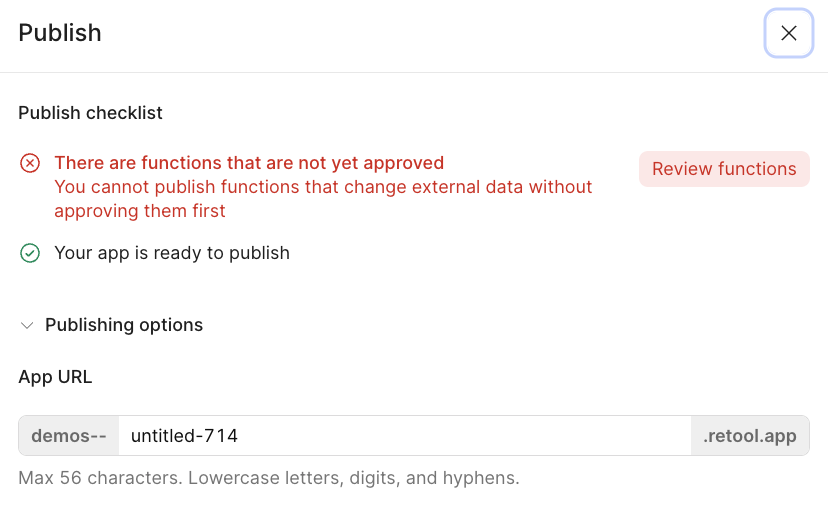
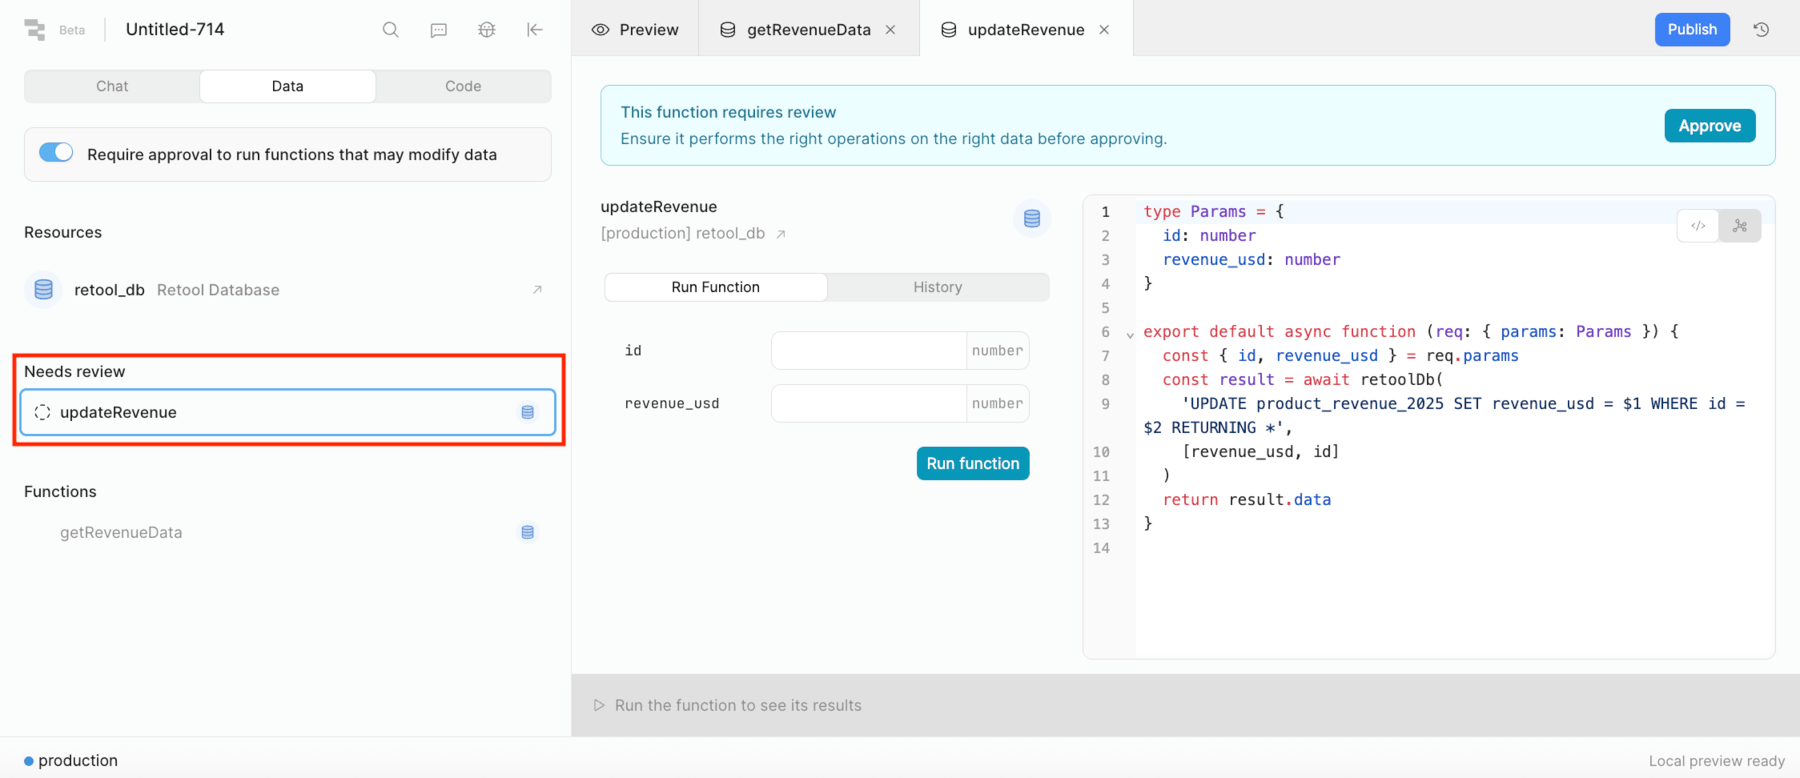
- With this error, you will need to review functions that alter the state of the data service, so Create, Update, Delete actions. Select the Data tab to view the functions.
- Functions that need a review are placed in the Needs review section.
- Test the function and confirm it updates a row in the database by entering an id and revenue_usd. For example set the
id = 1and therevenue_usd = 4000000.
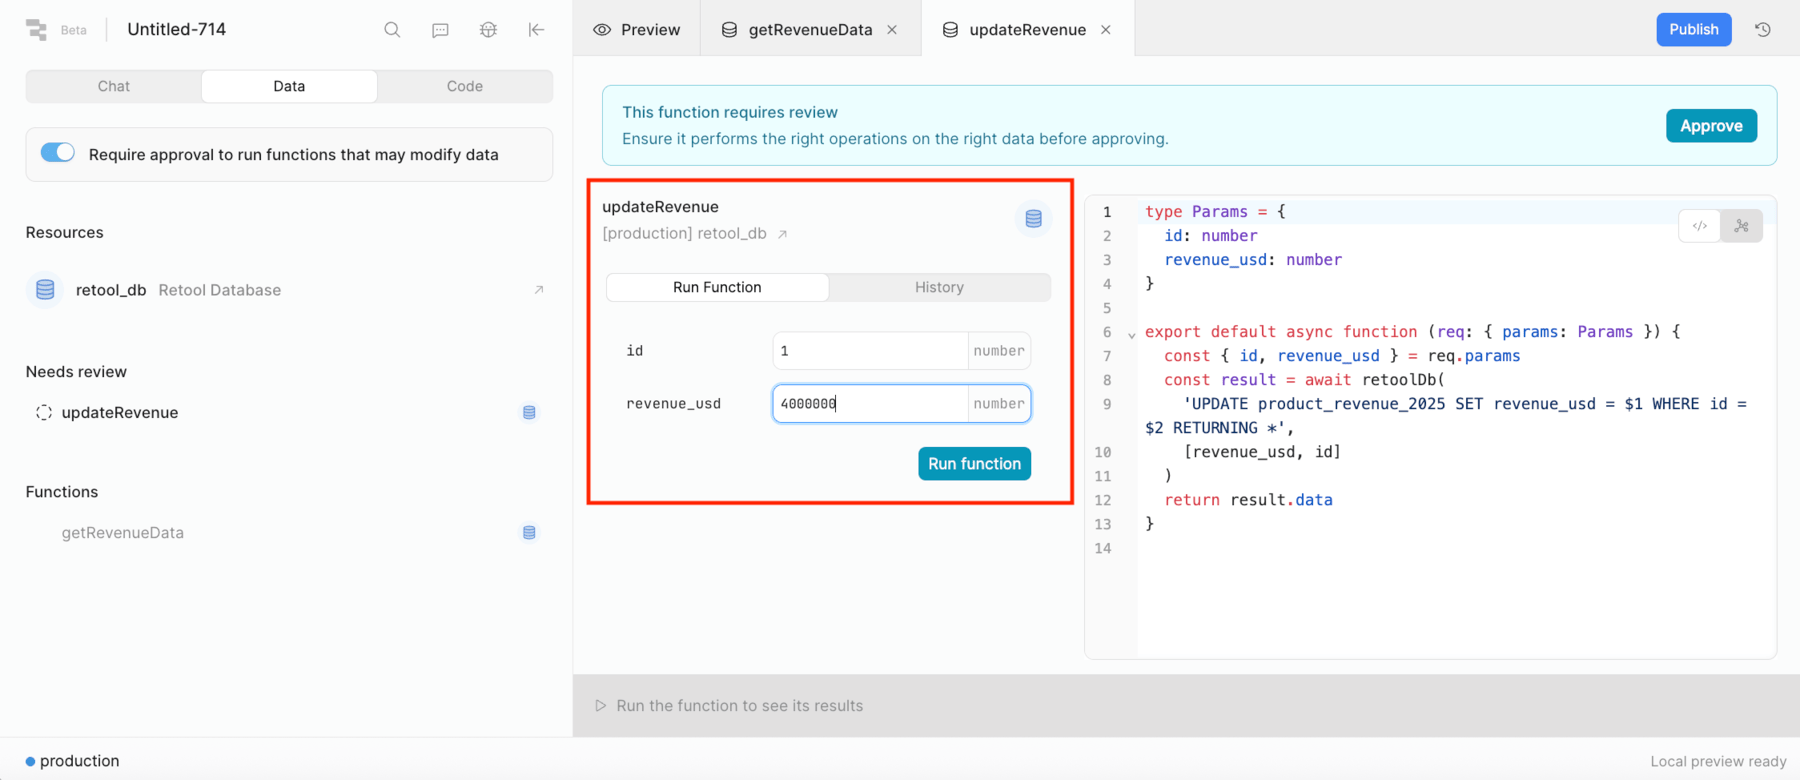
- This will update and display either success or failure message. The following along with verification in Retool Database confirms the data updated.
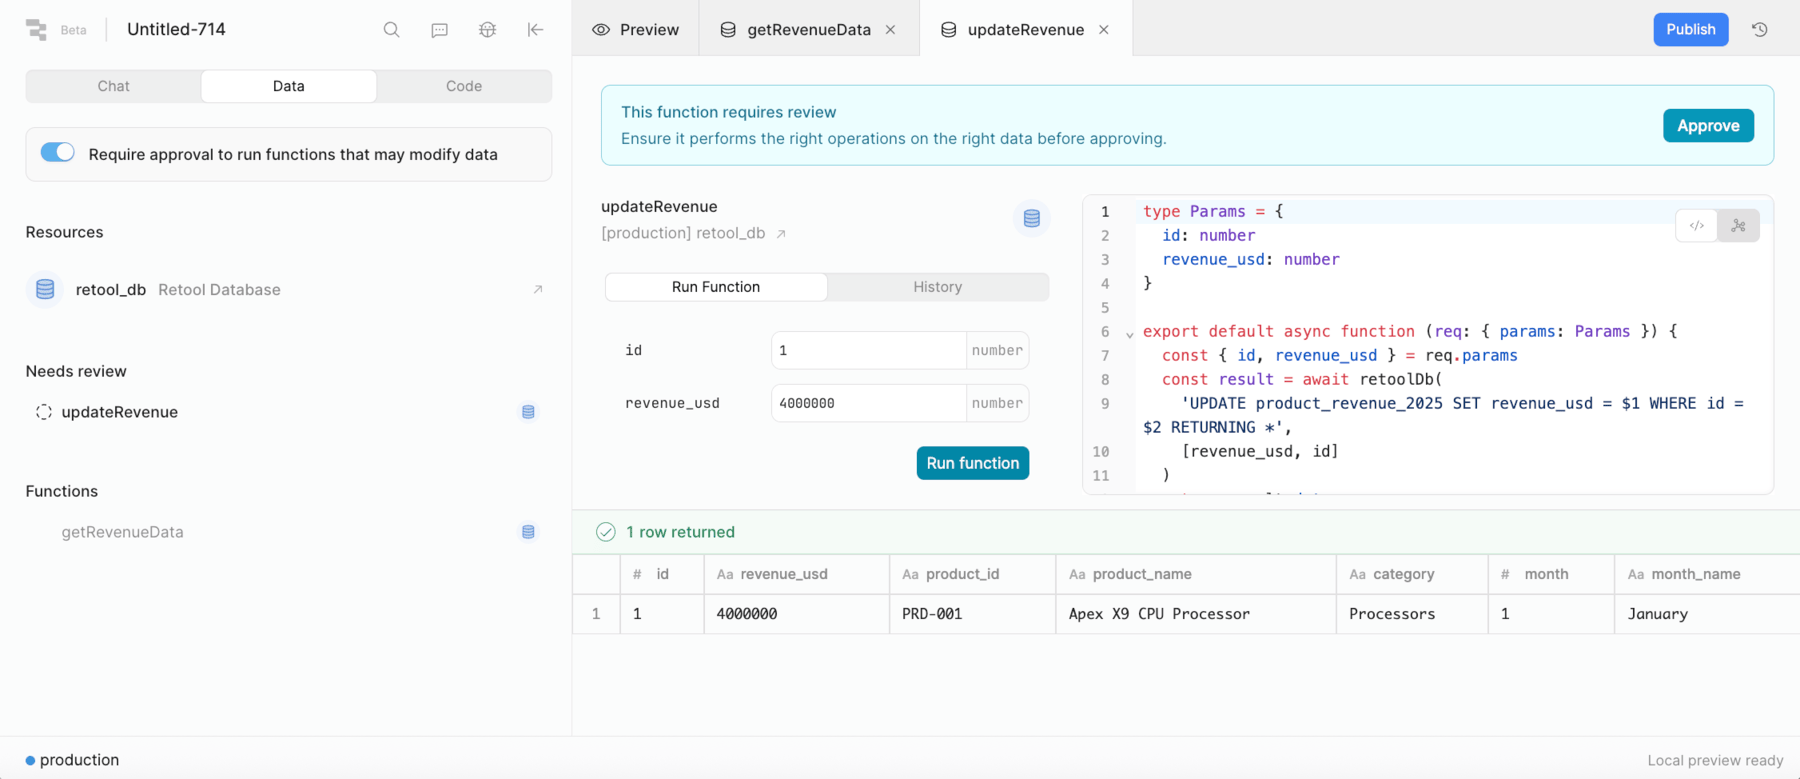
- Next you can approve the function, selecting the Approve button as shown in the following image.
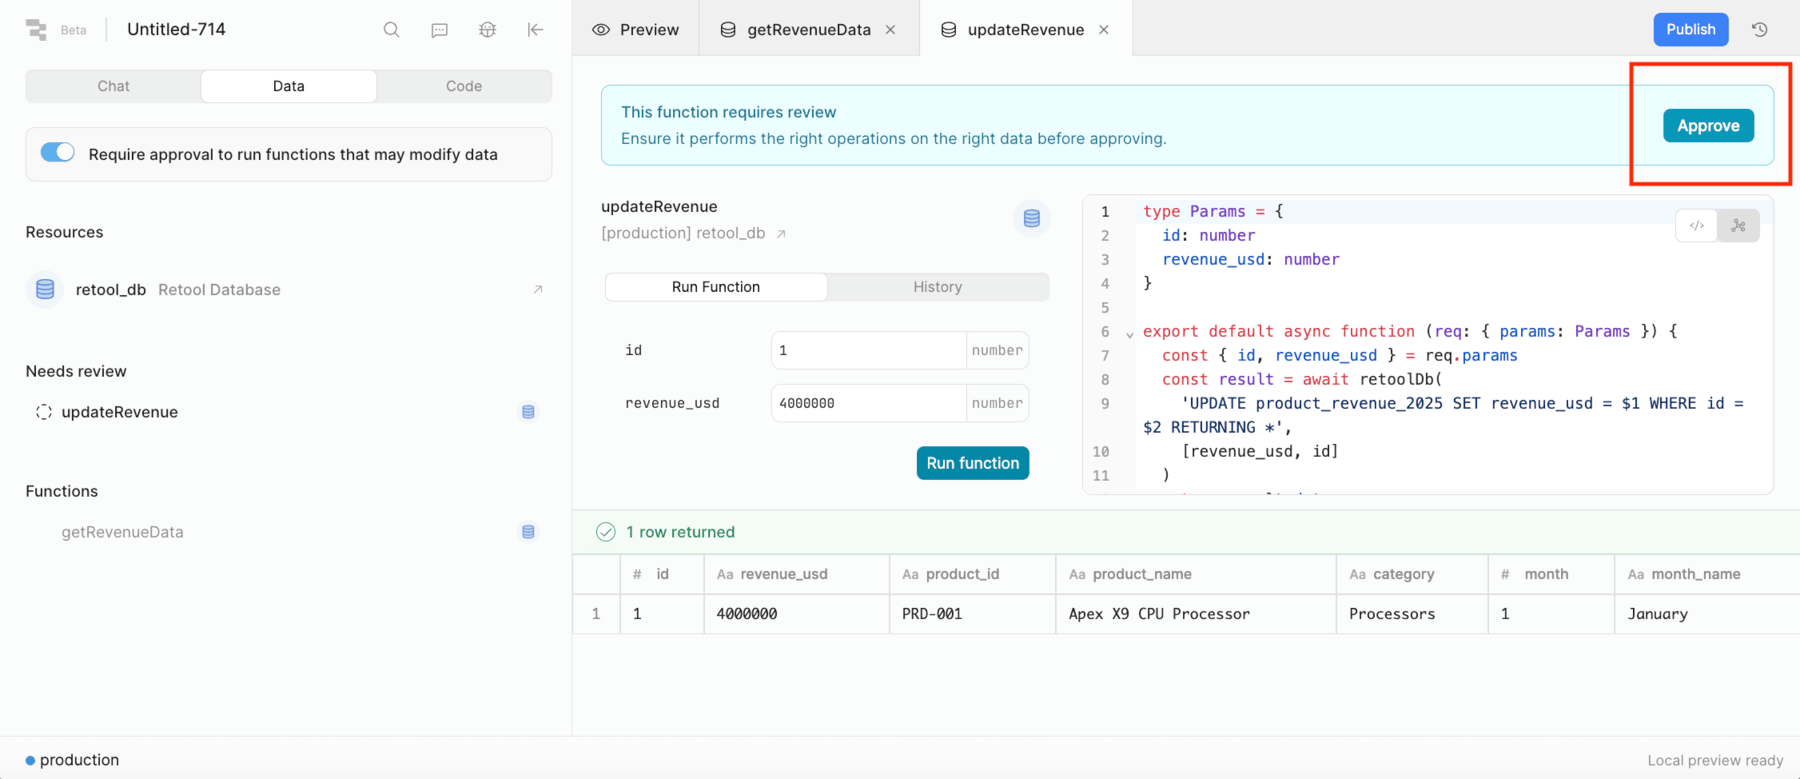
- The function will move from Needs review to Functions.
- Selecting Publish will now pass checks allowing you to specify the Application URL and the Release that this will be pinned to.
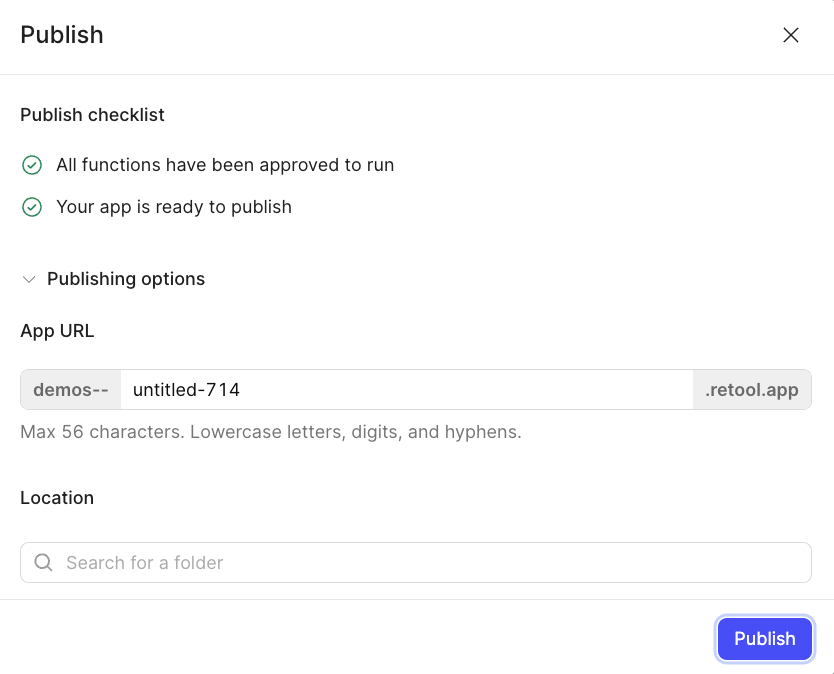
Update App URL, Location, and Release
Next we may want to modify the App URL that users use to access the app. Currently the following image shows what is set:
- Modify the App URL to say
sales-tracker. - Modify the
Locationto a folder you have access to and will use for your apps.
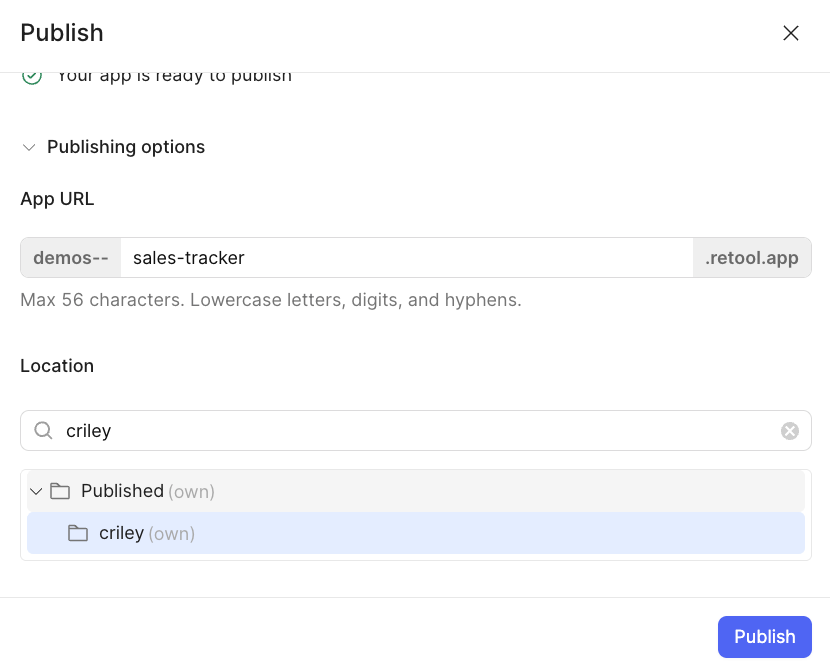
- Next we want to specify a release and tag it to the latest work. Because this is a new app, we could use a major version and associate it with
this tagged release(1.0.0).
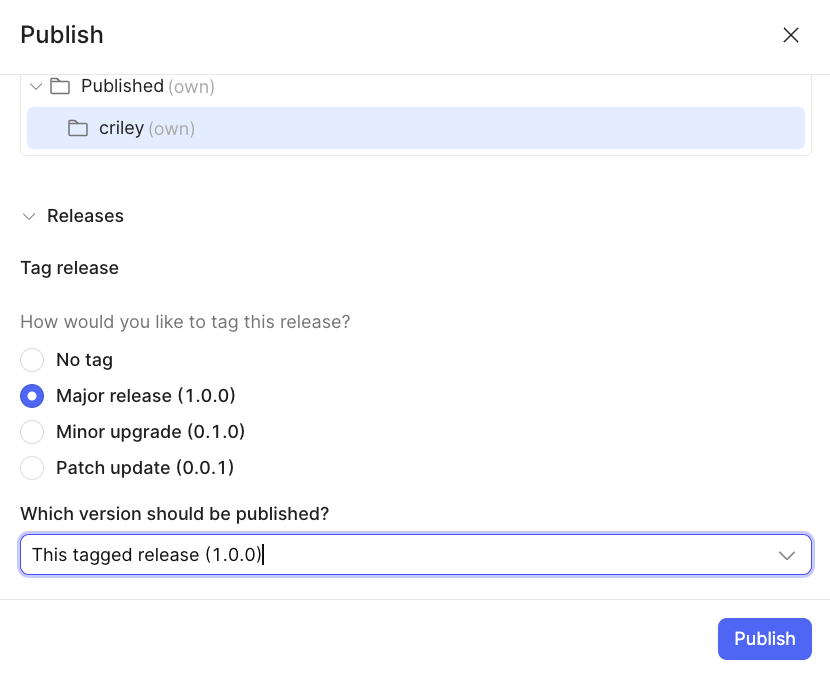
- Select Publish.
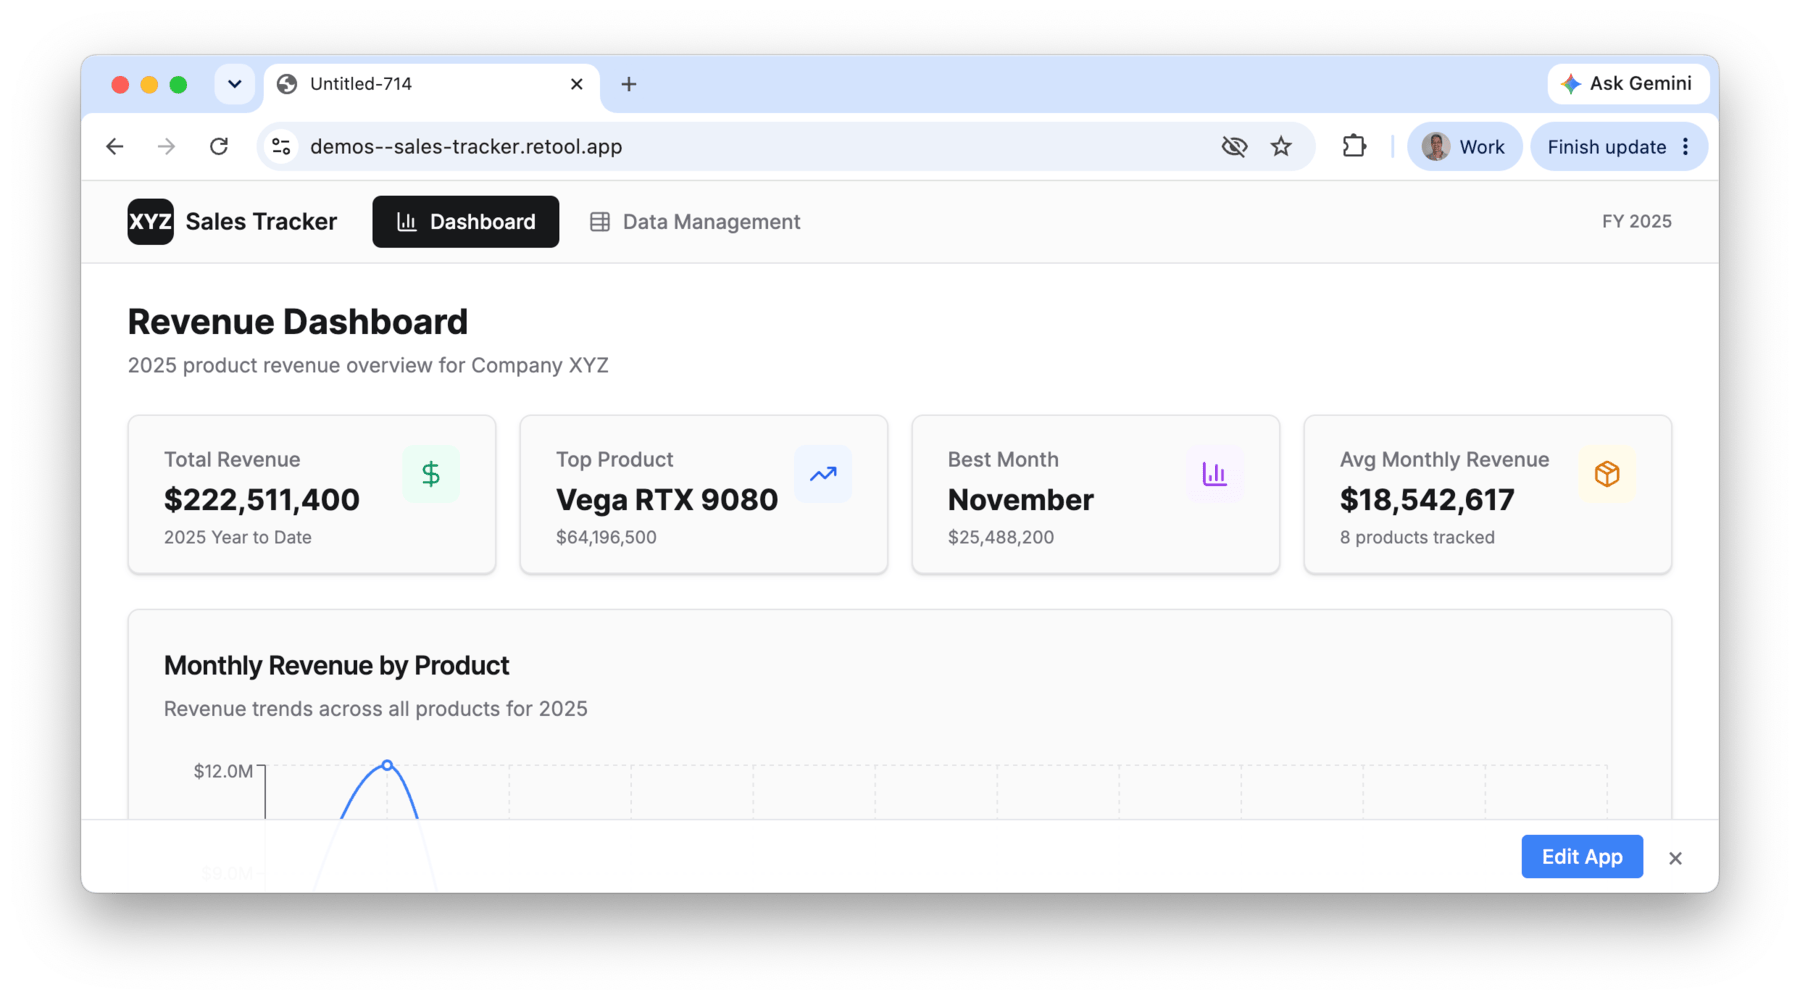
- This will then execute the publish process which creates a snapshot of the application, stores it, and makes it accessible at the App URL specified. The following will display in the Chat window showing it is completed.
- Select Copy link and open a new browser tab, copying the link into it. The application should then display.
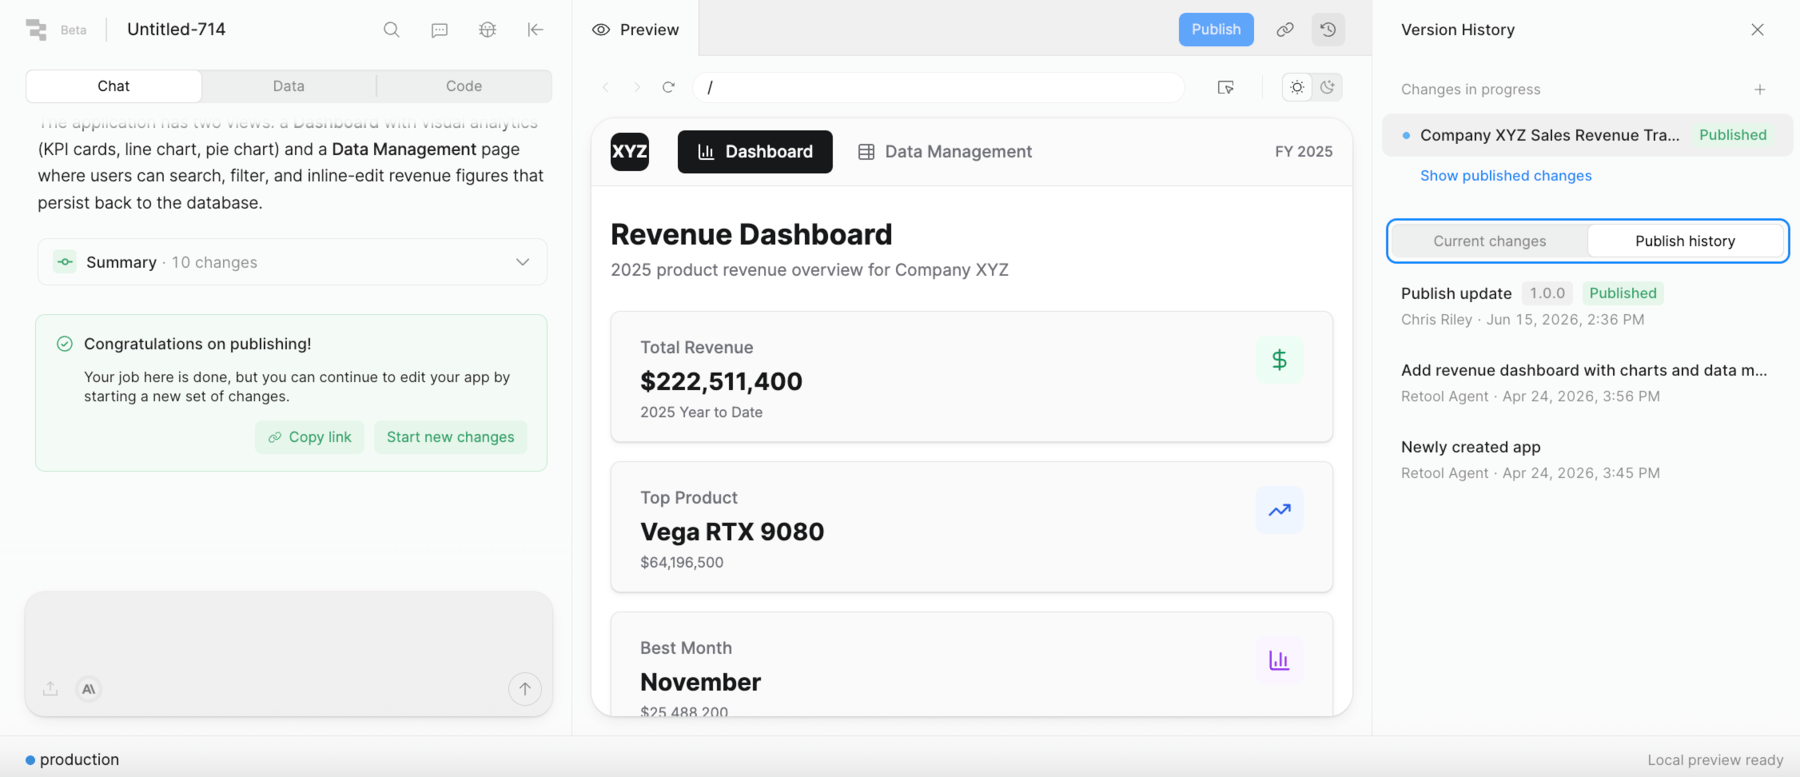
Version History
Current changes provides different versions of this application, associated with different chat threads.
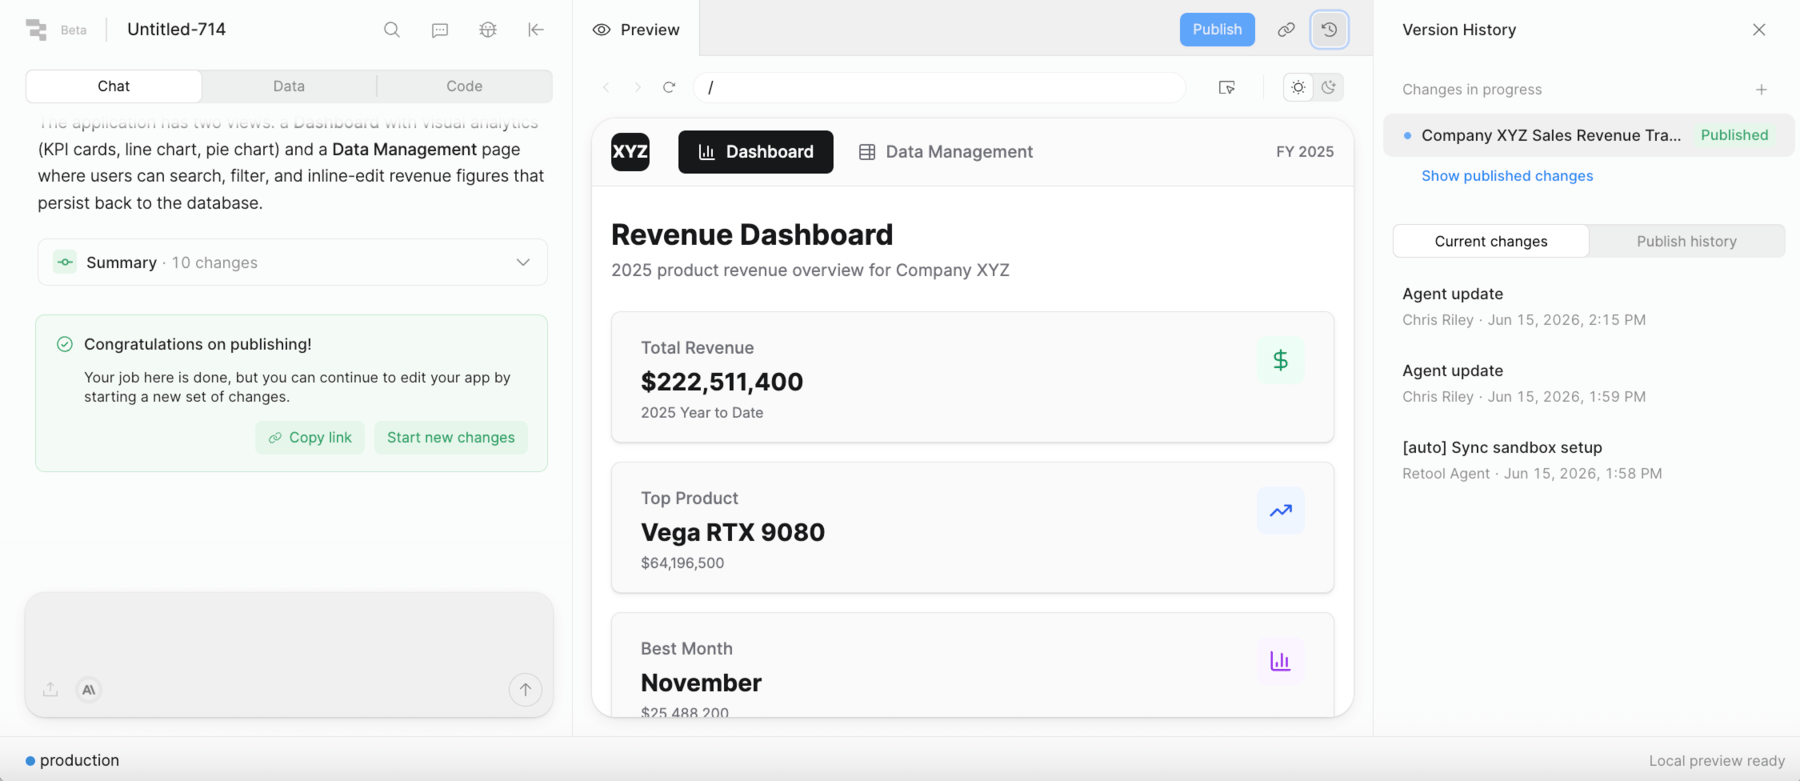
- Select Publish history to see what is currently active, identified by the
Publishedtag.
Summary
In this lab you used Retool to:
- Upload a CSV file as context and generate a full React application from a single prompt
- Explore the Retool Chat panel — including the prompt area, file upload, context size indicator, thread management, and model selection
- Review a live app preview with a line chart, pie chart, and editable data table
- Demonstrate write-back capability by updating a revenue record and seeing it reflected in the chart
- Inspect the generated React source code and data actions
Retool provides an enterprise-grade AppGen workflow that keeps developers in control — combining the speed of AI-generated apps with full access to source code, governed data resources, and Retool's platform (SSO, Source Control, and more).